


Build a Neat HTML5 Powered Contact Form: "
In this tutorial, we are going to learn how to create a swanky HTML5 AJAX powered contact form. The form will use some of the new HTML5 input elements and attributes, and will be validated using the browser’s built-in form validation.
We will use jQuery and Modernizr to help out with the older browsers, and PHP on the server side to validate the input.
Step 1: Getting Started
To begin, we need to setup our directory and files. To get started, I highly recommend the HTML5 boilerplate. This is a really good starting point for any HTML5 project and will save you a great deal of time. For this tutorial I chose ‘BOILERPLATE CUSTOM’.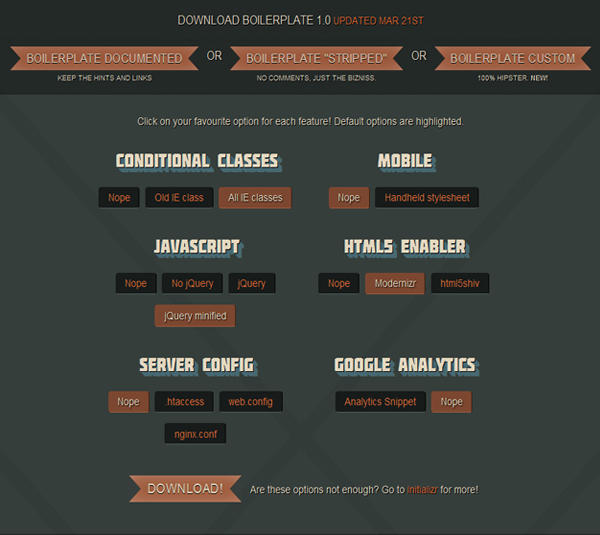
Once downloaded and unpacked, delete everything but
index.html and the css and js folders. I also added a folder called img and a PHP file called process.php. We will use the img folder for storing image assets for our form, and process.php to handle all the server-side logic for the contact form. Here is what my directory structure looks like now: 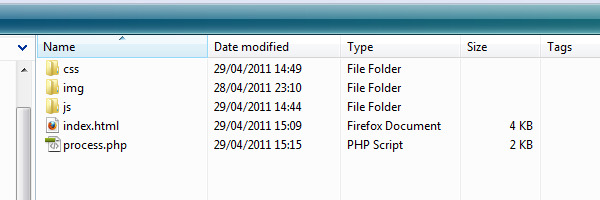
index file. Now, it’s time to move on to the markup.Step 2: The Form
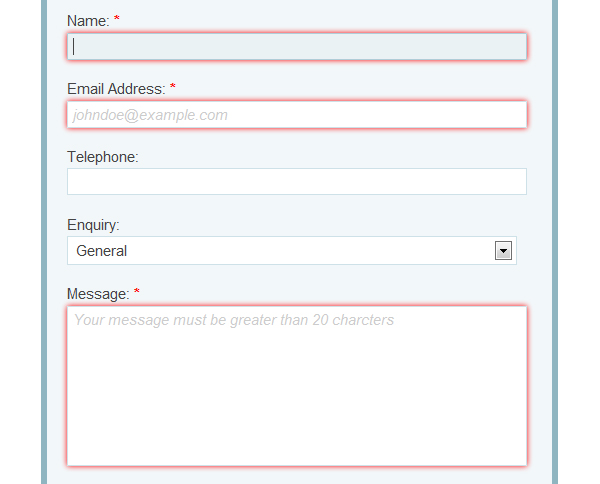
Openindex.html, and remove everything within the #container element. We’ll put our contact form inside this div:<div id="contact-form" class="clearfix"> <h1>Get In Touch!</h1> <h2>Fill out our super swanky HTML5 contact form below to get in touch with us! Please provide as much information as possible for us to help you with your enquiryThis is all the HTML we will need for our form. Let’s look at each individual section:</h2> <ul id="errors" class=""> <li id="info">There were some problems with your form submission:</li> </ul> <p id="success">Thanks for your message! We will get back to you ASAP!</p> <form method="post" action="process.php"> <label for="name">Name: <span class="required">*</span></label> <input type="text" id="name" name="name" value="" placeholder="John Doe" required="required" autofocus="autofocus" /> <label for="email">Email Address: <span class="required">*</span></label> <input type="email" id="email" name="email" value="" placeholder="johndoe@example.com" required="required" /> <label for="telephone">Telephone: </label> <input type="tel" id="telephone" name="telephone" value="" /> <label for="enquiry">Enquiry: </label> <select id="enquiry" name="enquiry"> <option value="general">General</option> <option value="sales">Sales</option> <option value="support">Support</option> </select> <label for="message">Message: <span class="required">*</span></label> <textarea id="message" name="message" placeholder="Your message must be greater than 20 charcters" required="required" data-minlength="20"></textarea> <span id="loading"></span> <input type="submit" value="Holla!" id="submit-button" /> <p id="req-field-desc"><span class="required">*</span> indicates a required field</p> </form> </div>
ul#errors and p#success will be holders for our error and success messages. We will hide these by default with CSS, and display them with either JavaScript or PHP once the form has been submitted. For the name input, our only requirement is that it has been filled in. In HTML5, we do this by adding the
'required' attribute. This will force the browser to check that this field has something in it before it allows the form to be submitted. The email field is similar, but as well as being required, we actually want to make sure it is an email address that was entered. To do this, we specify this input’s type as email, which is new in HTML5. Although telephone is not a required field, we are using the tel HTML5 input type for this. Enquiry is a standard
select element, and message is a typical textarea — nothing new here. To the textarea, we will set the required attribute to make sure the user enters some text. In HTML5, there is a new attribute for textareas called
maxlength. Yep, you guessed it, this lets us set a maximum number of characters we can write in the textarea. For some daft reason, the powers that be who made the HTML5 spec did not think we would need a minlength attribute (like we do now) and there is no attribute for this. So as a makeshift minlength attribute, we are going to use another new HTML5 attribute called a custom data attribute. This is basically any attribute name prefixed with the word ‘data-’. In our case we have appropriately chosen data-minlength. This lets us essentially create our own attributes.Another thing worth noticing is that we are setting an attribute called
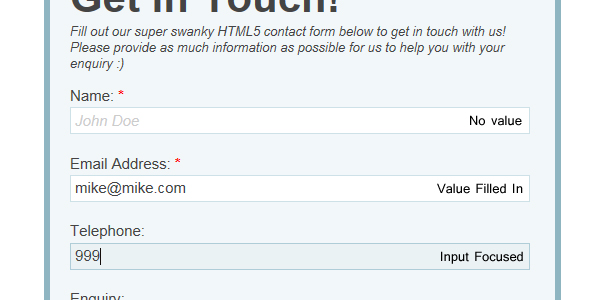
placeholder on all of the input elements (except telephone) and the textarea. This is a new HTML5 input attribute. When the form is first displayed, the placeholder text will appear in the input, normally in a different font color. Then, when you focus the input, the placeholder text disappears. If you blur out without filling the field in, the placeholder text is put back in. This is a pretty cool effect, and can provide the user with a bit more information on what they need to do. Previously, this would have had to be done with JavaScript.The final thing to notice is that the name input has an HTML5 attribute, called
autofocus. When the page is first loaded, this input element is given focus immediately without the user having to do anything. This is also good for prompting the user to do something. That’s all the HTML5-ness we are going to incorporate into our markup. For more detailed information on these new attributes and inputs checkout some of these links:
- Required Attribute
- Placeholder Attribute
- Autofocus Attribute
- Email Input Type
- Custom Data Attribute
- Telephone Input Type
- The input element in HTML5
Step 3: Styling the Form
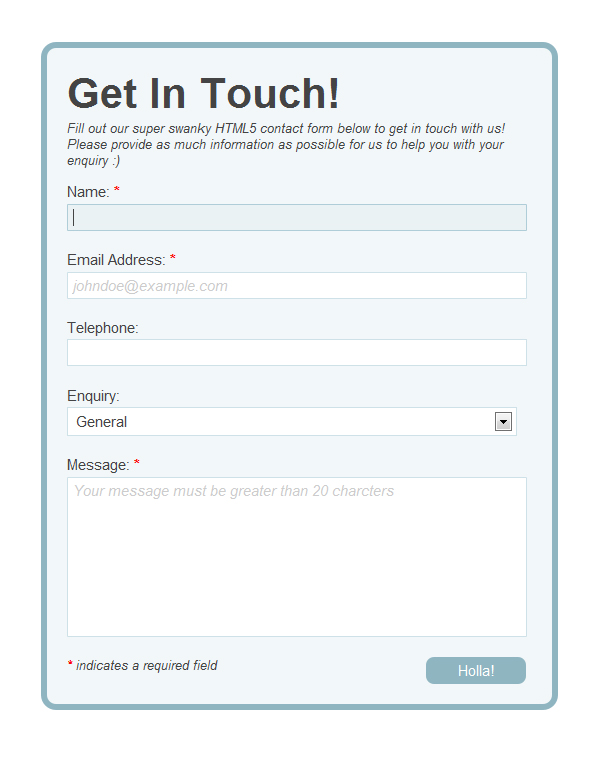
Here is our form, looking a little worse for wear…
It does not look too good at the moment, and it isn’t really doing our shiny new HTML5 goodness any justice, so let’s add some CSS. Open the
style.css file. The file already contains some resets and defaults that will help us make our form x-browser compatible. Scroll down and look for a comment saying: /* // ========================================== \\ || || || Your styles ! || || || \\ ========================================== // */
Directly after it, paste in the following CSS:
#contact-form {
background-color:#F2F7F9;
width:465px;
padding:20px;
margin: 50px auto;
border: 6px solid #8FB5C1;
-moz-border-radius:15px;
-webkit-border-radius:15px;
border-radius:15px;
position:relative;
}

#contact-form h1 {
font-size:42px;
}

#contact-form h2 {
margin-bottom:15px;
font-style:italic;
font-weight:normal;
}

#contact-form input,
#contact-form select,
#contact-form textarea,
#contact-form label {
font-size:15px;
margin-bottom:2px;
}

#contact-form input,
#contact-form select,
#contact-form textarea {
width:450px;
border: 1px solid #CEE1E8;
margin-bottom:20px;
padding:4px;
}

#contact-form input:focus,
#contact-form select:focus,
#contact-form textarea:focus {
border: 1px solid #AFCDD8;
background-color: #EBF2F4;
}

#contact-form textarea {
height:150px;
resize: none;
}

#contact-form label {
display:block;
}

#contact-form .required {
font-weight:bold;
color:#F00;
}

#contact-form #submit-button {
width: 100px;
background-color:#333;
color:#FFF;
border:none;
display:block;
float:right;
margin-bottom:0px;
margin-right:6px;
background-color:#8FB5C1;
-moz-border-radius:8px;
}

#contact-form #submit-button:hover {
background-color: #A6CFDD;
}

#contact-form #submit-button:active {
position:relative;
top:1px;
}

#contact-form #loading {
width:32px;
height:32px;
background-image:url(../img/loading.gif);
display:block;
position:absolute;
right:130px;
bottom:16px;
display:none;
}

#errors {
border:solid 1px #E58E8E;
padding:10px;
margin:25px 0px;
display:block;
width:437px;
-webkit-border-radius:8px;
-moz-border-radius:8px;
border-radius:8px;
background:#FFE6E6 url(../img/cancel_48.png) no-repeat 405px center;
display:none;
}

#errors li {
padding:2px;
list-style:none;
}

#errors li:before {
content: ' - ';
}

#errors #info {
font-weight:bold;
}

#errors #info:before {
content: '';
}

#success {
border:solid 1px #83D186;
padding:25px 10px;
margin:25px 0px;
display:block;
width:437px;
-webkit-border-radius:8px;
-moz-border-radius:8px;
border-radius:8px;
background:#D3EDD3 url(../img/accepted_48.png) no-repeat 405px center;
font-weight:bold;
display:none;
}

#errors.visible, #success.visible {
display:block;
}

#req-field-desc {
font-style:italic;
}

/* Remove box shadow firefox, chrome and opera put around required fields. It looks rubbish. */
input:required, textarea:required {
-moz-box-shadow:none;
-webkit-box-shadow:none;
-o-box-shadow:none;
box-shadow:none;
}

/* Normalize placeholder styles */

/* chrome, safari */
::-webkit-input-placeholder {
color:#CCC;
font-style:italic;
}

/* mozilla */
input:-moz-placeholder, textarea:-moz-placeholder {
color:#CCC;
font-style:italic;
}

/* ie (faux placeholder) */
input.placeholder-text, textarea.placeholder-text  {
color:#CCC;
font-style:italic;
}
If you save and reload, your page should now look like so:
Now that looks better! The CSS is pretty standard, but I will go over a few things that are not so obvious:
#errors li:before {
content: ' - ';
}
This will put a dash next to our error validation messages. It’s basically replacing the bullet point in the list, I just think this looks better.
#contact-form #submit-button:active {
position:relative;
top:1px;
}
This will give us a nice ‘push-down’ effect when the submit button is active.
input:required, textarea:required {
-moz-box-shadow:none;
-webkit-box-shadow:none;
-o-box-shadow:none;
box-shadow:none;
}
All browsers (except IE) by default put a red box shadow around required elements. This looks a bit over the top in my opinion, so I am removing it. I have already indicated that the field is required by putting a red asterisk in the label.
/* chrome, safari */
::-webkit-input-placeholder {
color:#CCC;
font-style:italic;
}

/* mozilla */
input:-moz-placeholder, textarea:-moz-placeholder {
color:#CCC;
font-style:italic;
}

/* ie (faux placeholder) */
input.placeholder-text, textarea.placeholder-text  {
color:#CCC;
font-style:italic;
}
This normalizes the appearance of the placeholder text on inputs and textareas. Here we are making it a light grey and italicizing it. This will give us consistency across all browsers except Opera, which does not support the styling of placeholders. IE just does not support the placeholder attribute. Fullstop. We will be using JavaScript to polyfill this. You can read more about styling HTML5 forms with CSS(2.1 + 3) here.
You will notice in the CSS that there are a few references to images. If you do not have these, simply download the source files for this tutorial and copy them over.
We’re done with the markup, and it’s looking pretty sweet. We’re going to create a PHP fallback in case the user’s browser does not support the new form input attributes (IE), or if the user has JavaScript disabled. We are going to write some JavaScript later to polyfill the features the browser lacks. But incase the user does not have a nice shiny new browser or JavaScript enabled, we still need to validate the form submission. We will do this serverside with PHP. We are also going to use it to email us the results of a valid form.
Step 4: Preparing For The Server Side Validation
Let’s dive straight in. Open up
process.php and paste in the following:<?php
if( isset($_POST) ){
//form validation vars
$formok = true;
$errors = array();
//sumbission data
$ipaddress = $_SERVER['REMOTE_ADDR'];
$date = date('d/m/Y');
$time = date('H:i:s');
//form data
$name = $_POST['name'];
$email = $_POST['email'];
$telephone = $_POST['telephone'];
$enquiry = $_POST['enquiry'];
$message = $_POST['message'];
//form validation to go here....
}
What we are saying here is: only execute this following code when the request method is
POST. By default, if a form is posted to a PHP script, the form’s input values are stored in a super global array called $_POST. If nothing is posted, $_POST will not be an array, the if statement will equate to false and our code will not be run.Once we have established that this is a
POST request, we can start our form processing logic. The first thing we need to do is set two variables:- $formok: A boolean value we can check to see if the form was valid or not at the end of the script.
- $errors: An array that we will use to store all of the problems with the form, as we are validating it.
After that, we set some general form submission data:
- $ipaddress: User’s IP address which can be useful for blacklisting spam, cross referencing analytics data etc.
- $date: The date the form was submitted. We use the
datefunction to generate the date in UK format. - $time: The time the form was submitted. We use the date function to generate the time.
We could combine the date and time if we wanted:
$datetime = date('d/m/Y H:i:s');
I like to keep them separate so I can use them for other things, if required. The final set of variables we are setting are the values of the submitted form fields . We are accessing the
$_POST array by passing in the form field name as the key to retrieve the data for each variable.Step 5: Validating the $_POST Data
We are going to check each variable individually now to make sure their value is valid. If it’s not, we’ll set the
$formok variable to false, and store an error message in the $errors array. We will start with the name field first.//validate name is not empty
if(empty($name)){
$formok = false;
$errors[] = 'You have not entered a name';
}
Here, we are just making sure that
$name actually has a value. If it does not, it means the user did not enter a name. We are using the empty() function to check for this. The [] after $errors is a shortcut to array_push (which is used to add an item to the end of an array). Next we will validate the email address://validate email address is not empty
if(empty($email)){
$formok = false;
$errors[] = 'You have not entered an email address';
//validate email address is valid
}elseif(!filter_var($email, FILTER_VALIDATE_EMAIL)){
$formok = false;
$errors[] = 'You have not entered a valid email address';
}
We are going to check to see if a valid email address was actually entered. For this task, we are going to use the
filter_var() function. Finally, we’ll need to validate the message.//validate message is not empty
if(empty($message)){
$formok = false;
$errors[] = "You have not entered a message";
}
//validate message is greater than 20 charcters
elseif(strlen($message) < 20){
$formok = false;
$errors[] = "Your message must be greater than 20 characters";
}
Yet again, we are going to check to see if a message was entered. If something was entered, we want to make sure it’s greater than 20 characters. For this, we are going to use the
strlen() function.The telephone field and the enquiry field are not required fields, so no need to validate these. You could, if you wanted, but for the purpose of this tutorial I’m not.
Step 6: What to do Next…
Once we have validated our form results, we need to decide whether to send the user an email containing the form results or not. We kept track of the validity of the form using the
$formok variable. If it is still equal to true, we want to submit the form results, otherwise we don’t.This is the logic we are going to use to send the message (paste this in after we have done our validation):
//send email if all is ok
if($formok){
$headers = "From: info@example.com" . "\r\n";
$headers .= 'Content-type: text/html; charset=iso-8859-1' . "\r\n";

$emailbody = "<p>You have recieved a new message from the enquiries form on your website.</p>
<p><strong>Name: </strong> {$name} </p>
<p><strong>Email Address: </strong> {$email} </p>
<p><strong>Telephone: </strong> {$telephone} </p>
<p><strong>Enquiry: </strong> {$enquiry} </p>
<p><strong>Message: </strong> {$message} </p>
<p>This message was sent from the IP Address: {$ipaddress} on {$date} at {$time}</p>";

mail("enquiries@example.com","New Enquiry",$emailbody,$headers);

}
To send the message, we are going to be using the
mail() function. We will need to pass this function four parameters: to, subject, message and headers.- to: This will be the email address that you want to send the form details to.
- subject: This will be the email’s subject.
- message: This will be the email’s content. We are storing this in the variable
$emailbody. This is a HTML string containing the results of our form. Where you see the curly braces with our variable names in them, these will be changed into the variables value when this script is run. This is called variable substitution. This sort of substitution only works if the string is encapsulated in DOUBLE quotes, not SINGLE. - headers: This is used to pass additional information to the email client so it knows how to interpet the email. We are storing our headers in the
$headersvariable and supplying extra information on who the email is from, and what type of content it contains.
Note: Remember to change the from email address in the headers and the to email address in the
mail function.This should produce a nice email like so:

If you are on a Windows server, you may need to put this line of code in (before you declare the
$headers variable) to get the mail function to work: ini_set('sendmail_from','info@example.com');
Whether the user’s form submission was valid or not, we want to return them back to the form. If the form was valid and the message was sent, we need to provide the user with the success message. If it’s not valid, we want to display the error messages stored in the
$errors array as well as populate the form fields with the data that was originally sent. We will store some variables we have been using in this script in an array and send them along with the redirect back to the form.//what we need to return back to our form $returndata = array( 'posted_form_data' => array( 'name' => $name, 'email' => $email, 'telephone' => $telephone, 'enquiry' => $enquiry, 'message' => $message ), 'form_ok' => $formok, 'errors' => $errors );
We will be storing our data in an associative array. This array has three members:
- posted_form_data: This will be an array containing the form data that was posted to the script.
- form_ok: We will store the
$formokvariable in this, and this variable will be checked back on the form page to update the user with the appropriate message. - errors: We will store the
$errorsvariable in this. This variable will be used if the$formokvariable is equal to false.
The final thing for us to do is to redirect the user back to the form page, along with our
$returndata array. Once we are redirected back to the form page, we will lose our $returndata variable; so, to make this data persistant, we will temporarily store it in the session.Another thing we need to bear in mind is, ultimately, if the user’s browser has JavaScript enabled, we want to submit the form via AJAX. That will mean we will want our AJAX request to be posted to the same place as the form submission when the JavaScript is disabled. Because the form would have already been validated on the client-side, it will pass through all the server-side validation, and the details will be emailed to us. If the form is not valid, it will never be submitted (as the browser validation / JavaScript will prevent it). This means that, with the AJAX request, there is no reason for us to redirect or set any session variables. In the final part of this script, we will check to see if the current request to
process.php was an AJAX request or not, and if it was, set our session variables and redirect.//if this is not an ajax request
if(empty($_SERVER['HTTP_X_REQUESTED_WITH']) && strtolower($_SERVER['HTTP_X_REQUESTED_WITH']) !== 'xmlhttprequest'){
//set session variables
session_start();
$_SESSION['cf_returndata'] = $returndata;
//redirect back to form
header('location: ' . $_SERVER['HTTP_REFERER']);
}
To check if this was an AJAX request, we search for the variable,
$_SERVER['HTTP_X_REQUESTED_WITH'] . Like the the super global $_POST array, there is also one called $_SERVER. This array contains server and execution environment information. Refer here for more detailed info.We then call
session_start() to give us access to the session and the set the variable $_SESSION['cf_returndata'] to mirror $returndata. On the form page, we will now be able to access this variable.To redirect back to the form, we are using the
header() function. We are telling it to redirect us to the last page we came from using the variable: $_SERVER['HTTP_REFERER'].Altogether you should have ended up with this:
<?php
if( isset($_POST) ){
//form validation vars
$formok = true;
$errors = array();
//submission data
$ipaddress = $_SERVER['REMOTE_ADDR'];
$date = date('d/m/Y');
$time = date('H:i:s');
//form data
$name = $_POST['name'];
$email = $_POST['email'];
$telephone = $_POST['telephone'];
$enquiry = $_POST['enquiry'];
$message = $_POST['message'];
//validate form data
//validate name is not empty
if(empty($name)){
$formok = false;
$errors[] = "You have not entered a name";
}
//validate email address is not empty
if(empty($email)){
$formok = false;
$errors[] = "You have not entered an email address";
//validate email address is valid
}elseif(!filter_var($email, FILTER_VALIDATE_EMAIL)){
$formok = false;
$errors[] = "You have not entered a valid email address";
}
//validate message is not empty
if(empty($message)){
$formok = false;
$errors[] = "You have not entered a message";
}
//validate message is greater than 20 characters
elseif(strlen($message) < 20){
$formok = false;
$errors[] = "Your message must be greater than 20 characters";
}
//send email if all is ok
if($formok){
$headers = "From: info@example.com" . "\r\n";
$headers .= 'Content-type: text/html; charset=iso-8859-1' . "\r\n";
$emailbody = "<p>You have received a new message from the enquiries form on your website.</p>
<p><strong>Name: </strong> {$name} </p>
<p><strong>Email Address: </strong> {$email} </p>
<p><strong>Telephone: </strong> {$telephone} </p>
<p><strong>Enquiry: </strong> {$enquiry} </p>
<p><strong>Message: </strong> {$message} </p>
<p>This message was sent from the IP Address: {$ipaddress} on {$date} at {$time}</p>";
mail("enquiries@example.com","New Enquiry",$emailbody,$headers);
}
//what we need to return back to our form
$returndata = array(
'posted_form_data' => array(
'name' => $name,
'email' => $email,
'telephone' => $telephone,
'enquiry' => $enquiry,
'message' => $message
),
'form_ok' => $formok,
'errors' => $errors
);
//if this is not an ajax request
if(empty($_SERVER['HTTP_X_REQUESTED_WITH']) && strtolower($_SERVER['HTTP_X_REQUESTED_WITH']) !== 'xmlhttprequest'){

//set session variables
session_start();
$_SESSION['cf_returndata'] = $returndata;

//redirect back to form
header('location: ' . $_SERVER['HTTP_REFERER']);

}
}
That’s all for processing our form submission — done and dusted in under 90 lines of PHP! All we need to do now is update the user and provide either a success message or an error message. You can save
process.php now.Step 7: Update the UI
Now that we have processed the form data and have been returned to the page, we need to update the user on what has happened. This means accessing the session variable we set on
process.php and working out what response to give. Because this page now needs to use PHP, we are going to need to change the file extension of index.html to .php (index.html = index.php). Don’t worry, this should not break anything we have already done.The first thing we need to do is get our variables out of the session. To do this, we need access to the session. Right at the top of the page before any markup (above doctype) paste the following code in:
<?php session_start() ?>
Starting the session before any content is sent to the browser should prevent any ‘cannot send session cookie – headers already sent by…’ errors you may receive. Below the
H2 of the form add in this PHP snippet:<?php
//init variables
$cf = array();
$sr = false;
if(isset($_SESSION['cf_returndata'])){
$cf = $_SESSION['cf_returndata'];
$sr = true;
}
?>
We are setting two variables to default values. More on these later… We are then checking to see if
$_SESSION['cf_returndata'] is set. We then set $cf (short for contact form) to equal our session variable. This is just so we don’t have to type $_SESSION… every time we want to access this data. The last variable $sr (short of server response), is set to true. This is a variable we are going to be checking to see if we have previously posted our form. The next thing we want to do is display an error message or success at the top of the form. Replace this: <ul id="errors" class=""> <li id="info">There were some problems with your form submission:</li> </ul> <p id="success">Thanks for your message! We will get back to you ASAP!</p>
With this:
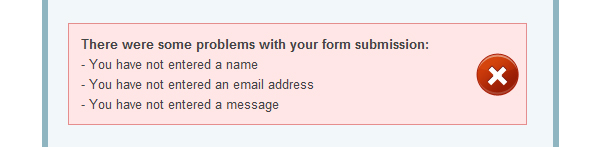
<ul id="errors" class="<?php echo ($sr && !$cf['form_ok']) ? 'visible' : ''; ?>">
<li id="info">There were some problems with your form submission:</li>
<?php
if(isset($cf['errors']) && count($cf['errors']) > 0) :
foreach($cf['errors'] as $error) :
?>
<li><?php echo $error ?></li>
<?php
endforeach;
endif;
?>
</ul>
<p id="success" class="<?php echo ($sr && $cf['form_ok']) ? 'visible' : ''; ?>">Thanks for your message! We will get back to you ASAP!</p>
By default, the messages do not appear at all because, in the CSS, we’ve set
'display:none‘. Inside the class attribute of the messages, we are using PHP to add a 'visible' class to them if they are to be shown. This class sets 'display' to 'block'.<?php echo ($sr && !$cf['form_ok']) ? 'visible' : ''; ?>
We are using the ternary operator here to check that…
- a) the server response is equal to true and
- b) that the form was not ok .
Essentially, if we have submitted the form,
$sr will equal true, and if the form was invalid $cf['form_ok'] will equal false. So the class visible will be outputted, but the PHP and message will show, and vice versa for the success message. Inside the parenthesis, we are checking the values of two variables. We are checking that $sr is equal to true and (&&) $cf['fomr_ok'] is equal to false. We are using shorthand to check these values. You could also write it this way if you wanted: <?php echo ($sr === true && $cf['form_ok'] === false) ? 'visible' : ''; ?>
Once we have decided which message to display, we need to populate the container with the relevant data. The success message does not change, so we can leave that as it is. The error message will need populating with the validation errors. To write these out, we are simply looping through our errors array stored in the session and populating a
li element inside of the ul: <ul id="errors" class="<?php echo ($sr && !$cf['form_ok']) ? 'visible' : ''; ?>"> <li id="info">There were some problems with your form submission:</li> <?php if(isset($cf['errors']) && count($cf['errors']) > 0) : foreach($cf['errors'] as $error) : ?> <li><?php echo $error ?></li> <?php endforeach; endif; ?> </ul>
We are first checking that we have our errors array in
$cf and that it contains at least one error. The if and foreach statement may look a little different to how you have seen them before. This is called Alternative Syntax. We have used alternative syntax here just to make it a little more readable with it being mixed with the HTML. You can use the normal syntax though if you like, it’s down to preference.That’s all we need for showing the user the response of the form submission. To test this out, disable JavaScript, and submit the form. Remember that the browser will validate the form as we are using the new HTML5 elements. So to be super sure my PHP is working, I’m testing in IE8. Yes, that’s right, IE does come in handy sometimes…
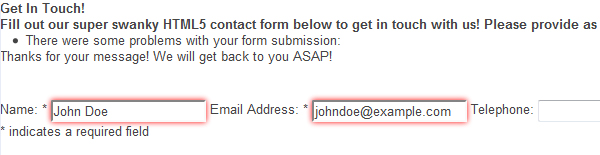
If you submit the invalid form, you should get this:
And if you fill the form in correctly, you should get:

You should also have received an email from the code we wrote earlier (if you filled the form in correctly). Now that the form is working, the last thing we need to do is populate the form fields again with the user’s data if the submission was invalid. Swap the HTML inside of the form tags for this:
<label for="name">Name: <span class="required">*</span></label>
<input type="text" id="name" name="name" value="<?php echo ($sr && !$cf['form_ok']) ? $cf['posted_form_data']['name'] : '' ?>" placeholder="John Doe" required="required" autofocus="autofocus" />

<label for="email">Email Address: <span class="required">*</span></label>
<input type="email" id="email" name="email" value="<?php echo ($sr && !$cf['form_ok']) ? $cf['posted_form_data']['email'] : '' ?>" placeholder="johndoe@example.com" required="required" />

<label for="telephone">Telephone: </label>
<input type="tel" id="telephone" name="telephone" value="<?php echo ($sr && !$cf['form_ok']) ? $cf['posted_form_data']['telephone'] : '' ?>" />

<label for="enquiry">Enquiry: </label>
<select id="enquiry" name="enquiry">
<option value="General" <?php echo ($sr && !$cf['form_ok'] && $cf['posted_form_data']['enquiry'] == 'General') ? "selected='selected'" : '' ?>>General</option>
<option value="Sales" <?php echo ($sr && !$cf['form_ok'] && $cf['posted_form_data']['enquiry'] == 'Sales') ? "selected='selected'" : '' ?>>Sales</option>
<option value="Support" <?php echo ($sr && !$cf['form_ok'] && $cf['posted_form_data']['enquiry'] == 'Support') ? "selected='selected'" : '' ?>>Support</option>
</select>

<label for="message">Message: <span class="required">*</span></label>
<textarea id="message" name="message" placeholder="Your message must be greater than 20 charcters" required="required" data-minlength="20"><?php echo ($sr && !$cf['form_ok']) ? $cf['posted_form_data']['message'] : '' ?></textarea>

<span id="loading"></span>
<input type="submit" value="Holla!" id="submit-button" />
<p id="req-field-desc"><span class="required">*</span> indicates a required field</p>
The only difference here is that we are using PHP to populate the value attribute of the inputs.
<?php echo ($sr && !$cf['form_ok']) ? $cf['posted_form_data']['name'] : '' ?>
Like we did with the success and error messages, we are checking to see if
$sr is equal to true and $cf['form_ok'] is equal to false, and if they are, we write out the saved value in the session for this form field. This is done using the ternary operator. On the select, we are doing the same, except, instead of writing out the saved value, we need to check each option value to see if it matches the one saved in the session. If it matches, we write out the selected attribute for that option.
Finally, one last thing we are going to do is
unset this session variable after we’ve gotten our data from it. You don’t have to do this, though; it comes down to preference. By unsetting it now, when the page is refreshed via the refresh button (not form post), an error / success message will not be shown. If you did not unset it, a user could fill in the contact form, go potter about on the internet, come back to the form and the error / success message will still be shown. I don’t like this so I’m going to prevent it by putting this line of PHP just after the closing form tags: <?php unset($_SESSION['cf_returndata']); ?>
If you submit an invalid form, you should notice now that your form input values are retained, and if you referesh the page, the message and data should be cleared. That’s it for the PHP side of things! You should have ended up with your form looking like so:
<div id="contact-form" class="clearfix"> <h1>Get In Touch!</h1> <h2>Fill out our super swanky HTML5 contact form below to get in touch with us! Please provide as much information as possible for us to help you with your enquiry
Don’t forget the
session_start() right at the top of the page! We now have a fully functional contact form. The data is validated, and, if successful, we are emailed the form results. Further, we update the UI with the results for each submission. The newer browsers will even validate the form before it is submitted using the new HTML5 input types and attributes we have used.
This is all fine and dandy, but we can take things one step further. We can use JavaScript to polyfill the features that the browser does not have (built in validation, support for HTML5 attributes etc.) . We can even use JavaScript to display our error / success messages and submit the form using AJAX.
But why do this when the form already works? Well, it’s simple. We want to provide as much consistency accross all browsers as possible, even if it is a really naff browser. Also, if we get the client’s browser to handle all of the validation work, it saves our server’s resources as we’re not posting to it when the form is not valid. These things are super browny points, and really are not that difficult to do.
Step 8: What is a Polyfill?
“A polyfill, or polyfiller, is a piece of code that provides the technology that you, the developer, expect the browser to provide natively.”
In our case we expect the browser to support the new HTML5 input types and attributes we have used. Firefox, Chrome, Opera and Safari have pretty good native support for these. IE6 – 9 has no support for them at all. Typical. To be honest, it’s quite shocking IE9 does not have support for these things, it was only just released earlier this year. Anyhow, putting IE bashing aside (I could go on forever), the first two things we are going to polyfill are the
autofocus and the placeholder attribute.We’ll be using jQuery to help us out with our JavaScript. We’ll use it primarily to handle our AJAX request, animation and DOM traversal & manipulation. You could get away with not using it, but you would have to write a significant amount of code. Its footprint isn’t too big, so I can live with the file size. I, probably like you, would rather write less code.
We’ll also be using a JavaScript library called Modernizr to help us with feature detection. This is already included as part of our HTML5 boilerplate, so we don’t have to do anything here to get Modernizr up and running!
Navigate to the
js directory and crack open script.js. We don’t have to worry about hooking up this file, jQuery or Modernizr, to index.php as this was already provided for us by the HTML5 boilerplate we used. Delete everything in this file and paste in the following: $(function(){
//set global variables and cache DOM elements for reuse later
var form = $('#contact-form').find('form'),
formElements = form.find('input[type!='submit'],textarea'),
formSubmitButton = form.find('[type='submit']'),
errorNotice = $('#errors'),
successNotice = $('#success'),
loading = $('#loading'),
errorMessages = {
required: ' is a required field',
email: 'You have not entered a valid email address for the field: ',
minlength: ' must be greater than '
}
//feature detection + polyfills
formElements.each(function(){
//do feature detection + polyfills here
});
});
All our code is going to live inside the
$(function(){ }) block. This will mean our code will be executed as soon as the page is loaded. Also any variables or functions we declare inside this block will not interfere with any other code outside. We are then caching some DOM elements, as we will be accessing these quite a bit. It’s more efficient to cache them in this way than to request them each time you want to use them. Here is a breakdown of what each variable is: - form: The contact form element.
- formElements: All input elements and textareas in the form except the submit button. This will just be an array of elements.
- formSubmitButton: The form’s submit button.
- errorNotice: The error notice — unordered list element.
- successNotice: The success message — paragraph element.
- loading: The loading span element. This will display a loading gif when the form is submitted once validated.
- errorMessages: This is an object containing some text for our error messages. These are used more than once so we are instantiating them here. You will notice some of the messages don’t read correctly. We will dynamically add to these later when we move on to validating the form.
After this, we are using a jQuery function, called
each() to iterate over the formElements array. Whilst we are iterating over the form elements, we want to do our feature detection for the placeholder attribute, and if an element has this attribute but is not supported by the browser, apply our polyfill. Here is the polyfill for the placeholder attribute://if HTML5 input placeholder attribute is not supported
if(!Modernizr.input.placeholder){
var placeholderText = this.getAttribute('placeholder');
if(placeholderText){
$(this)
.addClass('placeholder-text')
.val(placeholderText)
.bind('focus',function(){
if(this.value == placeholderText){
$(this)
.val('')
.removeClass('placeholder-text');
}
})
.bind('blur',function(){
if(this.value == ''){
$(this)
.val(placeholderText)
.addClass('placeholder-text');
}
});
}
}
Here we are using Modernizr to determine if we have support for the placeholder attribute on an input. Modernizer is an object, input is a property of that object, and placeholder is a property of input (hence all the dots). This value will either be
true or false. We are checking to see if it is false (the browser does not support the placeholder attribute); if so, we implement our polyfill. The first thing we do is declare a variable that will hold the placeholder text assigned to the element. Even though the browser does not support the placeholder attribute, we can still access this attribute. We use a function, called getAttribute() for this. The keyword 'this' refers to the current DOM element we are iterating over in the loop. Once we have the placeholder text, we can do a check to ensure that it isn’t empty. This is so we only apply our polyfill to inputs that have the placeholder attribute. We are then chaining some really useful jQuery functions together to create our polyfill. Here’s a breakdown of what we are doing:
- We are wrapping the ‘this’ keyword in the jQuery function
( $() )so we have access to some of jQuery’s handy DOM functions - We are adding the class
'placeholder-text‘ to the element. This will make the elements placeholder text that we are going to polyfill look like the rest of the browsers. We have set a rule for this up already in the CSS. - We are setting the input’s default value to the value of the placeholder attribute. This will show the placeholder text in the input field when the page has loaded.
- We are binding a focus event that will check if the placeholder attribute text is the same as the inputs value. If it is, then the input’s value is set to nothing, which clears the input and we remove the ‘
placeholder-text‘ class so that the text is the default input styled text. - We are binding a blur event that will check if the input’s value is equal to nothing. If it is, we populate the input with the placeholder text, and re-apply the ‘
placeholder-text‘
This will make any browser that does not support the placeholder attribute act as if it does convincingly. See the image below from IE8:
We’ll next polyfill the
autofocus attribute. This one is dead simple: //if HTML5 input autofocus attribute is not supported
if(!Modernizr.input.autofocus){
if(this.getAttribute('autofocus')) this.focus();
}
We use Modernizer to determine if the autofocus attribute is supported. If not, then we check if this element has the autofocus attribute set on it, and if it does, we focus it. Simple. In any browser that does not support this attribute, this will provide a fix.
The only other things we need to polyfill are the required attribute, the email input type, and the built in form validation. We also want to add in validation for the message length, and show the error message with details of problems with the form.
Step 9: Form Validation, Polyfill Style
//to ensure compatibility with HTML5 forms, we have to validate the form on submit button click event rather than form submit event.
//An invalid html5 form element will not trigger a form submit.
formSubmitButton.bind('click',function(){
var formok = true,
errors = [];
formElements.each(function(){
//validate form elements here
});
//if form is not valid
if(!formok){
//show error message here
}
//if form is valid
else {
//ajax request + show success message here
}
return false; //this stops submission off the form and also stops browsers showing default error message
});
We are binding a click event to the form submit button (stored in the
formSubmitButton variable). When this event is triggered, we will validate the form. Normally in JavaScript we would actually do this on the submit event of the form, but as the newer browsers are using their own built in validation, the form submit event is never triggered. The browser will display its own error messages, but this is highly inconsistent accross all of the browsers, and there is currently no way of styling these. Displaying our own error message will provide consistency, and also show for browsers that do not support the new validation methods. To stop the browsers showing their default error messages we return false at the end of this function. Here is a breakdown of what the variables set at the top are for:- formok: This will keep track of the validity of the form.
- errors: This is an array and will hold the error messages.
It’s similar to the PHP validation we wrote earlier!
We will start inside the loop where we are going to be validating the form elements. Inside this loop, we want to start by declaring some useful variables that we will use in our validation.
var name = this.name,
nameUC = name.ucfirst(),
value = this.value,
placeholderText = this.getAttribute('placeholder'),
type = this.getAttribute('type'), //get type old school way
isRequired = this.getAttribute('required'),
minLength = this.getAttribute('data-minlength');
- name: The name of the current element.
- nameUC: The name of the current element with the first letter uppercased.
ucfirst()is a custom method of the string object that we will be writing later. - value: The value of the current element.
- placeholderText: The placeholder text of the current element.
- type: The type of current element.
- isRequired: Whether the current element has the required attribute set on it or not.
- minLength: The
data-minlengthvalue of current element (if applicable).
Now that we have our variables set, we can start with our validation. For the elements that are using the HTML5 input types and attributes, we can use the new validation JavaScript API to check their validity.
In HTML5, form elements have a new property called
validity. This is where all the validation data for this element is stored. In Firebug, this looks like so: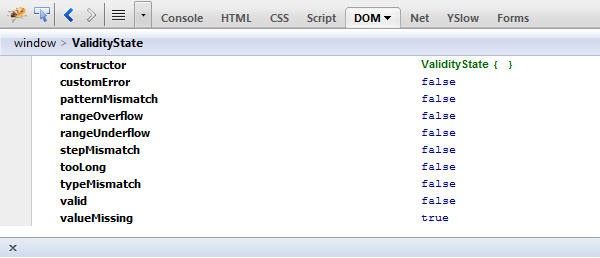
As you can see, there are numerous properties in this object which give us a bit more of a clue as to what the problem is. The values of the properties are either
false or false. In this screenshot, I tried to submit the form with no name, and I logged the validity property for the name input in the console ( console.log(this.validity) ). This shows me that a value was missing (valueMissing = true).Our code for checking the HTML5 elements:
//if HTML5 formfields are supported
if( (this.validity) && !this.validity.valid ){
formok = false;
//if there is a value missing
if(this.validity.valueMissing){
errors.push(nameUC + errorMessages.required);
}
//if this is an email input and it is not valid
else if(this.validity.typeMismatch && type == 'email'){
errors.push(errorMessages.email + nameUC);
}
this.focus(); //safari does not focus element an invalid element
return false;
}
We are checking whether this form element has the validity property, and if it does, we are then checking the
valid property of the validity object to see if this field is ok. If it is not valid (I’m using the shorthand, !, to check for false), we set formok to false, and perform some tests to see what the problem is. If the value is missing (triggered by required fields), we add an error message to the errors array we set earlier. We use the
push() method of the array object for this. The error message will consist of the element’s name (first letter uppercased) concatenated with the required error message that we set earlier in our script.If this form fields value is not missing, we then want to determine if the correct data was input. The only input in our form that needs validation is the email field. With this in mind, in the
elseif part of our code, we are checking if the typeMismatch property of the validity object is equal to true and if this input’s type is actually email. If so, we add the email error message to our errors array.When the browser validates a field and is deemed invalid, it is automatically focused. Safari does not support this, so for the sake of consistency, we manually focus the input. We then return false at the end of our HTML5 input validation to break out of the loop, as we know that we have an invalid element (we don’t need to waste our time validating the rest of the elements in the form).
This will cover our HTML5 inputs nicely, but we now need to cater to the browsers which do not support the JavaScript form validation API. If the JavaScript form validation API is not supported by the browser the above code will never be exectued and skipped.
The first thing we will check for is if the field was required. Our polyfill for this will look like:
//if this is a required element
if(isRequired){
//if HTML5 input required attribute is not supported
if(!Modernizr.input.required){
if(value == placeholderText){
this.focus();
formok = false;
errors.push(nameUC + errorMessages.required);
return false;
}
}
}
Firstly, we check if this field is a required field (dictated by the
required attribute). We are then using Modernizr to check if the required attribute is supported by the browser. If not, we need to manually check the value of the element and compare it to the element’s placeholder attribute. If they are the same, then obviously this form field has not been filled out so we do four things:- We focus the input (as this what the browser does when using its native validation)
- We set the
formokvariable tofalse, as the form is invalid - We add an error message to our errors array.
- We return
false, which breaks out of the loop, and will go straight to the next bit of the code outside of the loop.
We are next going to check if this is an email input, and, if it is, whether a valid email has been entered.
//if HTML5 input email input is not supported
if(type == 'email'){
if(!Modernizr.inputtypes.email){
var emailRegEx = /^([a-zA-Z0-9_\.\-])+\@(([a-zA-Z0-9\-])+\.)+([a-zA-Z0-9]{2,4})+$/;
if( !emailRegEx.test(value) ){
this.focus();
formok = false;
errors.push(errorMessages.email + nameUC);
return false;
}
}
}
It’s pretty much the same as before. We see if this is actually an email field, and then use Modernizr to check if the email input is supported. If it’s not, we write our code that checks if it is valid or not. For this polyfill, we are using regular expressions to test if the email is valid or not. We create a regular expression in the variable
emailRegEx, then use the test() method of the regular expression object to test if the value of the input is valid against the regular expression. You can learn more on using JavaScript regular expressions here.
If the email address is not valid, we do the same four things we did on the required input check.
The last thing we need to validate in our form is the message length. The required validation has already been taken care of above, so all we need to do is check the message’s length:
//check minimum lengths
if(minLength){
if( value.length < parseInt(minLength) ){
this.focus();
formok = false;
errors.push(nameUC + errorMessages.minlength + minLength + ' charcters');
return false;
}
}
We don't need to use Modernizr here. Instead, all we need to do is check that this element has a minimum length set, and if it does, make sure its length is greater than its set minimum length.
Length is a property of all string objects in JavaScript and returns the number of characters in the string. We use parseInt() to convert minLength to an integer to compare it against value.length. minLength was retrieved from the data-minlength attribute. This is retrieved as a string, so to prevent any potential errors down the line (comparing strings to numbers etc.), we convert this to an integer. Our polyfills and validation are now finished and sorted. You should have ended up with the following code:
//to ensure compatibility with HTML5 forms, we have to validate the form on submit button click event rather than form submit event.
//An invalid html5 form element will not trigger a form submit.
formSubmitButton.bind('click',function(){
var formok = true,
errors = [];
formElements.each(function(){
var name = this.name,
nameUC = name.ucfirst(),
value = this.value,
placeholderText = this.getAttribute('placeholder'),
type = this.getAttribute('type'), //get type old school way
isRequired = this.getAttribute('required'),
minLength = this.getAttribute('data-minlength');
//if HTML5 formfields are supported
if( (this.validity) && !this.validity.valid ){
formok = false;
//if there is a value missing
if(this.validity.valueMissing){
errors.push(nameUC + errorMessages.required);
}
//if this is an email input and it is not valid
else if(this.validity.typeMismatch && type == 'email'){
errors.push(errorMessages.email + nameUC);
}
this.focus(); //safari does not focus element an invalid element
return false;
}
//if this is a required element
if(isRequired){
//if HTML5 input required attribute is not supported
if(!Modernizr.input.required){
if(value == placeholderText){
this.focus();
formok = false;
errors.push(nameUC + errorMessages.required);
return false;
}
}
}
//if HTML5 input email input is not supported
if(type == 'email'){
if(!Modernizr.inputtypes.email){
var emailRegEx = /^([a-zA-Z0-9_\.\-])+\@(([a-zA-Z0-9\-])+\.)+([a-zA-Z0-9]{2,4})+$/;
if( !emailRegEx.test(value) ){
this.focus();
formok = false;
errors.push(errorMessages.email + nameUC);
return false;
}
}
}
//check minimum lengths
if(minLength){
if( value.length < parseInt(minLength) ){
this.focus();
formok = false;
errors.push(nameUC + errorMessages.minlength + minLength + ' charcters');
return false;
}
}
});
//if form is not valid
if(!formok){
//show error message here
}
//if form is valid
else {
//ajax request + show success message here
}
return false; //this stops submission off the form and also stops browsers showing default error message
});
Awesome! We're nearly there now. At this point, all we need to do is write the code that handles the logic to check if the form is to be submitted or not. We will need to display our error messages that we have stored, and stop the form submitting if there is an error. If, on the other hand, there isn't an error, we submit the form via AJAX and reveal the success message. We also need to cover the
ucfirst() function we have used to uppercase the first letter of each field name.Step 11: Nearly There...
The first thing we are going to do is write a function for handling the messages, and also our
ucfirst() function. Paste the following code outside the formSubmitButton.bind... logic we have been writing.//other misc functions
function showNotice(type,data)
{
if(type == 'error'){
successNotice.hide();
errorNotice.find("li[id!='info']").remove();
for(x in data){
errorNotice.append('<li>'+data[x]+'</li>');
}
errorNotice.show();
}
else {
errorNotice.hide();
successNotice.show();
}
}
String.prototype.ucfirst = function() {
return this.charAt(0).toUpperCase() + this.slice(1);
}
The
showNotice function will take two arguments. - The type of message to show
- The data to show in the message.
If the type is
'error', we hide the success message, loop through the data (which should be an array), and append the list elements to the error notices UL. We then show the error notice using the jQuery function show(). Because all of our code is contained in the same block, we have access to variables set outside this function (successNotice and errorNotice). If we want to show the success message, we simply hide the error message and display the success message. With the
ucfirst() function, I am adding this function to the prototype of the string object.
'A prototype is an object from which other objects inherit properties.'
This means that all string objects will inherit our
ucfirst() function. This is why, earlier, we used name.ucfirst(). name is a string, and because our method is in the prototype, it is available for us to use. We get the first character (
charAt(0) ), make it uppercase ( toUpperCase() ), then return it with the rest of the string minus the first character ( slice(1) ). charAt, toUpperCase and slice are all methods of the string object. You can read more about the prototype object here or here.Now that we have our miscellaneous functions sorted out, we can concentrate on the logic for the form's outcome. We are back to working inside the
formSubmitButton.bind logic.//if form is not valid
if(!formok){
//show error message here
}
//if form is valid
else {
//ajax request + show success message here
}
We will start with the logic if the form is not valid. The following code should be placed inside the
if statement: //animate required field notice
$('#req-field-desc')
.stop()
.animate({
marginLeft: '+=' + 5
},150,function(){
$(this).animate({
marginLeft: '-=' + 5
},150);
});
//show error message
showNotice('error',errors);
The first chunk of code simply animates the '* indicates a required field'. This is not essential; it's just a nicety that gives the user a bit more feedback -- that a problem has, in fact, occurred. We are using the jQuery function
animate() to animate the margin-left CSS value of the element. After this, we are going to call our showNotice() function. We want to show the error message so we pass 'error' as the first argument, then for the data we pass it the errors array we have been storing our form validation error messages in.If the form is valid, we need to submit it via AJAX.
loading.show();
$.ajax({
url: form.attr('action'),
type: form.attr('method'),
data: form.serialize(),
success: function(){
showNotice('success');
form.get(0).reset();
loading.hide();
}
});
Firstly, we reveal our loading
gif to indicate that the form is doing something. We then use the jQuery function ajax() to submit the form to process.php. For the url and type, we are using the jQuery function attr() to get these attributes. For the data, we use the jQuery function serialize(). If the AJAX request was successful, we call our showNotice() function and pass it 'success' as the first argument. This displays our success message. The last thing we do is reset the form (clear the form fields) and hide the loading gif. All of the JavaScript is now taken care of! Congrats1 You should have ended with your script.js file looking like so: $(function(){
//set global variables and cache DOM elements for reuse later
var form = $('#contact-form').find('form'),
formElements = form.find('input[type!="submit"],textarea'),
formSubmitButton = form.find('[type="submit"]'),
errorNotice = $('#errors'),
successNotice = $('#success'),
loading = $('#loading'),
errorMessages = {
required: ' is a required field',
email: 'You have not entered a valid email address for the field: ',
minlength: ' must be greater than '
}
//feature detection + polyfills
formElements.each(function(){
//if HTML5 input placeholder attribute is not supported
if(!Modernizr.input.placeholder){
var placeholderText = this.getAttribute('placeholder');
if(placeholderText){
$(this)
.addClass('placeholder-text')
.val(placeholderText)
.bind('focus',function(){
if(this.value == placeholderText){
$(this)
.val('')
.removeClass('placeholder-text');
}
})
.bind('blur',function(){
if(this.value == ''){
$(this)
.val(placeholderText)
.addClass('placeholder-text');
}
});
}
}
//if HTML5 input autofocus attribute is not supported
if(!Modernizr.input.autofocus){
if(this.getAttribute('autofocus')) this.focus();
}
});
//to ensure compatibility with HTML5 forms, we have to validate the form on submit button click event rather than form submit event.
//An invalid html5 form element will not trigger a form submit.
formSubmitButton.bind('click',function(){
var formok = true,
errors = [];
formElements.each(function(){
var name = this.name,
nameUC = name.ucfirst(),
value = this.value,
placeholderText = this.getAttribute('placeholder'),
type = this.getAttribute('type'), //get type old school way
isRequired = this.getAttribute('required'),
minLength = this.getAttribute('data-minlength');
//if HTML5 formfields are supported
if( (this.validity) && !this.validity.valid ){
formok = false;

//if there is a value missing
if(this.validity.valueMissing){
errors.push(nameUC + errorMessages.required);
}
//if this is an email input and it is not valid
else if(this.validity.typeMismatch && type == 'email'){
errors.push(errorMessages.email + nameUC);
}

this.focus(); //safari does not focus element an invalid element
return false;
}
//if this is a required element
if(isRequired){
//if HTML5 input required attribute is not supported
if(!Modernizr.input.required){
if(value == placeholderText){
this.focus();
formok = false;
errors.push(nameUC + errorMessages.required);
return false;
}
}
}
//if HTML5 input email input is not supported
if(type == 'email'){
if(!Modernizr.inputtypes.email){
var emailRegEx = /^([a-zA-Z0-9_\.\-])+\@(([a-zA-Z0-9\-])+\.)+([a-zA-Z0-9]{2,4})+$/;
if( !emailRegEx.test(value) ){
this.focus();
formok = false;
errors.push(errorMessages.email + nameUC);
return false;
}
}
}
//check minimum lengths
if(minLength){
if( value.length < parseInt(minLength) ){
this.focus();
formok = false;
errors.push(nameUC + errorMessages.minlength + minLength + ' charcters');
return false;
}
}
});
//if form is not valid
if(!formok){
//animate required field notice
$('#req-field-desc')
.stop()
.animate({
marginLeft: '+=' + 5
},150,function(){
$(this).animate({
marginLeft: '-=' + 5
},150);
});
//show error message
showNotice('error',errors);
}
//if form is valid
else {
loading.show();
$.ajax({
url: form.attr('action'),
type: form.attr('method'),
data: form.serialize(),
success: function(){
showNotice('success');
form.get(0).reset();
loading.hide();
}
});
}
return false; //this stops submission off the form and also stops browsers showing default error messages
});
//other misc functions
function showNotice(type,data)
{
if(type == 'error'){
successNotice.hide();
errorNotice.find("li[id!='info']").remove();
for(x in data){
errorNotice.append('<li>'+data[x]+'</li>');
}
errorNotice.show();
}
else {
errorNotice.hide();
successNotice.show();
}
}

String.prototype.ucfirst = function() {
return this.charAt(0).toUpperCase() + this.slice(1);
}
});
Conclusion
Congratulations! You've made it. It's been a long ride, and we've covered a lot of ground in this tutorial.
So, where do you go from here? This could be expanded to a much larger form, and all the code you've written will still work flawlessly. You could even add in your own validation for things like the telephone input field or the
maxlength attribute! Thanks for reading, and I hope you have enjoyed this tutorial!
 Posted in:


