"If you create your own themes you will, sooner or later, want to allow your theme users have some control over certain appearance and/or functional elements of your theme. When this time comes you will want to use the powerful WordPress Settings API. With it, your code becomes simpler, more efficient and more secure.
Introduction
This tutorial is not the first to be written on using the Settings API to create a theme or plugin settings page. In fact a good number of tutorials are available in the WordPress community already. Some quality tutorials include the
Extended WordPress Settings API Tutorial (in two parts) by Alison Barrett as well as the well known
Incorporating the Settings API in WordPress Themes by Chip Bennett.
This tutorial builds on some excellent code techniques found in those tutorials (credit goes to both!) so if you are not familiar with them I would definitely recommend that you read those two articles too. I hope that you may find some code in this tutorial that you can use and improve on in your own work. Right then! Let’s get straight to it!
A look at what we will be creating
I think it’s always nice when tutorials start by showing how the finished result looks like. So why don’t we start with that, shall we? For the purpose of this tutorial we will be using the
twentyeleven WordPress 3.2 default theme however feel free to use your own theme if you prefer.
- Download the Source files and unzip
- Find the
Part One/source_files/lib folder and upload it inside the twentyeleven theme folder so that it is on the same level as the twentyeleven/js folder you see.
- Then, open the
Part One/source_files/functions.php in a code editor and copy the require_once code line.
- Next, open the
twentyeleven/functions.php in your code editor. Find the twentyeleven_setup() function around line 74 and paste the line you copied earlier (point 3) inside the function as you see shown below.
function twentyeleven_setup() {

 //require only in admin!
 if(is_admin()){
  require_once('lib/wptuts-theme-settings-basic.php');
 }
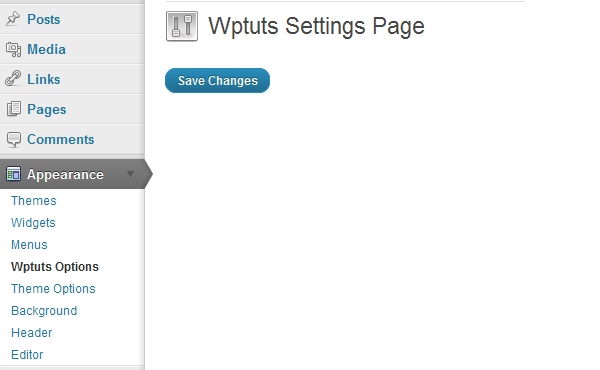
Upon completing this step you should be able to see the
Wptuts Options link under WordPress’
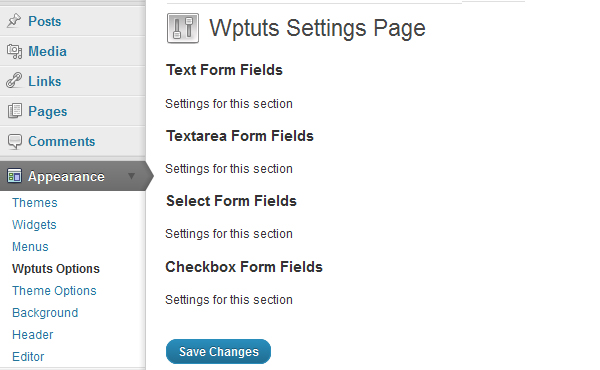
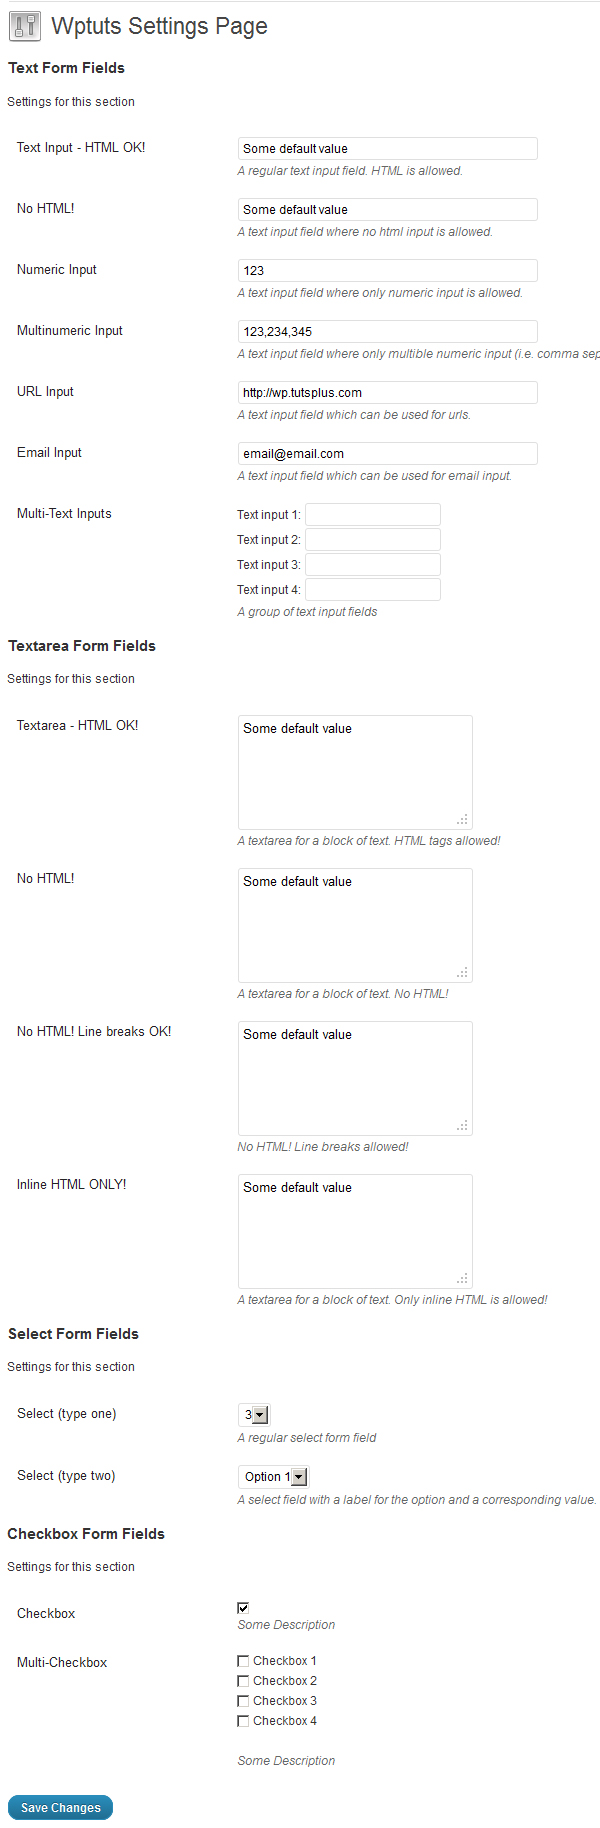
Appearance top-level menu of your Admin area. Go to it and take a moment to scan through the page contents. Following the
Wptuts Settings Page title are four settings sections with their individual settings fields:
- Text Form Fields
- Text Area Form Fields
- Select Form Fields
- Check Box Form Fields
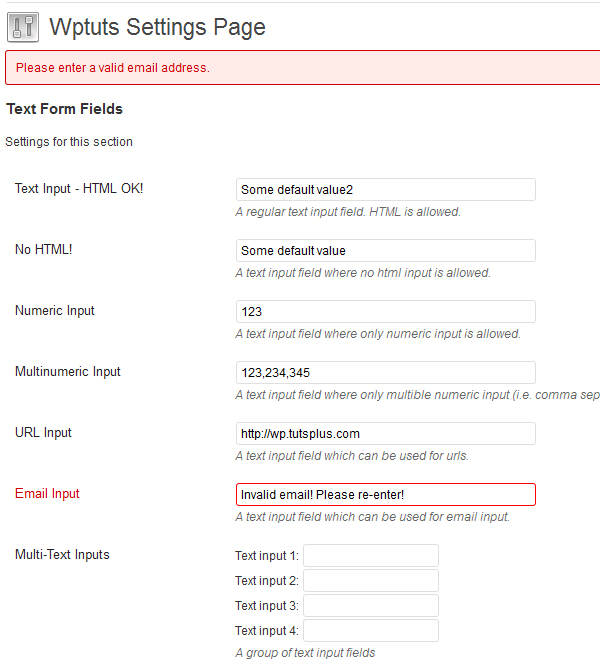
Note how certain settings allow HTML tags whereas other settings do not. Some settings are dedicated to numeric input only. Try saving the default settings and see the “Settings saved.” admin message appear. Try saving input with HTML tags on settings that do not allow their use and see how they are cleared away. Now go to the
Email Input setting and save a wrong email format like email@email. Save the setting and see the admin error message display. See also how the setting that needs to be corrected is highlighted red so that we know exactly where to go and correct things.
Now that you see what the finished result looks like, let’s learn how we can re-create it step by step.
Step 1 Registering the Administration page
“The final code described in this step is found in the Part One/source_ files/step1 folder”
This step is about creating an empty page that will eventually display our settings. As Part One of this tutorial requires only a single settings page we will simply add a submenu to the existing
Appearance top level menu. (
Part Two will show how to add tabs as well as more than one settings page.) We will call the
add_theme_page() function within our own
wptuts_add_menu()function and hook that to the
admin_menu action hook.
Prepare the Document
Create a new document in your code editor and call it
my-theme-settings.php Save it and upload it inside the
twentyeleven/lib folder. Open the
twentyeleven/functions.php in your code editor and find the
require_once code line you pasted in earlier and edit the file name to reflect the name of the new document you just created.
The code given below should be written in the twentyeleven/functions.php file.
function twentyeleven_setup() {

 //require only in admin!
 if(is_admin()){
  require_once('lib/my-theme-settings.php');
 }
Define our constants
First we define some constants. This will make it a little easier when you want to customize the code to your needs later on.
All the code given below and for the remaining part of Step 1 should be written in the my-theme-settings.php file.
/*
* Define Constants
*/
define('WPTUTS_SHORTNAME', 'wptuts'); // used to prefix the individual setting field id see wptuts_options_page_fields()
define('WPTUTS_PAGE_BASENAME', 'wptuts-settings'); // the settings page slug
Register the page
Next, tell WordPress that we want to register a settings page. For this, we need to write a function and hook it on the
admin_menu action hook.
/*
* Specify Hooks/Filters
*/
add_action( 'admin_menu', 'wptuts_add_menu' );

/*
* The Admin menu page
*/
function wptuts_add_menu(){

 // Display Settings Page link under the "Appearance" Admin Menu
 // add_theme_page( $page_title, $menu_title, $capability, $menu_slug, $function);
 $wptuts_settings_page = add_theme_page(__('Wptuts Options'), __('Wptuts Options','wptuts_textdomain'), 'manage_options', WPTUTS_PAGE_BASENAME, 'wptuts_settings_page_fn');
}
Understand the add_theme_page() parameters
Take note of the
add_theme_page() function parameters so you can later on customize the function call to your needs. The information is taken from the
Codex page:
$page_title - The text to be displayed in the title tags of the page when the menu is selected$menu_title - The text to be used for the menu$capability - The capability required for this menu to be displayed to the user.$menu_slug - The slug name to refer to this menu by (should be unique for this menu). (Note the use of our WPTUTS_PAGE_BASENAME constant!)$function - The callback function to output the content for this page. (The wptuts_settings_page_fn() described further down.)
Define a helper function and the page content output function
The fifth parameter in
add_theme_page() - i.e.
wptuts_settings_page_fn() function - is responsible for displaying our page content. However, before we write it we need to define a helper function that will help bring the final page output (page title, settings sections, settings fields and contextual help) for us together. Copy and paste the code you see below after the call to the
admin_menu action hook.
The helper function
/**
* Helper function for defining variables for the current page
*
* @return array
*/
function wptuts_get_settings() {

 $output = array();

 // put together the output array
 $output['wptuts_option_name']   = ''; // the option name as used in the get_option() call.
 $output['wptuts_page_title']   = __( 'Wptuts Settings Page','wptuts_textdomain'); // the settings page title
 $output['wptuts_page_sections']  = ''; // the setting section
 $output['wptuts_page_fields']   = ''; // the setting fields
 $output['wptuts_contextual_help']  = ''; // the contextual help

return $output;
}
The
wptuts_get_settings() helper function outputs an associative array with the following values (in the order they are written):
- The option name as we will use it in the
get_option() call. (see Step 2)
- The settings page title. (see below)
- The settings sections. (see Step 3)
- The settings fields (settings). (see Step 4)
- The settings contextual help. (see Step 7)
The page content output function
Copy and paste the code you see below after the
wptuts_get_settings() function.
/*
* Admin Settings Page HTML
*
* @return echoes output
*/
function wptuts_settings_page_fn() {
// get the settings sections array
 $settings_output = wptuts_get_settings();
?>
 <div class="wrap">
  <div class="icon32" id="icon-options-general"></div>
  <h2><?php echo $settings_output['wptuts_page_title']; ?></h2>

  <form action="options.php" method="post">
   <p class="submit">
    <input name="Submit" type="submit" class="button-primary" value="<?php esc_attr_e('Save Changes','wptuts_textdomain'); ?>" />
   </p>

  </form>
 </div>
<?php }
Check the result
If you have followed the above successfully, this is how your settings page should look like at this point.
Step 2 Registering Page Settings
"The final code described in this step is found in the Part One/source_ files/step2 folder"
Now that we have our settings page in place we need to tell WordPress the settings we want to register and whitelist i.e. sanitize for it. This step is just about that. It will not change the appearance of our page so don't expect to actually "see" any changes reflected. All this vital work is done in the background. We will use the
register_setting() function and it's sanitation callback within our custom
wptuts_register_settings() function and then hook this on the
admin_init action hook. Before we do this however, we need to adjust our helper
wptuts_get_settings() function to include a value for
$output['wptuts_option_name'].
The code given below should be written in the my-theme-settings.php file.
Adjust the helper function
/**
* Helper function for defining variables for the current page
*
* @return array
*/
function wptuts_get_settings() {

 $output = array();

 // put together the output array
 $output['wptuts_option_name']   = 'wptuts_options'; // the option name as used in the get_option() call.
 $output['wptuts_page_title']   = __( 'Wptuts Settings Page','wptuts_textdomain'); // the settings page title
 $output['wptuts_page_sections']  = ''; // the setting section
 $output['wptuts_page_fields']   = ''; // the setting fields
 $output['wptuts_contextual_help']  = ''; // the contextual help

return $output;
}
Register the page settings
Now add the next code block just below the
wptuts_get_settings() function.
/*
* Register our setting
*/
function wptuts_register_settings(){

 // get the settings sections array
 $settings_output  = wptuts_get_settings();
 $wptuts_option_name = $settings_output['wptuts_option_name'];

 //setting
 //register_setting( $option_group, $option_name, $sanitize_callback );
 register_setting($wptuts_option_name, $wptuts_option_name, 'wptuts_validate_options' );
}
Add it's hook.
/*
* Specify Hooks/Filters
*/
add_action( 'admin_menu', 'wptuts_add_menu' );
add_action( 'admin_init', 'wptuts_register_settings' );
Understand the register_setting() parameters
Take note of the
register_setting() function parameters. The information is taken from the
Codex page:
$option_group - A settings group name. (For simplicity we name it the same as the $option_name parameter below)$option_name - The name of an option to sanitize and save. (what we use in a get_option() call.)$sanitize_callback - A callback function that sanitizes the option's value.
Define the validation callback
Finally for this step we want to define our
wptuts_validate_options() validation callback function. It will not do anything yet. Nevertheless, it's good to prepare it and have it ready for Step 6. Copy and paste the code below at the end of our document and before the closing php tag.
/*
* Validate input
*
* @return array
*/
function wptuts_validate_options($input) {

 // for enhanced security, create a new empty array
 $valid_input = array();

return $valid_input; // return validated input
}
Check the result
If you have followed the above successfully, your settings page should still look the same as it did at the end of Step 1!
Step 3 Defining & Registering Settings Sections
"The final code described in this step is found in the Part One/source_ files/step3 folder"
This step covers the four settings sections we will need. Part of the code we'll cover will need to be written in a separate file which we will include in our
my-theme-settings.php so let's start with that.
Prepare a new Document
Create a new document in your code editor and call it
my-theme-options.php Copy and paste in it the function you see below. Then save the document and upload it inside the
twentyeleven/lib folder.
The code given below should be written in the my-theme-options.php file.
/**
* Define our settings sections
*
* array key=$id, array value=$title in: add_settings_section( $id, $title, $callback, $page );
* @return array
*/
function wptuts_options_page_sections() {

 $sections = array();
 // $sections[$id]   = __($title, 'wptuts_textdomain');
 $sections['txt_section']  = __('Text Form Fields', 'wptuts_textdomain');
 $sections['txtarea_section']  = __('Textarea Form Fields', 'wptuts_textdomain');
 $sections['select_section']  = __('Select Form Fields', 'wptuts_textdomain');
 $sections['checkbox_section']  = __('Checkbox Form Fields', 'wptuts_textdomain');

 return $sections;
}
The
wptuts_options_page_sections() function defines our settings sections. It outputs an associative array. The array value stands for the section title and the array key for the section id. Both are needed for the
add_settings_section() function call later on.
Include the new Document
We want to be able to use what the
wptuts_options_page_sections() function returns in the
my-theme-settings.php file. Make sure to include the
my-theme-options.php like you see shown below. The code is added after the call to the
admin_menu action hook.
The code given below and for the remaining part of Step 3 should be written in the my-theme-settings.php file.
/*
* Include the required files
*/
// page settings sections & fields
require_once('my-theme-options.php');
Adjust our helper function
Next, we adjust the
wptuts_get_settings() helper function to include a value for the
$output['wptuts_page_sections'] variable.
/**
* Helper function for defining variables for the current page
*
* @return array
*/
function wptuts_get_settings() {

 $output = array();

 // put together the output array
 $output['wptuts_option_name']   = 'wptuts_options'; // the option name as used in the get_option() call.
 $output['wptuts_page_title']   = __( 'Wptuts Settings Page','wptuts_textdomain'); // the settings page title
 $output['wptuts_page_sections']  = wptuts_options_page_sections(); // the setting section
 $output['wptuts_page_fields']   = ''; // the setting fields
 $output['wptuts_contextual_help']  = ''; // the contextual help

return $output;
}
Register the settings sections
Now, let's register our settings sections by calling the
add_settings_section() function. Remember that the settings sections we defined are stored as an array so we need to run a
foreach loop.
/*
* Register our setting
*/
function wptuts_register_settings(){

 // get the settings sections array
 $settings_output  = wptuts_get_settings();
 $wptuts_option_name = $settings_output['wptuts_option_name'];

 //setting
 // register_setting( $option_group, $option_name, $sanitize_callback );
 register_setting($wptuts_option_name, $wptuts_option_name, 'wptuts_validate_options' );

 //sections
 // add_settings_section( $id, $title, $callback, $page );
 if(!empty($settings_output['wptuts_page_sections'])){
  // call the "add_settings_section" for each!
  foreach ( $settings_output['wptuts_page_sections'] as $id => $title ) {
   add_settings_section( $id, $title, 'wptuts_section_fn', __FILE__);
  }
 }
}
Understand the register_setting() parameters
Take note of the
add_settings_section() function parameters. The information is taken from the
Codex page:
$id - String for use in the 'id' attribute of tags. (The array key in our $section array.)$title - Title of the section. (The array value in our $section array.)$callback - The name of the callback function that will echo some explanations about that section. (The wptuts_section_fn() function defined further down.)$page - The settings page on which to show the section.
Define the sections callback function and adjust the page content output function
The settings sections callback function - i.e.
wptuts_section_fn() - will echo it's contents for each section we created.
/*
* Section HTML, displayed before the first option
* @return echoes output
*/
function  wptuts_section_fn($desc) {
 echo "<p>" . __('Settings for this section','wptuts_textdomain') . "</p>";
}
Finally, we tell WordPress that we want the sections to display on our settings page. We do this by calling the 2 functions:
settings_fields() and
do_settings_sections() in our
wptuts_settings_page_fn()
/*
* Admin Settings Page HTML
*
* @return echoes output
*/
function wptuts_settings_page_fn() {
// get the settings sections array
 $settings_output = wptuts_get_settings();
?>
 <div class="wrap">
  <div class="icon32" id="icon-options-general"></div>
  <h2><?php echo $settings_output['wptuts_page_title']; ?></h2>

  <form action="options.php" method="post">
   <?php
   // http://codex.wordpress.org/Function_Reference/settings_fields
   settings_fields($settings_output['wptuts_option_name']);

   // http://codex.wordpress.org/Function_Reference/do_settings_sections
   do_settings_sections(__FILE__);
   ?>
   <p class="submit">
    <input name="Submit" type="submit" class="button-primary" value="<?php esc_attr_e('Save Changes','wptuts_textdomain'); ?>" />
   </p>

  </form>
 </div>
<?php }
Check the result
If you have followed the above successfully, this is how your settings page should look like at this point.
Step 4 Defining & Registering Setting Fields
"The final code described in this step is found in the Part One/source_ files/step4/ my-theme-settings.php folder"
This step is all about the actual settings or as they are called in the
Settings API, the settings fields. We start by defining a new helper function.
Define a new helper function
The function (written by Alison Barrett) is explained in her
own tutorial so I would encourage you to read that at some point. Please take note of the fact that our
wptuts_create_settings_field() function will pass the
$class argument to our validation function so it is not there simply for stylistic use in a css file!
The code given below should be written in the my-theme-settings.php file just after the wptuts_get_settings() function.
/**
* Helper function for registering our form field settings
*
* src: http://alisothegeek.com/2011/01/wordpress-settings-api-tutorial-1/
* @param (array) $args The array of arguments to be used in creating the field
* @return function call
*/
function wptuts_create_settings_field( $args = array() ) {
 // default array to overwrite when calling the function
 $defaults = array(
  'id'      => 'default_field',                   // the ID of the setting in our options array, and the ID of the HTML form element
  'title'   => 'Default Field',                 // the label for the HTML form element
  'desc'    => 'This is a default description.',  // the description displayed under the HTML form element
  'std'     => '',          // the default value for this setting
  'type'    => 'text',         // the HTML form element to use
  'section' => 'main_section',       // the section this setting belongs to — must match the array key of a section in wptuts_options_page_sections()
  'choices' => array(),         // (optional): the values in radio buttons or a drop-down menu
  'class'   => ''          // the HTML form element class. Also used for validation purposes!
 );

 // "extract" to be able to use the array keys as variables in our function output below
 extract( wp_parse_args( $args, $defaults ) );

 // additional arguments for use in form field output in the function wptuts_form_field_fn!
 $field_args = array(
  'type'      => $type,
  'id'        => $id,
  'desc'      => $desc,
  'std'       => $std,
  'choices'   => $choices,
  'label_for' => $id,
  'class'     => $class
 );

 add_settings_field( $id, $title, 'wptuts_form_field_fn', __FILE__, $section, $field_args );

}
Understand the add_settings_field() parameters
Take note of the
add_settings_field() function parameters. The information is taken from the
Codex page:
$id - String for use in the 'id' attribute of tags.$title - Title of the field.$callback - The name of the callback function that will echo the form field.$page - The settings page on which to show the field$section - The section of the settings page in which to show the field$args - Additional arguments to pass to our callback function. (These are what we mainly work with when we define our wptuts_options_page_fields() function further down)
Define the settings fields
The code given below should be written in the my-theme-options.php file just after the wptuts_options_page_sections() function.
/**
* Define our form fields (settings)
*
* @return array
*/
function wptuts_options_page_fields() {
 // Text Form Fields section
 $options[] = array(
  "section" => "txt_section",
  "id"      => WPTUTS_SHORTNAME . "_txt_input",
  "title"   => __( 'Text Input - Some HTML OK!', 'wptuts_textdomain' ),
  "desc"    => __( 'A regular text input field. Some inline HTML (<a>, <b>, <em>, <i>, <strong>) is allowed.', 'wptuts_textdomain' ),
  "type"    => "text",
  "std"     => __('Some default value','wptuts_textdomain')
 );

 $options[] = array(
  "section" => "txt_section",
  "id"      => WPTUTS_SHORTNAME . "_nohtml_txt_input",
  "title"   => __( 'No HTML!', 'wptuts_textdomain' ),
  "desc"    => __( 'A text input field where no html input is allowed.', 'wptuts_textdomain' ),
  "type"    => "text",
  "std"     => __('Some default value','wptuts_textdomain'),
  "class"   => "nohtml"
 );

 $options[] = array(
  "section" => "txt_section",
  "id"      => WPTUTS_SHORTNAME . "_numeric_txt_input",
  "title"   => __( 'Numeric Input', 'wptuts_textdomain' ),
  "desc"    => __( 'A text input field where only numeric input is allowed.', 'wptuts_textdomain' ),
  "type"    => "text",
  "std"     => "123",
  "class"   => "numeric"
 );

 $options[] = array(
  "section" => "txt_section",
  "id"      => WPTUTS_SHORTNAME . "_multinumeric_txt_input",
  "title"   => __( 'Multinumeric Input', 'wptuts_textdomain' ),
  "desc"    => __( 'A text input field where only multible numeric input (i.e. comma separated numeric values) is allowed.', 'wptuts_textdomain' ),
  "type"    => "text",
  "std"     => "123,234,345",
  "class"   => "multinumeric"
 );

 $options[] = array(
  "section" => "txt_section",
  "id"      => WPTUTS_SHORTNAME . "_url_txt_input",
  "title"   => __( 'URL Input', 'wptuts_textdomain' ),
  "desc"    => __( 'A text input field which can be used for urls.', 'wptuts_textdomain' ),
  "type"    => "text",
  "std"     => "http://wp.tutsplus.com",
  "class"   => "url"
 );

 $options[] = array(
  "section" => "txt_section",
  "id"      => WPTUTS_SHORTNAME . "_email_txt_input",
  "title"   => __( 'Email Input', 'wptuts_textdomain' ),
  "desc"    => __( 'A text input field which can be used for email input.', 'wptuts_textdomain' ),
  "type"    => "text",
  "std"     => "email@email.com",
  "class"   => "email"
 );

 $options[] = array(
  "section" => "txt_section",
  "id"      => WPTUTS_SHORTNAME . "_multi_txt_input",
  "title"   => __( 'Multi-Text Inputs', 'wptuts_textdomain' ),
  "desc"    => __( 'A group of text input fields', 'wptuts_textdomain' ),
  "type"    => "multi-text",
  "choices" => array( __('Text input 1','wptuts_textdomain') . "|txt_input1", __('Text input 2','wptuts_textdomain') . "|txt_input2", __('Text input 3','wptuts_textdomain') . "|txt_input3", __('Text input 4','wptuts_textdomain') . "|txt_input4"),
  "std"     => ""
 );

 // Textarea Form Fields section
 $options[] = array(
  "section" => "txtarea_section",
  "id"      => WPTUTS_SHORTNAME . "_txtarea_input",
  "title"   => __( 'Textarea - HTML OK!', 'wptuts_textdomain' ),
  "desc"    => __( 'A textarea for a block of text. HTML tags allowed!', 'wptuts_textdomain' ),
  "type"    => "textarea",
  "std"     => __('Some default value','wptuts_textdomain')
 );

 $options[] = array(
  "section" => "txtarea_section",
  "id"      => WPTUTS_SHORTNAME . "_nohtml_txtarea_input",
  "title"   => __( 'No HTML!', 'wptuts_textdomain' ),
  "desc"    => __( 'A textarea for a block of text. No HTML!', 'wptuts_textdomain' ),
  "type"    => "textarea",
  "std"     => __('Some default value','wptuts_textdomain'),
  "class"   => "nohtml"
 );

 $options[] = array(
  "section" => "txtarea_section",
  "id"      => WPTUTS_SHORTNAME . "_allowlinebreaks_txtarea_input",
  "title"   => __( 'No HTML! Line breaks OK!', 'wptuts_textdomain' ),
  "desc"    => __( 'No HTML! Line breaks allowed!', 'wptuts_textdomain' ),
  "type"    => "textarea",
  "std"     => __('Some default value','wptuts_textdomain'),
  "class"   => "allowlinebreaks"
 );

 $options[] = array(
  "section" => "txtarea_section",
  "id"      => WPTUTS_SHORTNAME . "_inlinehtml_txtarea_input",
  "title"   => __( 'Some Inline HTML ONLY!', 'wptuts_textdomain' ),
  "desc"    => __( 'A textarea for a block of text.
   Only some inline HTML
   (<a>, <b>, <em>, <strong>, <abbr>, <acronym>, <blockquote>, <cite>, <code>, <del>, <q>, <strike>)
   is allowed!', 'wptuts_textdomain' ),
  "type"    => "textarea",
  "std"     => __('Some default value','wptuts_textdomain'),
  "class"   => "inlinehtml"
 );

 // Select Form Fields section
 $options[] = array(
  "section" => "select_section",
  "id"      => WPTUTS_SHORTNAME . "_select_input",
  "title"   => __( 'Select (type one)', 'wptuts_textdomain' ),
  "desc"    => __( 'A regular select form field', 'wptuts_textdomain' ),
  "type"    => "select",
  "std"    => "3",
  "choices" => array( "1", "2", "3")
 );

 $options[] = array(
  "section" => "select_section",
  "id"      => WPTUTS_SHORTNAME . "_select2_input",
  "title"   => __( 'Select (type two)', 'wptuts_textdomain' ),
  "desc"    => __( 'A select field with a label for the option and a corresponding value.', 'wptuts_textdomain' ),
  "type"    => "select2",
  "std"    => "",
  "choices" => array( __('Option 1','wptuts_textdomain') . "|opt1", __('Option 2','wptuts_textdomain') . "|opt2", __('Option 3','wptuts_textdomain') . "|opt3", __('Option 4','wptuts_textdomain') . "|opt4")
 );

 // Checkbox Form Fields section
 $options[] = array(
  "section" => "checkbox_section",
  "id"      => WPTUTS_SHORTNAME . "_checkbox_input",
  "title"   => __( 'Checkbox', 'wptuts_textdomain' ),
  "desc"    => __( 'Some Description', 'wptuts_textdomain' ),
  "type"    => "checkbox",
  "std"     => 1 // 0 for off
 );

 $options[] = array(
  "section" => "checkbox_section",
  "id"      => WPTUTS_SHORTNAME . "_multicheckbox_inputs",
  "title"   => __( 'Multi-Checkbox', 'wptuts_textdomain' ),
  "desc"    => __( 'Some Description', 'wptuts_textdomain' ),
  "type"    => "multi-checkbox",
  "std"     => '',
  "choices" => array( __('Checkbox 1','wptuts_textdomain') . "|chckbx1", __('Checkbox 2','wptuts_textdomain') . "|chckbx2", __('Checkbox 3','wptuts_textdomain') . "|chckbx3", __('Checkbox 4','wptuts_textdomain') . "|chckbx4")
 );

 return $options;
}
Note how the arguments are used for each setting type whether it is a text input field, a textarea, a select drop down or a checkbox setting. Note the
section argument and how it matches the
$sections array key we output in our
wptuts_options_page_sections() function. See that the
class argument is regularly used for both our text and textarea settings types (this will be used in the
wptuts_validate_options() function later.)
Adjust the helper function
Next, we adjust the
wptuts_get_settings() helper function to include a value for the
$output['wptuts_page_fields'] variable.
The code given below and for the remaining part of Step 4 should be written in the my-theme-settings.php file.
/**
* Helper function for defining variables for the current page
*
* @return array
*/
function wptuts_get_settings() {

 $output = array();

 // put together the output array
 $output['wptuts_option_name']   = 'wptuts_options';
 $output['wptuts_page_title']   = __( 'Wptuts Settings Page','wptuts_textdomain');
 $output['wptuts_page_sections']  = wptuts_options_page_sections();
 $output['wptuts_page_fields']   = wptuts_options_page_fields();
 $output['wptuts_contextual_help']  = '';

return $output;
}
Register the settings fields
Let's register our settings fields by calling the
wptuts_create_settings_field() helper function which ultimately calls the
add_settings_field() function. Remember that just like the settings sections, the settings fields we defined are stored as an array so we need to run a
foreach loop.
/*
* Register our setting
*/
function wptuts_register_settings(){

 // get the settings sections array
 $settings_output  = wptuts_get_settings();
 $wptuts_option_name = $settings_output['wptuts_option_name'];

 //setting
 // register_setting( $option_group, $option_name, $sanitize_callback );
 register_setting($wptuts_option_name, $wptuts_option_name, 'wptuts_validate_options' );

 //sections
 // add_settings_section( $id, $title, $callback, $page );
 if(!empty($settings_output['wptuts_page_sections'])){
  // call the "add_settings_section" for each!
  foreach ( $settings_output['wptuts_page_sections'] as $id => $title ) {
   add_settings_section( $id, $title, 'wptuts_section_fn', __FILE__);
  }
 }

 //fields
 if(!empty($settings_output['wptuts_page_fields'])){
  // call the "add_settings_field" for each!
  foreach ($settings_output['wptuts_page_fields'] as $option) {
   wptuts_create_settings_field($option);
  }
 }
}
Define the setting fields callback function
Finally we define the
wptuts_form_field_fn() callback function that will handle the form field display. Copy and paste the following code just after the
wptuts_section_fn() function.
/*
* Form Fields HTML
* All form field types share the same function!!
* @return echoes output
*/
function wptuts_form_field_fn($args = array()) {

 extract( $args );

 // get the settings sections array
 $settings_output  = wptuts_get_settings();

 $wptuts_option_name = $settings_output['wptuts_option_name'];
 $options    = get_option($wptuts_option_name);

 // pass the standard value if the option is not yet set in the database
 if ( !isset( $options[$id] ) && 'type' != 'checkbox' ) {
  $options[$id] = $std;
 }

 // additional field class. output only if the class is defined in the create_setting arguments
 $field_class = ($class != '') ? ' ' . $class : '';

 // switch html display based on the setting type.
 switch ( $type ) {
  case 'text':
   $options[$id] = stripslashes($options[$id]);
   $options[$id] = esc_attr( $options[$id]);
   echo "<input class='regular-text$field_class' type='text' id='$id' name='" . $wptuts_option_name . "[$id]' value='$options[$id]' />";
   echo ($desc != '') ? "<br /><span class='description'>$desc</span>" : "";
  break;

  case "multi-text":
   foreach($choices as $item) {
    $item = explode("|",$item); // cat_name|cat_slug
    $item[0] = esc_html__($item[0], 'wptuts_textdomain');
    if (!empty($options[$id])) {
     foreach ($options[$id] as $option_key => $option_val){
      if ($item[1] == $option_key) {
       $value = $option_val;
      }
     }
    } else {
     $value = '';
    }
    echo "<span>$item[0]:</span> <input class='$field_class' type='text' id='$id|$item[1]' name='" . $wptuts_option_name . "[$id|$item[1]]' value='$value' /><br/>";
   }
   echo ($desc != '') ? "<span class='description'>$desc</span>" : "";
  break;

  case 'textarea':
   $options[$id] = stripslashes($options[$id]);
   $options[$id] = esc_html( $options[$id]);
   echo "<textarea class='textarea$field_class' type='text' id='$id' name='" . $wptuts_option_name . "[$id]' rows='5' cols='30'>$options[$id]</textarea>";
   echo ($desc != '') ? "<br /><span class='description'>$desc</span>" : "";
  break;

  case 'select':
   echo "<select id='$id' class='select$field_class' name='" . $wptuts_option_name . "[$id]'>";
    foreach($choices as $item) {
     $value  = esc_attr($item, 'wptuts_textdomain');
     $item  = esc_html($item, 'wptuts_textdomain');

     $selected = ($options[$id]==$value) ? 'selected="selected"' : '';
     echo "<option value='$value' $selected>$item</option>";
    }
   echo "</select>";
   echo ($desc != '') ? "<br /><span class='description'>$desc</span>" : "";
  break;

  case 'select2':
   echo "<select id='$id' class='select$field_class' name='" . $wptuts_option_name . "[$id]'>";
   foreach($choices as $item) {

    $item = explode("|",$item);
    $item[0] = esc_html($item[0], 'wptuts_textdomain');

    $selected = ($options[$id]==$item[1]) ? 'selected="selected"' : '';
    echo "<option value='$item[1]' $selected>$item[0]</option>";
   }
   echo "</select>";
   echo ($desc != '') ? "<br /><span class='description'>$desc</span>" : "";
  break;

  case 'checkbox':
   echo "<input class='checkbox$field_class' type='checkbox' id='$id' name='" . $wptuts_option_name . "[$id]' value='1' " . checked( $options[$id], 1, false ) . " />";
   echo ($desc != '') ? "<br /><span class='description'>$desc</span>" : "";
  break;

  case "multi-checkbox":
   foreach($choices as $item) {

    $item = explode("|",$item);
    $item[0] = esc_html($item[0], 'wptuts_textdomain');

    $checked = '';

       if ( isset($options[$id][$item[1]]) ) {
     if ( $options[$id][$item[1]] == 'true') {
         $checked = 'checked="checked"';
     }
    }

    echo "<input class='checkbox$field_class' type='checkbox' id='$id|$item[1]' name='" . $wptuts_option_name . "[$id|$item[1]]' value='1' $checked /> $item[0] <br/>";
   }
   echo ($desc != '') ? "<br /><span class='description'>$desc</span>" : "";
  break;
 }
}
Breaking-down the code
We collect our settings fields in the
$options variable.
// get the settings sections array
$settings_output  = wptuts_get_settings();

$wptuts_option_name = $settings_output['wptuts_option_name'];
$options    = get_option($wptuts_option_name);
We pass the standard value (
$std) if the setting is not yet set. We also put together a
$field_class to be used as the form input field class (can be used for styling if needed.)
// pass the standard value if the option is not yet set in the database
if ( !isset( $options[$id] ) && 'type' != 'checkbox' ) {
 $options[$id] = $std;
}

// additional field class. output only if the class is defined in the create_setting arguments
$field_class = ($class != '') ? ' ' . $class : '';
Then, we run a
foreach loop and
switch based on the setting field type (text, textarea, select, checkbox etc.) When you customize this function later on, you will want to create a new
case for each new setting field type (note:
type) you add.
// run a foreach and switch on option type
foreach ($options as $option) {
 switch ( $option['type'] ) {
  case 'text':
   // echo code
  break;

  case "multi-text":
   // echo code
  break;

  case 'textarea':
   // echo code
  break;

  case 'select':
   // echo code
  break;

  case 'select2':
   // echo code
  break;

  case 'checkbox':
   // echo code
  break;

  case 'multi-checkbox':
   // echo code
  break;
 }
}
Check the result
If you have followed the above successfully, this is how your settings page should look like at this point. Note that nothing will save yet so don't be surprised if nothing happens when you try!
Step 5 Validating & Saving User Input
"The final code described in this step is found in the Part One/source_ files/step5 folder"
Step 5 is all about validating and sanitizing what users attempt to save when they hit the "Save Settings" button. This process, also refered to as "whitelisting" is, in my opinion, the most important part in this tutorial. If there's anything that my theme users have indelibly impressed upon me is to validate, validate, validate! So, in this tutorial we will create a project-ready validation callback function which you can use in your projects. Feel free to modify, improve and extend it according to your needs.
Oh! and one more thing before we get to the actual validation function. Should you notice that your settings don't save even when everything else looks fine, this is the place to troubleshoot! So, we'll also cover a troubleshooting tip that may help.
The validation callback function
We have already defined this function in step 2 so go ahead and find it in your
my-theme-settings.php. Then copy and paste the completed function you see below in it's place.
/*
* Validate input
*
* @return array
*/
function wptuts_validate_options($input) {

 // for enhanced security, create a new empty array
 $valid_input = array();

 // collect only the values we expect and fill the new $valid_input array i.e. whitelist our option IDs

  // get the settings sections array
  $settings_output = wptuts_get_settings();

  $options = $settings_output['wptuts_page_fields'];

  // run a foreach and switch on option type
  foreach ($options as $option) {

   switch ( $option['type'] ) {
    case 'text':
     //switch validation based on the class!
     switch ( $option['class'] ) {
      //for numeric
      case 'numeric':
       //accept the input only when numeric!
       $input[$option['id']]   = trim($input[$option['id']]); // trim whitespace
       $valid_input[$option['id']] = (is_numeric($input[$option['id']])) ? $input[$option['id']] : 'Expecting a Numeric value!';

       // register error
       if(is_numeric($input[$option['id']]) == FALSE) {
        add_settings_error(
         $option['id'], // setting title
         WPTUTS_SHORTNAME . '_txt_numeric_error', // error ID
         __('Expecting a Numeric value! Please fix.','wptuts_textdomain'), // error message
         'error' // type of message
        );
       }
      break;

      //for multi-numeric values (separated by a comma)
      case 'multinumeric':
       //accept the input only when the numeric values are comma separated
       $input[$option['id']]   = trim($input[$option['id']]); // trim whitespace

       if($input[$option['id']] !=''){
        // /^-?\d+(?:,\s?-?\d+)*$/ matches: -1 | 1 | -12,-23 | 12,23 | -123, -234 | 123, 234  | etc.
        $valid_input[$option['id']] = (preg_match('/^-?\d+(?:,\s?-?\d+)*$/', $input[$option['id']]) == 1) ? $input[$option['id']] : __('Expecting comma separated numeric values','wptuts_textdomain');
       }else{
        $valid_input[$option['id']] = $input[$option['id']];
       }

       // register error
       if($input[$option['id']] !='' && preg_match('/^-?\d+(?:,\s?-?\d+)*$/', $input[$option['id']]) != 1) {
        add_settings_error(
         $option['id'], // setting title
         WPTUTS_SHORTNAME . '_txt_multinumeric_error', // error ID
         __('Expecting comma separated numeric values! Please fix.','wptuts_textdomain'), // error message
         'error' // type of message
        );
       }
      break;

      //for no html
      case 'nohtml':
       //accept the input only after stripping out all html, extra white space etc!
       $input[$option['id']]   = sanitize_text_field($input[$option['id']]); // need to add slashes still before sending to the database
       $valid_input[$option['id']] = addslashes($input[$option['id']]);
      break;

      //for url
      case 'url':
       //accept the input only when the url has been sanited for database usage with esc_url_raw()
       $input[$option['id']]   = trim($input[$option['id']]); // trim whitespace
       $valid_input[$option['id']] = esc_url_raw($input[$option['id']]);
      break;

      //for email
      case 'email':
       //accept the input only after the email has been validated
       $input[$option['id']]   = trim($input[$option['id']]); // trim whitespace
       if($input[$option['id']] != ''){
        $valid_input[$option['id']] = (is_email($input[$option['id']])!== FALSE) ? $input[$option['id']] : __('Invalid email! Please re-enter!','wptuts_textdomain');
       }elseif($input[$option['id']] == ''){
        $valid_input[$option['id']] = __('This setting field cannot be empty! Please enter a valid email address.','wptuts_textdomain');
       }

       // register error
       if(is_email($input[$option['id']])== FALSE || $input[$option['id']] == '') {
        add_settings_error(
         $option['id'], // setting title
         WPTUTS_SHORTNAME . '_txt_email_error', // error ID
         __('Please enter a valid email address.','wptuts_textdomain'), // error message
         'error' // type of message
        );
       }
      break;

      // a "cover-all" fall-back when the class argument is not set
      default:
       // accept only a few inline html elements
       $allowed_html = array(
        'a' => array('href' => array (),'title' => array ()),
        'b' => array(),
        'em' => array (),
        'i' => array (),
        'strong' => array()
       );

       $input[$option['id']]   = trim($input[$option['id']]); // trim whitespace
       $input[$option['id']]   = force_balance_tags($input[$option['id']]); // find incorrectly nested or missing closing tags and fix markup
       $input[$option['id']]   = wp_kses( $input[$option['id']], $allowed_html); // need to add slashes still before sending to the database
       $valid_input[$option['id']] = addslashes($input[$option['id']]);
      break;
     }
    break;

    case "multi-text":
     // this will hold the text values as an array of 'key' => 'value'
     unset($textarray);

     $text_values = array();
     foreach ($option['choices'] as $k => $v ) {
      // explode the connective
      $pieces = explode("|", $v);

      $text_values[] = $pieces[1];
     }

     foreach ($text_values as $v ) {

      // Check that the option isn't empty
      if (!empty($input[$option['id'] . '|' . $v])) {
       // If it's not null, make sure it's sanitized, add it to an array
       switch ($option['class']) {
        // different sanitation actions based on the class create you own cases as you need them

        //for numeric input
        case 'numeric':
         //accept the input only if is numberic!
         $input[$option['id'] . '|' . $v]= trim($input[$option['id'] . '|' . $v]); // trim whitespace
         $input[$option['id'] . '|' . $v]= (is_numeric($input[$option['id'] . '|' . $v])) ? $input[$option['id'] . '|' . $v] : '';
        break;

        // a "cover-all" fall-back when the class argument is not set
        default:
         // strip all html tags and white-space.
         $input[$option['id'] . '|' . $v]= sanitize_text_field($input[$option['id'] . '|' . $v]); // need to add slashes still before sending to the database
         $input[$option['id'] . '|' . $v]= addslashes($input[$option['id'] . '|' . $v]);
        break;
       }
       // pass the sanitized user input to our $textarray array
       $textarray[$v] = $input[$option['id'] . '|' . $v];

      } else {
       $textarray[$v] = '';
      }
     }
     // pass the non-empty $textarray to our $valid_input array
     if (!empty($textarray)) {
      $valid_input[$option['id']] = $textarray;
     }
    break;

    case 'textarea':
     //switch validation based on the class!
     switch ( $option['class'] ) {
      //for only inline html
      case 'inlinehtml':
       // accept only inline html
       $input[$option['id']]   = trim($input[$option['id']]); // trim whitespace
       $input[$option['id']]   = force_balance_tags($input[$option['id']]); // find incorrectly nested or missing closing tags and fix markup
       $input[$option['id']]   = addslashes($input[$option['id']]); //wp_filter_kses expects content to be escaped!
       $valid_input[$option['id']] = wp_filter_kses($input[$option['id']]); //calls stripslashes then addslashes
      break;

      //for no html
      case 'nohtml':
       //accept the input only after stripping out all html, extra white space etc!
       $input[$option['id']]   = sanitize_text_field($input[$option['id']]); // need to add slashes still before sending to the database
       $valid_input[$option['id']] = addslashes($input[$option['id']]);
      break;

      //for allowlinebreaks
      case 'allowlinebreaks':
       //accept the input only after stripping out all html, extra white space etc!
       $input[$option['id']]   = wp_strip_all_tags($input[$option['id']]); // need to add slashes still before sending to the database
       $valid_input[$option['id']] = addslashes($input[$option['id']]);
      break;

      // a "cover-all" fall-back when the class argument is not set
      default:
       // accept only limited html
       //my allowed html
       $allowed_html = array(
        'a'    => array('href' => array (),'title' => array ()),
        'b'    => array(),
        'blockquote'  => array('cite' => array ()),
        'br'    => array(),
        'dd'    => array(),
        'dl'    => array(),
        'dt'    => array(),
        'em'    => array (),
        'i'    => array (),
        'li'    => array(),
        'ol'    => array(),
        'p'    => array(),
        'q'    => array('cite' => array ()),
        'strong'   => array(),
        'ul'    => array(),
        'h1'    => array('align' => array (),'class' => array (),'id' => array (), 'style' => array ()),
        'h2'    => array('align' => array (),'class' => array (),'id' => array (), 'style' => array ()),
        'h3'    => array('align' => array (),'class' => array (),'id' => array (), 'style' => array ()),
        'h4'    => array('align' => array (),'class' => array (),'id' => array (), 'style' => array ()),
        'h5'    => array('align' => array (),'class' => array (),'id' => array (), 'style' => array ()),
        'h6'    => array('align' => array (),'class' => array (),'id' => array (), 'style' => array ())
       );

       $input[$option['id']]   = trim($input[$option['id']]); // trim whitespace
       $input[$option['id']]   = force_balance_tags($input[$option['id']]); // find incorrectly nested or missing closing tags and fix markup
       $input[$option['id']]   = wp_kses( $input[$option['id']], $allowed_html); // need to add slashes still before sending to the database
       $valid_input[$option['id']] = addslashes($input[$option['id']]);
      break;
     }
    break;

    case 'select':
     // check to see if the selected value is in our approved array of values!
     $valid_input[$option['id']] = (in_array( $input[$option['id']], $option['choices']) ? $input[$option['id']] : '' );
    break;

    case 'select2':
     // process $select_values
      $select_values = array();
      foreach ($option['choices'] as $k => $v) {
       // explode the connective
       $pieces = explode("|", $v);

       $select_values[] = $pieces[1];
      }
     // check to see if selected value is in our approved array of values!
     $valid_input[$option['id']] = (in_array( $input[$option['id']], $select_values) ? $input[$option['id']] : '' );
    break;

    case 'checkbox':
     // if it's not set, default to null!
     if (!isset($input[$option['id']])) {
      $input[$option['id']] = null;
     }
     // Our checkbox value is either 0 or 1
     $valid_input[$option['id']] = ( $input[$option['id']] == 1 ? 1 : 0 );
    break;

    case 'multi-checkbox':
     unset($checkboxarray);
     $check_values = array();
     foreach ($option['choices'] as $k => $v ) {
      // explode the connective
      $pieces = explode("|", $v);

      $check_values[] = $pieces[1];
     }

     foreach ($check_values as $v ) {

      // Check that the option isn't null
      if (!empty($input[$option['id'] . '|' . $v])) {
       // If it's not null, make sure it's true, add it to an array
       $checkboxarray[$v] = 'true';
      }
      else {
       $checkboxarray[$v] = 'false';
      }
     }
     // Take all the items that were checked, and set them as the main option
     if (!empty($checkboxarray)) {
      $valid_input[$option['id']] = $checkboxarray;
     }
    break;

   }
  }
return $valid_input; // return validated input
}
Breaking-down the code
Some of the process may remind you of what we did in the setting fields callback function which handled the form field display on the page.
We collect our settings fields in the
$options variable.
// get the settings sections array
 $settings_output = wptuts_get_settings();

 $options = $settings_output['wptuts_page_fields'];
Then, we run a
foreach loop and
switch based on the setting field type (text, textarea, select, checkbox etc.) When you customize this function later on, you will want to create a new
case for each new setting field type (note:
type) you add.
// run a foreach and switch on option type
 foreach ($options as $option) {
  switch ( $option['type'] ) {
   case 'text':
    // validation code
   break;

   case "multi-text":
    // validation code
   break;

   case 'textarea':
    // validation code
   break;

   case 'select':
    // validation code
   break;

   case 'select2':
    // validation code
   break;

   case 'checkbox':
    // validation code
   break;

   case 'multi-checkbox':
    // validation code
   break;
  }
 }
Each setting field type, the text and textarea types in particular, may be used for different user input. Sometimes the input may be some text where html elements are allowed but at other times it may be that html is not allowed, or only inline html is OK. Some settings may expect a numeric, email or url user input. All that needs to be validated properly and here is where the
class argument in our
wptuts_options_page_fields() function comes in.
We run a second
switch based on the setting field class (nohtml, numeric, email, url etc.) which will contain different validation/sanitation code depending on what is needed. When you customize this function later on, you will want to create a new
case for each new setting field class you may create. Written below, you see the class
switch for the text setting field type. Take a moment to study the class
switch used for the textarea setting field as well.
switch ( $option['type'] ) {
 case 'text':
  //switch validation based on the class!
  switch ( $option['class'] ) {

   //for numeric
   case 'numeric':
    // validation code
   break;

   //for multi numeric separated with a comma
   case 'multinumeric':
    // validation code
   break;

   //for no html
   case 'nohtml':
    // validation code
   break;

   //for url
   case 'url':
    // validation code
   break;

   //for email
   case 'email':
    // validation code
   break;

   // a "cover-all" fall-back when the class argument is not set
   default:
    // validation code
   break;
  }
 break;
Take the time to study the validation/sanitation done in each
case. Should you see any functions used you're not sure about, look them up. A good resource for Data Validation is found in the
Codex
Troubleshooting settings that won't save
Should you notice that your settings don't save, the first thing to do is
print_r both the incoming
$input at the top of the validation function and the outgoing
$valid_input at the end before it is returned.
function wptuts_validate_options($input) {
 ?><pre><?php
  print_r($input);
 ?></pre><?php

 /*
 validation code
 */

 ?><pre><?php
  print_r($valid_input);
 ?></pre><?php
 exit;
return $valid_input;
}
If the validation code you are using is not written well then the
$valid_input array values will be empty even though the
$input array values look ok. Isolate the problematic settings and look into your validation code to find out what may be preventing the value of a particular
$input key from being passed on as the value of the corresponding
$valid_input key.
Register errors
As you go through the validation code you will notice that what we mostly do is take the user input, "clean it up" and then pass it on to our validated input array. On occation however, such as in the case of email input, we will require the user to correct his input before saving the value in the database. We need to let the user know that there is a problem i.e. his input is not correct and that he needs to re-enter the value needed correctly. The WordPress Settings API allows us to provide such feedback using the
add_settings_error() function.
You will see this function used on our text setting field type and specifically for the numeric, multinumeric and email classes. Shown below is the validation done on the email input field.
//for email
case 'email':
 //accept the input only after email has been validated
 $input[$option['id']]   = trim($input[$option['id']]); // trim whitespace
 if($input[$option['id']] != ''){
  $valid_input[$option['id']] = (is_email($input[$option['id']])!== FALSE) ? $input[$option['id']] : __('Invalid email! Please re-enter!','wptuts_textdomain');
 }elseif($input[$option['id']] == ''){
  $valid_input[$option['id']] = __('This setting field cannot be empty! Please enter a valid email address.','wptuts_textdomain');
 }

 // register error
 if(is_email($input[$option['id']])== FALSE || $input[$option['id']] == '') {
  add_settings_error(
   $option['id'], // setting title
   WPTUTS_SHORTNAME . '_txt_email_error', // error ID
   __('Please enter a valid email address.','wptuts_textdomain'), // error message
   'error' // type of message
  );
 }
break;
Understand the add_settings_error() parameters
Take note of the
add_settings_error() function parameters. The information is taken from the
Codex page:
$setting - Slug title of the setting to which this error applies.$code - Slug-name to identify the error. Used as part of 'id' attribute in HTML output.$message - The formatted message text to display to the user (will be shown inside styled <div> and <p>)$type - The type of message it is (error or update), controls HTML class.
Check the result
If you have followed the above successfully, then you should now be able to edit and save your settings! You will not see any admin messages (neither "success" nor "error") yet - we still have to write this (see step 6) - however your settings will be validated and saved.
Step 6 Admin Messages
"The final code described in this step is found in the Part One/source_ files/step6 folder"
In Step 5 we talked about whitelisting our settings and saving them. This is all nice however, we need to provide some sort of feedback when settings save successfully and when errors occur. Step 6 talks about displaying such feedback in the form of admin messages.
The helper function
WordPress provides us with an action hook we can use to echo out
admin messages and this is what we will be using to display feedback both on "success" and on "error". First, we will create a helper function with 2 parameters: the actual message and the message type ("error", "info", "update", etc). I've seen this at
Wp Recipes and I liked the way it was done so, we'll use it here as well.
The code given below and for the rest of Step 6 should be written in the my-theme-settings.php file just after the wptuts_validate_options() function.
/**
* Helper function for creating admin messages
* src: http://www.wprecipes.com/how-to-show-an-urgent-message-in-the-wordpress-admin-area
*
* @param (string) $message The message to echo
* @param (string) $msgclass The message class
* @return echoes the message
*/
function wptuts_show_msg($message, $msgclass = 'info') {
 echo "<div id='message' class='$msgclass'>$message</div>";
}
The callback function and action hook
Next we need to write our callback function that will be hooked to
admin_notices
/**
* Callback function for displaying admin messages
*
* @return calls wptuts_show_msg()
*/
function wptuts_admin_msgs() {

 // check for our settings page - need this in conditional further down
 $wptuts_settings_pg = strpos($_GET['page'], WPTUTS_PAGE_BASENAME);
 // collect setting errors/notices: //http://codex.wordpress.org/Function_Reference/get_settings_errors
 $set_errors = get_settings_errors();

 //display admin message only for the admin to see, only on our settings page and only when setting errors/notices are returned!
 if(current_user_can ('manage_options') && $wptuts_settings_pg !== FALSE && !empty($set_errors)){

  // have our settings succesfully been updated?
  if($set_errors[0]['code'] == 'settings_updated' && isset($_GET['settings-updated'])){
   wptuts_show_msg("<p>" . $set_errors[0]['message'] . "</p>", 'updated');

  // have errors been found?
  }else{
   // there maybe more than one so run a foreach loop.
   foreach($set_errors as $set_error){
    // set the title attribute to match the error "setting title" - need this in js file
    wptuts_show_msg("<p class='setting-error-message' title='" . $set_error['setting'] . "'>" . $set_error['message'] . "</p>", 'error');
   }
  }
 }
}

// admin messages hook!
add_action('admin_notices', 'wptuts_admin_msgs');
Understand the function
I made sure to comment out the function well however it should be noted that the
get_settings_errors() function will not only return error messages but all notices in general - including a successfull message when our settings save correctly. So don't let the function name mislead you! This is why we are able to use the same function to display the "Settings saved" admin message on "success" as well as the error messages on "error".
Check the result
If you have followed the above successfully, then you should be able now to see the successful "Settings saved." admin message when you pass input validation, as well as the error admin message when you don't.
Error? But where?
Now that the error message displays as expected let's add a touch of javascript to draw attention to the setting the user needs to correct. You actually have the code already uploaded on your server. You've done this already in Step 1 so all we need to do is simply include the required files in our settings page so that the browser can execute the script. Copy and paste the following above the
wptuts_add_menu() function.
/*
* Group scripts (js & css)
*/
function wptuts_settings_scripts(){
 wp_enqueue_style('wptuts_theme_settings_css', get_template_directory_uri() . '/lib/css/wptuts_theme_settings.css');
 wp_enqueue_script( 'wptuts_theme_settings_js', get_template_directory_uri() . '/lib/js/wptuts_theme_settings.js', array('jquery'));
}
Then we adjust the
wptuts_add_menu() function like this:
/*
* The Admin menu page
*/
function wptuts_add_menu(){

 // Display Settings Page link under the "Appearance" Admin Menu
 // add_theme_page( $page_title, $menu_title, $capability, $menu_slug, $function);
 $wptuts_settings_page = add_theme_page(__('Wptuts Options'), __('Wptuts Options','wptuts_textdomain'), 'manage_options', WPTUTS_PAGE_BASENAME, 'wptuts_settings_page_fn');

 // css & js
 add_action( 'load-'. $wptuts_settings_page, 'wptuts_settings_scripts' );
}
What does the js code say? Look inside the
twentyeleven/lib/js folder and open the file you see inside:
wptuts_theme_settings.js in your code editor.
jQuery(function(){
 var error_msg = jQuery("#message p[class='setting-error-message']");
 // look for admin messages with the "setting-error-message" error class
 if (error_msg.length != 0) {
  // get the title
  var error_setting = error_msg.attr('title');

  // look for the label with the "for" attribute=setting title and give it an "error" class (style this in the css file!)
  jQuery("label[for='" + error_setting + "']").addClass('error');

  // look for the input with id=setting title and add a red border to it.
  jQuery("input[id='" + error_setting + "']").attr('style', 'border-color: red');
 }
});
We look for any admin messages with the class
setting-error-message. If we have any displaying on the page, we proceed and get the error message
title attribute. This will always match a setting label (
for attribute) and an input form field (
id attribute). All is left to do, is add an error class to the label and a border style to the input form field. Note that the error class is then styled in the css file (
twentyeleven/lib/css/wptuts_theme_settings.css). When you open the css file you'll see it is practically empty. Use it as you want to add further stylling to your settings page.
Check the result (again)
If you have followed the above successfully, then error settings should be highlighted red when error admin messages display like you see below.
"The final code described in this step is found in the Part One/source_ files/step7/ my-theme-settings.php folder"
Step 7 Contextual Help
The final Step 7 in this tutorial will touch on adding contextual help to our settings page. This additional information will be located inside the panel that slides open when you click on the "Help" tab located at the top right of your admin screen. What we need to do, is write the text we want and then tell WordPress where we want it displayed.
Write the text
Open your
my-theme-options.php file in your code editor. Copy and paste the function you see below
/**
* Contextual Help
*/
function wptuts_options_page_contextual_help() {

 $text  = "<h3>" . __('Wptuts Settings - Contextual Help','wptuts_textdomain') . "</h3>";
 $text  .= "<p>" . __('Contextual help goes here. You may want to use different html elements to format your text as you want.','wptuts_textdomain') . "</p>";

 // return text
 return $text;
}
Let WordPress know where to display it
First we need to adjust our helper
wptuts_get_settings() function to include a value for
$output['wptuts_contextual_help'].
The code given below and for the remaining part of Step 7 should be written in the my-theme-settings.php file.
/**
* Helper function for defining variables for the current page
*
* @return array
*/
function wptuts_get_settings() {

 $output = array();

 // put together the output array
 $output['wptuts_option_name']   = 'wptuts_options';
 $output['wptuts_page_title']   = __( 'Wptuts Settings Page','wptuts_textdomain');
 $output['wptuts_page_sections']  = wptuts_options_page_sections();
 $output['wptuts_page_fields']   = wptuts_options_page_fields();
 $output['wptuts_contextual_help']  = wptuts_options_page_contextual_help();

return $output;
}
Then we adjust our
wptuts_add_menu() function one last time. We call the
add_contextual_help() function which takes in two parameters:
$screen (our setting page) and
$text (the help text we output from
wptuts_options_page_contextual_help())
/*
* The Admin menu page
*/
function wptuts_add_menu(){

 $settings_output   = wptuts_get_settings();
 // collect our contextual help text
 $wptuts_contextual_help = $settings_output['wptuts_contextual_help'];

 // Display Settings Page link under the "Appearance" Admin Menu
 $wptuts_settings_page = add_theme_page(__('Wptuts Options'), __('Wptuts Options','wptuts_textdomain'), 'manage_options', WPTUTS_PAGE_BASENAME, 'wptuts_settings_page_fn');
  // contextual help
  if ($wptuts_settings_page) {
   add_contextual_help( $wptuts_settings_page, $wptuts_contextual_help );
  }
  // css & js
  add_action( 'load-'. $wptuts_settings_page, 'wptuts_settings_scripts' );
}
Check the result
If you have followed the above successfully, then our contextual help test should display inside the "Help" tab like you see below.
Using the theme settings in our theme
Last but not least we want to look into how we can go about using our theme settings in our theme template files. Copy and paste the following code in the
twentyeleven/functions.php after the
twentyeleven_setup() function.
/**
* Collects our theme options
*
* @return array
*/
function wptuts_get_global_options(){

 $wptuts_option = array();

 $wptuts_option  = get_option('wptuts_options');

return $wptuts_option;
}

/**
* Call the function and collect in variable
*
* Should be used in template files like this:
* <?php echo $wptuts_option['wptuts_txt_input']; ?>
*
* Note: Should you notice that the variable ($wptuts_option) is empty when used in certain templates such as header.php, sidebar.php and footer.php
* you will need to call the function (copy the line below and paste it) at the top of those documents (within php tags)!
*/
$wptuts_option = wptuts_get_global_options();
Our settings were saved in a single array with the option name
wptuts_options. To retrieve them we call
get_option('wptuts_options'). As you can see this is done inside our
wptuts_get_global_options() fuction whose output is collected in the
$wptuts_option variable.
Note: If you feel that the wptuts_get_global_options() function is somewhat redundant, don't. It's use will make more sense once you go through Part Two of this series. Echo a particular option in any of your theme templates like this:
<?php echo $wptuts_option['wptuts_txt_input']; ?> - the value in the brackets is the id of the option you want to display.
Worth noting
You will notice that when you try to echo the above in the
header.php,
sidebar.php and
footer.php templates nothing happens! This is not the case in other WordPress templates (
index.php,
page.php etc.). Try it out for yourself to see.
Copy and paste the following in the
twentyeleven/header.php after the
<body> tag and see how it returns
NULL on the front-end.
<pre><?php var_dump($wptuts_option);?></pre>
Now copy and paste the following just after the
wp_head(); call.
$wptuts_option = wptuts_get_global_options();
Note how the variable now returns all our theme settings. Just remember this when you try to display options from your theme settings in your
header.php,
sidebar.php and
footer.php theme templates.
Up next... Part Two
Hope you enjoyed Part One and I look forward to reading your comments on what you thought about it. Part Two (coming tomorrow!) will show how we can create Top Level Admin menus with more than one setting pages. We will throw in some tabs too so you can see how a settings page with tabs can be created."


 Clean and quick!
 Don’t activate it just yet.
 Play around with the shortcode attributes to see different maps. Perhaps this:
 Note: the WordPress shortcode API is very forgiving. You can use the self-closing or enclosing forms of a shortcode and the API will correct for variations. See the documentation.
 Posted in: