• Feed RSS

Quick Tip! 9 Handy WordPress Code Snippets (That You Really Should Know!)

"Here are some short but handy code snippets that may make your life as a WordPress developer a little easier. We’ll cover a little bit of everything, from how to automatically delete posts, how to quickly dish out a post thumbnail, to how to redirect users once they’ve logged in. Open up your text-replacement program and get ready to add a few new shortcuts!

We’ll start off with a few simple one-liners.

1. Hide The Front-End Dashboard Bar

Since v3.1, WordPress has provided a front-end admin bar for all users. Depending on your intent, this can detract from the look of your site. To disable it, use the show_admin_bar function:
show_admin_bar(FALSE);
You can also disable this from your User Profile, but this is especially useful if you’ve got a ton of authors/members on the site and you need to disable the bar altogether.

2. Empty Trashed Posts Automatically

Trashed posts can build up if you forget to delete them permanently. Use this code in /wp-config.php to empty your trashed posts:
define('EMPTY_TRASH_DAYS', 5 );

3. Turn On WordPress Internal Debugger

When you’re developing, you need to see the errors your code is throwing up. Keep in mind that not all errors stop a script from executing but they are errors nevertheless, and they may have strange effects upon your other code. So, turn on WordPress debug by placing this in your /wp-config.php:
define('WP_DEBUG', TRUE);
You may be amazed by what you see in the footer. Remember to turn debugging off when your site is ready to go public. Debug info can be valuable to hackers.

4. Redirect Users After They Login

When a user logs in, they normally get sent straight to their dashboard. This may not be the experience you want your users to have. The following code uses the login_redirect filter to redirect non-administrators to the home page:
add_filter("login_redirect", "subscriber_login_redirect", 10, 3);

function subscriber_login_redirect($redirect_to, $request, $user){ 

 if(is_array($user->roles)){

   if(in_array('administrator', $user->roles)) return home_url('/wp-admin/');

 }

 return home_url();

}
Based on the user’s role, you could send them to any page you like.

5. Show A Default Post Thumbnail Image

Since v2.9, WordPress has provided a post thumbnail image option, just like the images you see here on wp.tutsplus. On the admin post page it’s called ‘Featured Image’. But if you don’t have an image for your post, you can simply call a default image.
Within the loop:
if(has_post_thumbnail()){

 the_post_thumbnail();

}else{

 echo '<img src="' .  get_bloginfo('template_directory') . '/images/default_post_thumb.jpg" />';

}
You could even have a bunch of default images and pick one at random

6. Show “Time Ago” Post Time For Posts And Comments

Instead of: Posted on October, 12, 2011, we can have: Posted 2 days ago.
As used in the loop:
echo human_time_diff(get_the_time('U'), current_time('timestamp')) . ' ago';
  • human_time_diff() converts a timestamp value to a friendly form
  • get_the_time() gets the time the post was made, with ‘U’ parameter gets value as a Unix timestamp
  • current_time() gets the current time, with ‘timestamp’ parameter gets value as a Unix timestamp
Use it on comments as well:
echo human_time_diff(get_comment_time('U'), current_time('timestamp')) . ' ago';
Or maybe show the regular date/time of the post only if more than a week ago, else show the time ago:
$time_diff = current_time('timestamp') - get_the_time('U');

if($time_diff < 604800){//seconds in a week = 604800

 echo 'Posted ' . human_time_diff(get_the_time('U'), current_time('timestamp')) . ' ago';

}else{

 echo 'Posted on ' . get_the_date() . ', ' . get_the_time();

};

7. Style Post Author Comments Differently

It’s nice for users to be able to see when the author of a post makes a comment on the post, just like we do here on wp.tutsplus. All we have to do is add a class to the comment wrapper and then style it in the theme.
In order to find which comments are made by the post author, we use this code to output a class name:
if($comment->user_id == get_the_author_meta('ID')){

 echo '<div class="comment_wrapper author_comment">';

}else{

 echo '<div class="comment_wrapper">';

}
We compare the user ID of the comment with the post author ID from get_the_author_meta. If they match, we echo a class of author_comment which we can then style with css.

8. Show User, Post And Comment Info For Your WordPress Site

You can query your WordPress database directly to show handy site info. Put this function in your functions.php and call it anywhere in your template files with get_site_data()
function get_site_data(){

 global $wpdb;

 $users = $wpdb->get_var("SELECT COUNT(ID) FROM $wpdb->users");

 $posts = $wpdb->get_var("SELECT COUNT(ID) FROM $wpdb->posts WHERE post_status = 'publish'");

 $comments = $wpdb->get_var("SELECT COUNT(comment_ID) FROM $wpdb->comments");

 echo '<p>' . $users . ' members have made ' . $comments . ' comments in ' . $posts . ' posts</p>';

}
This is better than calling some of the native WordPress functions as it counts all post types and only currently published posts.

9. Add A JavaScript File Correctly

WordPress gives us the wp_enqueue_script function so we can add scripts safely.
Say we have a scripts dir under our template dir, and in there we have a script called do_stuff.js. So we have url_to_template_dir/scripts/do_stuff.js
Let’s include our script the right way. This must be included before the wp_head call in your header file:
$script_url = get_template_directory_uri() . '/scripts/do_stuff.js';

wp_enqueue_script('do_stuff', $script_url);
Here we concatenate our script path and name onto the output of the WordPress get_template_directory_uri function. We then enqueue the script by providing a handle (for possible later reference) and the url to our script. WordPress will now include our script in each page.
The real advantage to all of this is that, say our do_stuff script was a jQuery script, then we would also need to have jQuery loaded.
Now, jQuery is included by default in WordPress, and has been pre-registered with the handle jquery. So all we need do is enqueue our jQuery, then enqueue our do_stuff.js, like this:
wp_enqueue_script('jquery');

$script_url = get_template_directory_uri() . '/scripts/do_stuff.js';

wp_enqueue_script('do_stuff', $script_url, array('jquery'));
Note the third parameter to wp_enqueue_script for do_stuff: that tells WordPress that our do_stuff script is dependent on the file with the handle jquery. This is important because it means that jquery will be loaded before do_stuff. In fact, you could have the enqueue statements in reverse order and it wouldn’t matter since defining a script’s dependencies allows WordPress to put the scripts in correct loading order so that they all work happily together."
read more

20+ Tumblr Style WordPress Themes for Efortless Microblogging

"Tumblr style WordPress themes are a great way to deliver short messages and various types of media with minimal effort. They are a huge time saver, making it much easier to do photo-based posts, smoothly embed audio and video. Tumblr style WordPress themes are for those, who are looking to create a fun and lively blog without spending too much time.


Casual (Free)

In one package you can get all the benefits of Tumblr wrapped in the extensiveness of WordPress and Obox functionality. Tumblog functionality allows you to publish images, videos, audio, text, links and quotes just as you do on Tumblr. When a visitor submits a comment to your blog there are no page reloads. That means they can watch a video and comment at the same time.

Casual Tumblr Style WordPress Theme
Express is an iPhone app built to quickly and effortlessly publish images/links/notes and short posts, on the go, to your Obox powered WordPress website. Tweet, Like or share a custom URL with our neat social sharing options for each post that you publish.

Cinch

Cinch is a feature-rich Tumblog theme built for WordPress. Incorporating advanced QuickPress functionality and nice jQuery awesomeness, Cinch is a first choice for microblogging. Posting a variety of multimedia elements is super-easy.

Cinch Tumblr Style WordPress Theme
The theme includes some jQuery wizardry all round and it makes scrolling & navigating so much fun. The theme has 2 widgetized areas in sidebar and also some extra Woo custom widgets (Flickr, Twitter, Adspace, Search). 11 delicious color schemes to choose from, and possible to change color of links and buttons in options panel.

Fast Blog

Fast blog was released last year, but it still remains very popular Tumblr style WordPress theme with tons of positive responses from its users. It’s perfect for quick and easy microblogging thanks to WooTumblog plugin. You can add posts quickly even from a mobile phone.

Fast Blog Tumblr Style Theme
Fast Blog features smooth Twitter and Flickr implementation with very important buffering system to avoid exceeding the requests limit and to speed up page loading. Custom widgets, social media icons, useful shortcodes, working AJAX contact form are all included out of the box.

Elefolio

Elefolio is here to combine Tumblog publishing and portolio feature into single, easy to use theme. Custom post type is used for portfolio and you can also stream images from your Dribbble account. Elefolio will impress any visitor with its simple yet detailed look.

Elefolio Tumblr Style WordPress Theme for Efortless Microblogging
The homepage displays a welcome message to greet your visitors and social media icons are next to it. You can customize the typography, add custom Woo widgets or choose one of the 9 alternative color styles. This theme support the Express App for iPhone, which lets you post images, notes, links and quotes while on the go!

DailyNotes

DailyNotes aka Notes of Life is a very unique WordPress theme that shines out with its magical simplicity. It’s the most elegant medium to share the moments of your daily life, the easy way. Minimal in design, trimmed down to the bare essentials, DailyNotes is for those, who are looking to create a fun and lively personal blog with a little effort.

DailyNotes WordPress Tumblr Theme
The theme is compatible with all the major browsers (Firefox, Opera, Chrome, IE6+ IE7+IE8, Netscape, Safari). It comes in four different color variations. If the default style isn’t to your liking, then try out the Stone, Wooden and Canvas variations. PSD files are included. Custom tumblr-style post types make it easy to share photos, videos, notes, quotes links and audio files at the click of a button.

Minblr

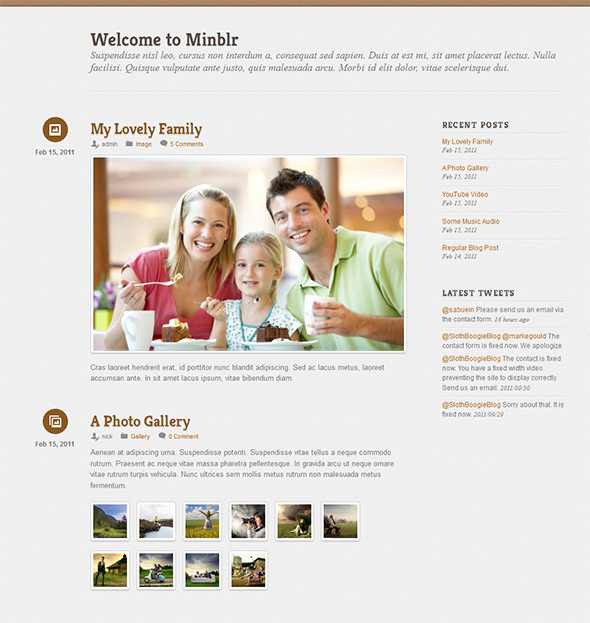
Minblr theme from Themify is another Tumblr style WordPress theme with a liquid and responsive layout that works well on desktop and mobile devices. It means that the layout flows nicely across any display resolution and is supported by all the major browsers.

Minblr WordPress Theme
Minblr theme has 3 different layout styles and 10 colorful skins. It utilizes WordPress 3.1 post formats, but there is also a fallback to the older versions. Custom homepage welcome message is perfect for intros, memorable quotes, personal thoughts.

Auld

Auld’s simplicity is perfect for lazy bloggers who need colorful and vibrant site for super quick publishing without too much effort in polishing their posts. Auld was created by James McDonald and it is being sold at WooThemes marketplace.

Auld WordPress Theme for Microblogging
Auld uses jQuery Masonry plugin to align the post blocks nicely below each other in a two column fashion. The theme has support for Google Fonts and there is a possibility to customize the typography to suit your taste. This theme supports the Express App for iPhone, which lets you post images, notes, links and quotes while on the go!

Abbreviate

Abbreviate theme uses the Wootumblog plugin that empowers your WordPress theme to act like a Tumblr site. 3 unique color schemes with every detail covered. Using TimThumb you never have to worry about resizing your pictures, it is all done automatically.

Abbreviate WordPress Theme for Microblogging
Abbreviate theme is pre-packed with OCMX Live that is an advanced WordPress framework turning your WordPress installation into even more powerful content management system. OCMX has been designed around the WordPress, meaning almost instant familiarity.

Roughprint

The best thing about WordPress post formats is that you are able to classify your posts into categories and that make the best bits of your content very easy to discover. Take advantage of the new WordPress post formats with this very unique tumblog-style child theme for Thesis or Genesis Framework.

Roughprint Tumblog WordPress Theme
This theme utilizes post formats feature in a Tumblog style way with custom presentations of the different formats. All of these formats work right “out of the box” with no need to touch any code. It’s even easy to edit the icons with the included PSD and separate icons folder. This theme utilizes custom fonts (via CSS) to really make the theme stand out.

Grido

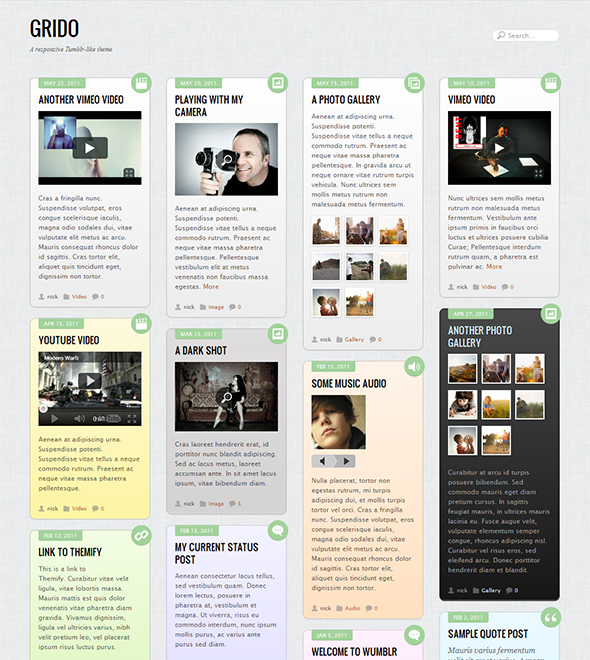
Grido is a trendy and responsive Tumblr-like theme that comes with 9 different gradient backgrounds to style the posts. When a browser window is resized the posts are re-stacked in a smooth animation. There is also a list view next to the grid view layout, optional RSS, search form and social network icons.

Grido Microblogging Theme
You can choose a color scheme to reflect the mood of the post or select a different color for each post to make your it look like a wall of sticky notes. There are up to 4 footer columns to include useful widgets.

Tumble Ten (Free)

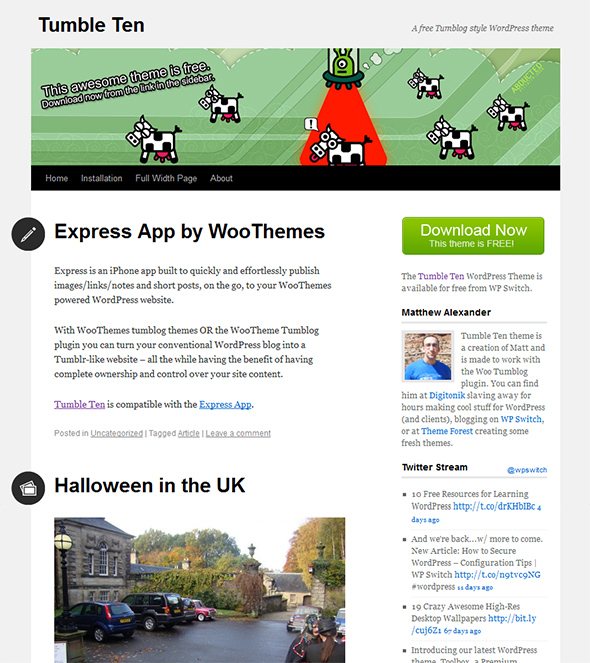
Tumble Ten is a modified version of the same default Twenty Ten theme with a more Tumblresque style. In order to use Tumble Ten, you must have the Woo Tumblog plugin installed for the Tumblog functions to work.

Tumble Ten Tumblt Style WordPress Theme
The Woo Tumblog plugin allows you to do Tumblr style posting next to the normal blogging. It becomes very easy to add links, quotes, pictures and videos directly from WordPress dashboard. Tumble Ten theme also comes with 3 custom widgets for flickr photos, twitter feed and author’s bio.

Slanted

Slanted is an extremely unique Tumblog WordPress theme with a literally slanted design. This theme has an extensive multimedia support, which makes posting images, video, audio, quotes, notes, links and other multimedia elements super-easy to do.

Slanted Simple Tumblr Style WordPress Theme
Slanted theme supports the Express App for iPhone, so you can post while on the go. It includes jQuery navigation and hotkeys that makes scrolling and navigating so much fun. Also, you can choose from 10 different color schemes.

Salju (Free)

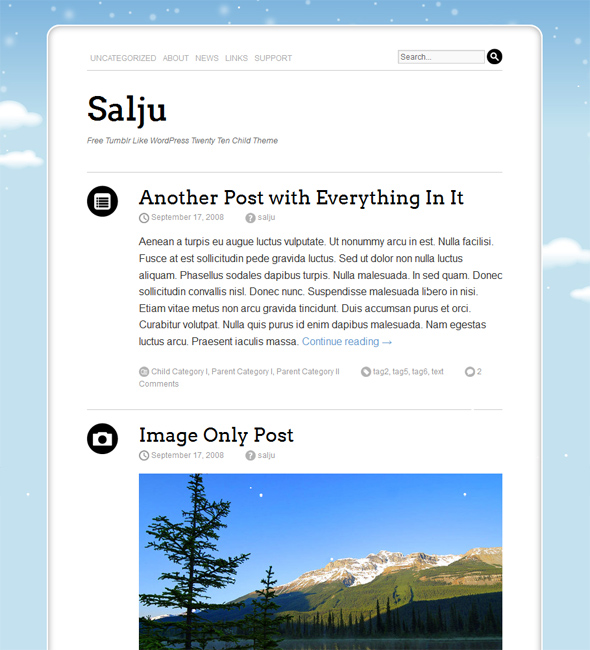
Salju is a vivacious WordPress theme that features falling snowflakes and a snowman. It is very niche specific and could only be used for a Winter season. There are 7 different post types available and a space for 3 different widgets in the footer.

Salju Theme for Microblogging
Salju uses TwentyTen theme as a Framework, so it is only a child theme. It was built for WordPress 3.0 and above, therefore it does support custom drop-down menus and custom post types.

Nimble

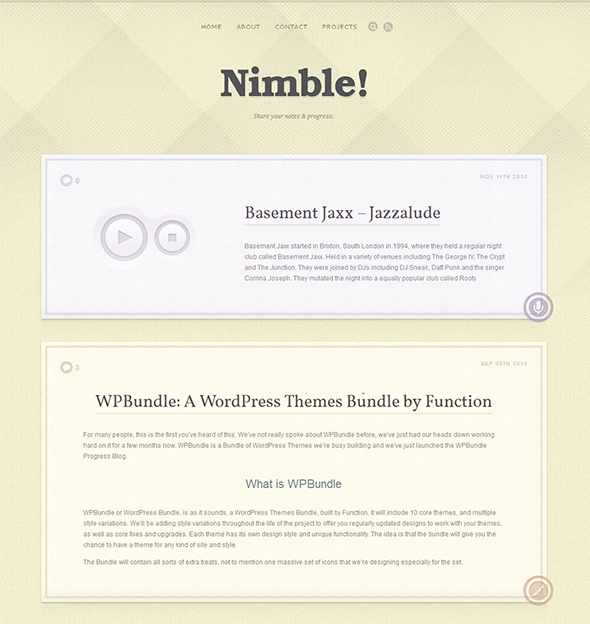
If you need something to share various media types and do it in an easy and professional way, Nimble is ideal. It has a custom made audio player and support for video embedding, so your media will surely attract the attention of blog readers.

Nimble Tumblog Style WordPress Theme for microblogging
With WordPress’s built-in post formats, different types of post are distinguished and that makes it easy to focus on a gallery, video, single image, link, etc. Have a quick few Images you want to share? You can add multiple images to a post and they’ll be displayed in a beautiful grid.

My Journey

My Journey works just like Tumblr, only better. Not only that it is perfect for a personal blog or portfolio, but you can even have fun on the run by posting videos, photos, links and more by using Express App, an iPhone app made by WooThemes that can be bought for $4.99 from the apple app store.

My Journey WordPress Theme for Microblogging
MyJourney WordPress theme comes with 1 click auto-install feature that installs demo content into the theme helping you understand how your new theme works. Built-in SEO options, cross browser optimization, thumbnail auto-sizing and other essential features are included.

LightBright

LightBright is one of the Tumblr style WordPress themes that makes it easy to share the moment of your daily life. Using different post types, you are able to add photos, videos, audio files, quotes or links and make your blog lively in a matter of seconds. LightBright comes with four different color variations. If Turquoise isn’t your style, then try switching to the Purple, Green or Black color schemes.

LightBright WordPress Tumblr Theme for Microblogging
This theme utilizes Timthumb to automatically resize your thumbnail images. If you love the format of Tumblr, but you don’t want to give up the versatility of WordPress, this theme is for you. As long as you are a member of ElegantThemes, you can be sure that your theme will always be compatible with the latest version of WordPress.

Retreat

Based on a theme that has become very successful as tumblog theme. Retreat theme is fully packed with easy to use quick publishing tools. It also comes with AJAX-based Twitter widget that updates often, and can track keywords, mentioned there. This theme support the Express App for iPhone.

Retreat WordPress Theme for Effortless Microblogging
Posting a variety of multimedia elements (images, video, audio, quotes, notes & links) is an easy task to do with Retreat. Post to your tumblog from your dashboard, using the amazing new AJAX-powered & WooThemes-exclusive QuickPress functionality that is bundled with this theme. 7 delicious color schemes to choose from and a possibility to change more colors from the options panel.

Wumblr

Fluid and responsive layout that works well on desktop and mobile devices such as iPhone, Android, Blackberry, etc. 9 different post formats including 15 color presets that help customize the look of each post. Clean and SEO friendly markups for better search engine rankings.

Wumblr Tumblr Style WordPress Theme for microblogging
Take full control of your theme with an easy to use theme options panel. Layered Photoshop file is included when you purchase a Developer Package. There are some custom widget including a header widget for social media profiles.

Tumble

The Tumble Theme is another Tumblr style microblogging theme for WordPress. It takes advantage of WordPress post formats, providing a variety of post styles such as video posts, status updates, quotes, galleries and more.

Tumble WordPress Theme for Microblogging
Organic Themes are coded with the developer in mind, providing W3C valid code and clean formatting for easy theme customization. The design is clean, minimal and easily customized. Tumble theme comes with Option Framework, that allows you to customize your theme easily. Gravity Forms are included for quick and easy form building.

Garuda Di Dadaku (Free)

Garuda Di Dadaku is a free Tumblog style WordPress themes brought to you by WPCharity. Actually it is built on the same TwentyTen theme, so it is another child theme. WPCharity tend to use only free graphic resources to build their themes, so you are 100% sure that all the graphic elements within this theme are legally used.

Salju Theme for Microblogging
It was built for WordPress 3.0 and above, therefore it does support custom drop-down menus and custom post types. There are 7 different post types to choose from including rich media formats. Garuda Di Dadaku headings are enhanced with beautiful custom typography.

Blog Writer

Blog Writer is a great option for bloggers who prefer Tumblr style blogging with some extra content to it. It is also perfect for people, who want Tumblr style blogging and professional look for their personal site. Writer comes with 4 different flavors for you to choose from: Fabric, Leather, Wood and Grass.

Blog Writer Tumblr Style WordPress Theme
With ThemeFuse themes there are no more fiddling with server settings and ordinary WordPress installation procedures, because their themes have one click auto install feature that lets you enjoy your coffee while framework auto-installs the theme.

BonPress (Free)

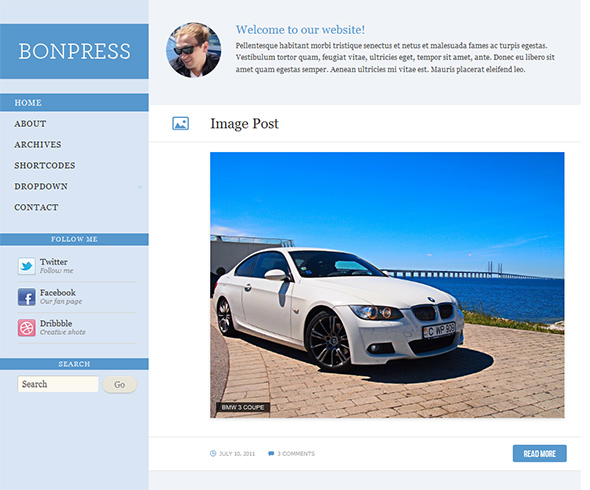
BonPress is another Tumblog style theme that could be perfect for your personal blog. Packed with various post formats, multiple custom widgets for Twitter and Flickr integration. Theme has 4 color styles: blue, black, pink, orange.

BonPress Tumblr Style Theme
The layout of this theme automatically adapts to fit on any screen resolution on desktop and mobile devices. With an advanced WPZOOM options panel, you can easily customize every major detail of your theme.
Tired of common repetitive templates? Want something different, unusual and unique? This carefully selected list of “Creative WordPress Themes” is dedicated to you."
read more

WordPress Cheat Sheets: The Loop Visual Model

"This entry is part 2 of 2 in the series WordPress Cheat Sheets
With the popularity of our old WordPress cheat sheet, we’ve decided to fire up a new batch of these quick pocket guides that you guys n’ gals can download, save to your phones for a fast reference, or even print out and keep next to your desk while you’re working on customizing WordPress to do your bidding. Today’s cheat sheet: The Loop Visual Model!

The Loop is easily one of the most powerful and crucial pieces of WordPress to understand, and while there’s a lot already written about it, it’s also just nice to have a quick reference for the loop in the event that you need a fast refresher.
This is a quick visual model that can be a great helper when trying to wrap your brain around the loop for the first time (or the thirtieth!). It doesn’t include everything that you can possibly do with it (ie: comments.php isn’t even shown), but it’s a simple model that should pair nicely with coded examples.

Don’t Miss…

Don’t miss out on Our Beginners Guide to The_Loop(), or our Advanced Guide to WordPress Queries, which plays right into the content of this cheat sheet.
Oh, and we’ll be doing our best to keep these sheets updated as WordPress grows into new versions, but if you spot an error (or just want to send some love), let us know in the comments!"
read more

How to Sync A Local & Remote WordPress Blog Using Version Control

"Ever wondered how you might use Version Control with WordPress? If you prefer to work on your WordPress projects locally but have to get them to sync remotely, this tutorial is for you. You have probably tried to synchronize between the two setups by manually uploading the changed files and using PHPmyAdmin to export and import your database once changed, and (very likely) broke something in the process. In this tutorial, we are going to automate the syncing process; so you can concentrate on what you are supposed to do instead of wrestling with never-ending migrations.


The Problem

We usually start WordPress development on our local machines. It’s always faster and easier especially when you have a slow internet connection. But there are times when you need to work remotely. You might want to make a small change, fix some padding or simply publish a new post. The modifications are not saved to your WordPress local machine install and that’s when the mess begins.
The mess starts because you may need to release a new version, and since you work locally, changes that you made remotely need to be brought off-line. It’s a real pain. You need to figure out what files you changed and download/FTP them. Sometimes the changes happen in the Database, so you need a special tool like phpmyAdmin to bring the changes.
In the process, you may break something or forget a modification. That’s when everything becomes messy. In this case, you need two things: version control and synchronization. In this tutorial, I’m going to describe the solution that I’m following to organize my development and sync between my local machine and my remote server.

Step 1 Setting Up The Foundation

Explaining The Plan

First, let me explain what we are going to do. Our aim is to sync easily between the remote and local version. You’ll work in which version you please and then makes them identical. To do that, we need first to account for differences between the remote and the local setup.
WordPress stores information about your blog in both static files and your database. Some of this information is relative to your current hosting. That’s why when you upload your whole WordPress directory and replace the remote version, it will not work.
The information is unluckily split into two parts:
  • Static files: WordPress puts your database server information in the wp-config.php file.
  • Database: WordPress puts the site and home page URL in the wp-options table.
For the wp-config.php, we will implement a process that detects if we are in the local or remote server. That way, the same file will work in both environments. For the database, we’ll integrate it with the version control system and update it to match the local or remote host settings.

Integrating Version Control

I use Mercurial for version control. Git is more popular in the web development arena, but in our case they are almost similar: You just need a version control tool.
Pick Mercurial if you are on a Windows machine. It has Tortoise, a user-friendly interface, to manage your repositories. The version control tool must be installed in both your local and remote machines. That being said, you’ll need a dedicated server or a VPS to be able to install the third-party application.
To initialize a repository in Mercurial, type the following in your console
cd /mydev_directory
hg init
hg add
hg commit
In the first line, we change our working directory to the folder that we want to enable version control in. This will be your WordPress directory (where you’ll install WordPress). The next line initializes the repository. The third line tells mercurial to version control all the files in the directory. This will include sub-folders too. The last line creates a new changeset in the directory; your text editor will open, and you’ll be prompted to write a description of this commit.
This tutorial doesn’t cover how to use Mercurial. If you don’t know version control, then you should learn it. That’s an important tool to add to your skills set. Here are a few tutorials that I suggest:
  • Hginit: Definitively the best tutorial on Mercurial, yet.
  • Mercurial on Ubuntu: This tutorial shows how to setup Mercurial on Ubuntu. Useful if you run Ubuntu on your VPS or dedicated server.

Step 2 Setting Up Your Local WordPress Blog

We will make a fresh install of WordPress in our local machine. Download the latest WordPress version, extract it inside an empty directory of your choice in your web server, and install it from your browser or by changing the wp-config.php file.
Now we are going to activate version control in our WordPress directory
cd /testpress
Hg init
Hg add
Hg commit
These commands initialize the repository and create the first changeset. Now, we can simply clone this repository in our server, install WordPress, and be able to sync back and forth between the local and remote distribution.
However, there are differences as we said earlier. Before implementing the syncing process, we need to implement a script that checks where the WordPress installation is running and loads the right settings. The settings that need to be changed are the database information. They are located in the wp-config.php file and WordPress loads them from this file. My local version looks like this
// ** MySQL settings - You can get this info from your web host ** //
/** The name of the database for WordPress */
define('DB_NAME', 'test');

/** MySQL database username */
define('DB_USER', 'root');

/** MySQL database password */
define('DB_PASSWORD', 'xxxxx');

/** MySQL hostname */
define('DB_HOST', 'localhost');

/** Database Charset to use in creating database tables. */
define('DB_CHARSET', 'utf8');

/** The Database Collate type. Don't change this if in doubt. */
define('DB_COLLATE', '');
Note that I only copied the part that matters. In my remote server, this part should differ slightly
// ** MySQL settings - You can get this info from your web host ** //
/** The name of the database for WordPress */
define('DB_NAME', 'user_blog');

/** MySQL database username */
define('DB_USER', 'root');

/** MySQL database password */
define('DB_PASSWORD', 'xyxyx');

/** MySQL hostname */
define('DB_HOST', 'localhost');

/** Database Charset to use in creating database tables. */
define('DB_CHARSET', 'utf8');

/** The Database Collate type. Don't change this if in doubt. */
define('DB_COLLATE', '');
The trick is to write some code that detects where WordPress is located. The variable to use is the PHP variable _SERVER["HTTP_HOST"]. The code evaluates the variable and assigns the database settings.
/*
* Unified variables
*/
$user_name = 'root';
$hostname = 'localhost';
$charset = 'UTF-8';
$collate = '';
/*
* Check for the current environment
*/
if ($_SERVER["HTTP_HOST"] === 'onlineqrlab.com') {
 $db_name = 'user_wordpress';
 $password = 'xyxyxy';
} else if ($_SERVER["HTTP_HOST"] === 'localhost') {
 $db_name = 'test';
 $password = 'xxxxxx';
}

// ** MySQL settings - You can get this info from your web host ** //
/** The name of the database for WordPress */
define('DB_NAME', $db_name);

/** MySQL database username */
define('DB_USER', $user_name);

/** MySQL database password */
define('DB_PASSWORD', $password);

/** MySQL hostname */
define('DB_HOST', $hostname);

/** Database Charset to use in creating database tables. */
define('DB_CHARSET', $chartset);

/** The Database Collate type. Don't change this if in doubt. */
define('DB_COLLATE', $collate);
In the example above, I only have two parameters that changed: Database name and password. You may have more than that. For example, if you are hosting mySql in an external server, you’ll need to change the host name for your remote server setup. You’d better also limit the access of the WordPress blog to user level with limited capabilities instead of administrator level.
Check that your WordPress local version works. If it did, then you are half done!

Step 3 Syncing The Mercurial Repositories

Setting The Remote Server Repository

You can start now working on your local WordPress installation. Each time you do a major modification make a commit with Mercurial to track the changes. In the remote server, assuming that you have Apache installed, create a new folder where you’ll upload your WordPress repository.
cd /apache
mkdir mywp_repo
cd mywp_repo

Note that these commands should be executed on your remote server. You’ll require SSH access and a command line too. I’m using Putty on Windows to connect to my server. Once our repository is initialized, we can push (upload) and pull (download) changesets from other repositories to keep it up to date. For this process to happen, you’ll need either your local or remote server to publish the repository so you can pull/push from it.
Mercurial web server is missing some important features like access control, authentication and SSL. So it’s unsecure to use it on your remote server. Preferably, you’ll need to run the Mercurial web server locally and pull the changes from the local server to the remote server. To run the Mercurial server, type the following in your local machine:
hg serve
Now you should be able to access your repository from your browser. Type the URL that gets displayed on your command line. Usually, it’s localhost:8000. The repository is also available online. You can access it from any computer connected to the internet using youripaddress:8000.
Hg pull  192.xxx.xxx.xxx:8000
Hg update
But I don’t recommend this method because it’s not secure. There is an easy and secure way to do that. It’s a middle repository hosted by a third-party service. I’m using BitBucket. It has a good and reliable service and also offers bugs tracking and a wiki.
Register and create an account in BitBucket. They offer unlimited private and public repositories with up to 5 users for free. Create a new repository in BitBucket and you should be taken to this page.

BitBucket has HTTPS and SSH support. If your repository is private, as in my case, you’ll need to authenticate with your username and password to be able to push and pull from the repository. After creating your new repository in BitBucket, execute the following commands in your local machine
hg push https://username@bitbucket.org/username/repository
You’ll be asked to provide your password and the repository will get uploaded to BitBucket. After uploading to BitBucket, clone the repository to your remote server.
hg clone https://username@bitbucket.org/username/repository
hg update
Cloning download the files to a new directory (with the name being the same as your repository directory); you can rename this directory. This will make the first step in this section (where we created the WordPress setup directory) rather obsolete.
Think of BitBucket as a middle-man between your computer and your remote host. It’s possible to have your own secure Mercurial server in your remote server, but this is beyond the scope of this tutorial. The advantage is being independant from the middle-man. This allows pushing changes directly to your web server.
So how is this better than FTP?
  1. You don’t have to figure out which files have changed.
  2. It’s more convenient and takes less time.
  3. A lot faster since Mercurial pushes only the files that changed.

Installing The Remote Server Blog

Already tired? Don’t worry, we are almost there. After pulling the repository either from your local machine or BitBucket, you’ll need to run the WordPress install again; this time on the remote server site. Make sure the settings you put in the wp-config.php file we made earlier are correct, and load your WordPress remote site.
You’ll be asked to install your WordPress blog again, that’s because your database is empty. After the install, your WordPress blog is ready. You can make changes in the remote or local version and sync them with Mercurial.
But there still an important issue: The database doesn’t sync with the files. This is important because things like blog posts, comments, plug-in custom tables… will not be the same in the local and remote version. WordPress has an import/export feature. But it’s not useful, since it doesn’t do a real synchronization. What you need is to go to your phpmyadmin, export all your WordPress tables in one side (remote or local) and then go to the other side phpmyadmin and replace the tables.
After doing this, your WordPress databases will become the same. You’ll need to change, however, the site_url row in the wp_options table. This process gets painful as the database gets heavier.

Step 4 Synchronizing The Databases

As we saw earlier, the database is a little bit problematic. It doesn’t get synchronized with the files, is harder to reach, and requires updating two fields each time you synchronize. It’s not fun doing it over and over again. Automation is the solution; actually, that’s our job.
What we need is a script that synchronizes the local and remote databases without breaking anything. The idea that came to my mind is to include the database in the revision control. The database content will be exported to a file that is tracked by the revision control. Each time we pull changes, the database content will be replaced by this file, making our database up-to-date.
Since there are a couple of rows that differ from a host to another (the site url and home page url), we need another mysql script that updates these ones with the right values. Another important thing is conflicts. If you are working and making changes (commits) to both the remote and local version, this will create a conflict. A typical scenario is when you are working and committing to your local version, and someone (online) is adding new content to your blog. I can’t help in this situation, you need to learn about Mercurial (or your revision control system) merging and team work.
To avoid conflicts, make sure that you pull the repository from BitBucket before making changes; and also to commit and push the changes to BitBucket after making them. This will ensure that BitBucket always has the latest version, and you are also working on the latest version.
This step is a little bit sensitive, so make sure you are following the steps carefully. First, I’m going to explain how the end solution works. You are going to have two scripts: push and pull. Depending on your operating system, it’s going to be push.sh and pull.sh (Linux) or push.bat or pull.bat (Windows). I’m using Windows locally, and Linux (Ubuntu) remotly, so this tutorial will cover both operating systems.
The first script will push the changes to the Bitbucket server. When you make some database changes, use the push script to upload the changes to your BitBucket repository. Push will dump the current database to a file (/db/db_sync.sql) that is tracked by the version control system. The file will be pushed along with the other files and uploaded to BitBucket.
The second script will pull the changes from the Bitbucket server. The pull script will also read the (/db/db_sync.sql) file and replace the database. This will update the database with the version you pushed with. Since they have different hostnames, the pull script will modify the necessary fields, namely the site url and home page url.

Pushing to BitBucket

In the remote and local server, create a new directory called “db”. The exported database file will be saved there. In your local server (I’m assuming you are using Windows) create a new file called push.bat. It doesn’t really matter where you put the file (just make sure you are using the right paths). I put the file in the root directory of my WordPress repository.
mysqldump -u username -ppassword database_name > db/db_sync.sql
hg add db/db_sync.sql
hg commit
hg push https://username@bitbucket.org/username/repository
You can remove the “hg add db/db_sync.sql” command after executing the script for the first time. This is only required once.
In the server side (Linux/Ubuntu), things aren’t really much different. The file extension changes from .bat to .sh, and possibly your mySql server username, password and database name. The file content is exactly the same.

Pulling from BitBucket

Pulling is a little bit harder. It requires importing the SQL file, and also changing some critical fields that differs from an environment to another.
In your local machine, create a file called pull.bat
hg pull https://username@bitbucket.org/username/repository
hg update
cd db
mysql -u username -ppassword testpress < db_sync.sql
mysql -u username -ppassword testpress < db.sql
In your db folder, add a file called "db.sql". This file has SQL statements that will do the required changes to match the host settings. You can add more statements if you need to.
USE testpress;
UPDATE wp_options SET option_value="http://localhost/testpress" WHERE option_name="siteurl";
UPDATE wp_options SET option_value="http://localhost/testpress" WHERE option_name="home";
Apart from the file extension, mySql settings and databas namee nothing really changes in the remote server. This is because we are executing programs commands. The commands and their usage is platform agnostic. Make sure that you enter the correct values for the website URL in the "db.sql" file. They should match your blog URL, if you are not sure you can alwyas check the values in the wp_options table.
To run the scripts, in Windows double click the “.bat” file and in your remote server terminal run the command “sh script_name.sh”.

The Process

You should now have 2 executable files in each environment (pull and push). You should also have a sql script (db.sql) which should not get added to version controlling. We can now test our small system.
  1. In your local machine, add a new blog post
  2. Push the changes from your local machine
  3. Pull the changes in the remote machine
  4. Check if the blog is running correctly and the blog post was added
"
read more

How To Create A Simple 404 Error Page For WordPress Themes

"A visitor can encounter a 404 error for a number of reasons. As a website owner, you should ensure that the user experience of your website doesn’t leave your visitor feeling lost or confused when this happens. Creating a custom 404 page is easy using the 404.php template in your WordPress theme, and it can go a long way to ensuring a visitor remains on your website, even after they encounter a 404 error.


What is a 404 page?

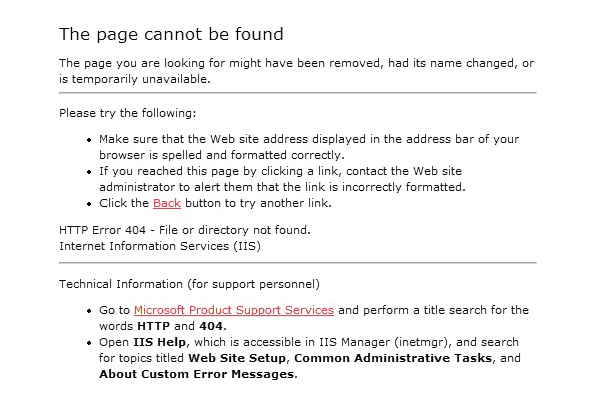
A classic default 404 page
Adding a custom 404 page to your WordPress theme is simple. All you need to do is have a file named ’404.php’ in your theme directory…
A 404 ‘Not Found’ error page is a page generated by the server to inform you that the content you were trying to access on the website cannot be found. Typically you will encounter a 404 error when something has been moved or deleted, or when you click a link/type a website address with a typo in it.
I encounter 404 pages all of the time, usually because I type a lot of web addresses rather than use bookmarks, and I have clumsy fingers. This will often lead me to requesting www.google.com/mial, instead of the GMail page I intended. Very frustrating! A few years ago 404 pages were nothing more than the standard server 404 page, but in recent times developers and designers have taken it upon themselves to create more user-friendly 404 pages, to let you know where you are, why you got there, and where you can go now.

How To Add A Custom 404 Page To Your Theme

Now let’s look at how to actually add a 404 page that’s customized to your theme. Adding a custom 404 page is simple; All you need to do is have a file named ’404.php’ in your theme directory. Of course, if your ’404.php’ file is empty, then the ’404 Not Found’ page that gets displayed to users will be blank.
A quick method of making a custom 404 page that ties in nicely with your theme is to copy the contents of the ‘page.php’ file in your theme to your new ’404.php’ file. Once you’ve done that, remove all of the code referring to The Loop and replace it with the following code:

Page Not Found

Sorry, but the page you requested has not been found

How To Make Your 404 Page Great

If a user has arrived at a 404 page on your website, what you really want to do is help them get to the content they intended to arrive at. If the server’s default 404 page is displayed, chances are the user is going to hit ‘Back’ and find the content they were looking for somewhere else.
To help the user find the content they were looking for, you should implement the following elements on your custom 404 page. These things may already be part of your theme, and therefore already exist on your 404 page (if you copied the code from your ‘page.php’ file, for example), in which case you should point them out to the user.
  1. Display an apologetic message explaining that the content the user requested has not been found. Mentioning the error code “404″ isn’t really necessary, but you can put it there if you like.
  2. Suggest that the user checks their address bar to ensure there are no typos in the web address.
  3. Display/point out a search box allowing the user to search your website for the content they were looking for.
  4. Suggest articles the user might have been looking for based on the page they requested/popular entries on your website.
  5. Give the user a list of “what you can do now” options, such as going to your home page or browsing your archives.
  6. Finally, allow the user to report the error to you by including an e-mail link/contact form/Tweet button so that you can fix the error where applicable.
In my imaginary theme, I would implement the above something like this:
<?php get_header(); ?>
   <div id="page">
       <h1>Page Not Found</h1>
       <p>We're very sorry, but the page you requested has not been found! It may have been moved or deleted.</p>
       <p>I'm not blaming you, but have you checked your address bar? There might be a typo in the URL.</p>
       <p>If there isn't, you could try searching my website for the content you were looking for:</p>
       <?php get_search_form(); ?>
       <p>Or maybe you were looking for one of my popular posts:</p>
       <ul>
           <li><a href="http://www.website.com/popular-post1">Popular Post 1</a></li>
           <li><a href="http://www.website.com/popular-post2">Popular Post 2</a></li>
           <li><a href="http://www.website.com/popular-post3">Popular Post 3</a></li>
           <li><a href="http://www.website.com/popular-post4">Popular Post 4</a></li>
       </ul>
       <p>Alternatively, you can go to <a href="http://www.website.com">my home page</a> or <a href="http://www.website.com/archives">browse my archives</a></p>
       <p>One last thing, if you're feeling so kind, please <a href="mailto:webmaster@website.com">tell me</a> about this error, so that I can fix it. Thanks!</p>
   </div>
   <?php get_sidebar(); get_footer(); ?>
Tutsplus 404 page

The Key Elements

If you can nail the “helpful” part of your 404 page, you’re welcome to add humor and design perks after the fact… Just don’t put the cart before the horse.
Now let’s break down the key elements that we used:
  • The very basics: We’re using the 404.php filename, so that WordPress knows to use this as the error page template.
  • Our page title (inside an H1 tag) clearly states that a page wasn’t found.
  • Offer a brief text explanation and offer some alternative solutions (check the URL).
  • Provide a search bar (using the default WP search form function)
  • Provide at the very least, a link to the archives. Advanced users might want to include a page, category or tag listing right here on this page as well.
  • Provide a contact for people to report errors.
Whilst it’s often very tempting to leave a humorous image & note on your 404 page, try to be as helpful as possible first, and funny later. Despite the fact there are entire websites dedicated to the hilarity of certain 404 pages, ensuring a visitor stays on and returns to your website is your first priority (unless you intend to be featured on one of those websites, in which case, go nuts!)

Other Considerations

When a user arrives at a 404 page, and it’s not because there is a typo in the URL (most users don’t type in URLs directly), so chances are good that you have either moved something or deleted something.

Redirect Old Content

When moving content, you should always redirect the old URL to the new URL, as this is a simple and effective way of ensuring that all visitors intending to reach that content are able to. Redirecting is a fairly simple task in WordPress when you use the popular plugin, Redirection. This plugin also allows you to monitor the 404 errors generated by your server, and what URL was requested when the 404 was generated. This allows you to redirect that URL to the correct location, thus improving your overall user experience.

Going an Extra Step

As we mentioned above, a truly great 404 page doesn’t even need to look like a 404 page… by including things like a full page, category and tag listing, you can not only help fill out the page design, you can provide immediate links for users to browse rather than expecting them to spend time trying to refine their search. Also consider providing a list of “popular” content… sometimes popular content can be better than relevant content if your goal is to keep 404 visitors on the site.

Don’t Delete the Posts; Delete the Content.

Finally, when deleting content, consider simply deleting the page/post content, rather than the entire post/page, and informing your visitors why you have removed the content. You could take that a step further and recommend alternative sources where a user could find similar content to the content you have removed. This helps prevent “link-rot” on your site while still removing the content that you want to disappear."
read more

25 Useful Free WordPress Plugins For Multi-Author Blogs

"There are successful bloggers who exclusively write all of the content on their blogs however the vast majority of the top blogs on the web have a number of writers producing content for them on a regular basis. When you manage a multi author blog you spend less of your time writing articles and more time reviewing articles, scheduling articles and managing authors.
Today we would like to show you 25 WordPress plugins that will help you run a multi-author site quicker and more efficiently. The list includes plugins that help you manage your staff and plugins that make the posting process better for you and for your authors. It’s important for authors to get credit for the work that they do therefore several author profile plugins that let you increase an authors presence on your articles have also been included in the list.
*As always, all plugins have been tested for the purpose of this article.

Managing Authors

The following plugins will help you manage and communicate with your staff more efficiently.

1. Adminimize

Adminimize is a powerful free plugin that lets you control who has power over every aspect of your website. You can deactivate every possible option you can think of and control what admin, editors, authors, contributors and subscribers can do. The plugin automatically recognises any new user groups you have created too.
In short, it gives you complete control over what every user on your site can and cannot do. It works well with a number of other popular plugins too and is updated fairly regularly.
Adminimize

2. User Role Editor

A large percentage of blog owners won’t need the extended functionality that Adminimize provides. WordPress does not allow contributors to upload images so it’s a useful way of adding this functionality easily (if not, it’s a pain for guest posters to add images to posts).
In short, User Role Editor allows you to control exactly what each user group can and cannot do.
User Role Editor

3. Members

Like User Role Editor, the Members WordPress plugin features a useful role manager that allows you to modify what certain user groups can and cannot do.
The plugin lets you control who can see content using shortcodes. By using this feature you can post secret messages to authors and staff or create private informational pages for them (everyone else will see a blank page).
Members

4. Dashboard Notepad

What sets Dashboard Notepad apart from other notepad plugins is the ability to configure who can read the notes and who can edit them. It’s a useful way of communicating with your staff and leaving notes for yourself for future articles.
Dashboard Notepad

5. Private Messages For WordPress

If you are looking for a more direct way of liaising with your staff, you may want to consider Private Messages For WordPress. The plugin allows user groups the ability of messaging each other. You can set the number of messages each user group is allowed in their inbox. By setting the number of messages for a given user group to -1 you can remove their ability to send messages. Therefore, to create a private messaging option for editors only, you just have to remove the option for authors, contributors and subscribers.
Private Messages For WordPress

6. Admin Message Board

Adds a private discussion area that all admins can view and add to. For some strange reason the plugin mimics Twitter and restricts messages to 140 characters or less.
Admin Msg Board

7. Pre Publish Reminder

A useful plugin that lets you add notes for authors on the sidebar or below the post area. For example, you could remind them of formatting rules or remind them to always add a featured image. Handy if you have staff members who keep forgetting important elements of your posting rules.
Pre Publish Reminder

8. Blog Metrics

Yoasts Blog Metrics makes it easy to monitor exactly what sort of contribution each author is making to your website. The plugins shows the average number of posts per month, average number of words per post, average number of comments and average number of words in the comments. It’s a useful way of gauging the value of each of your authors.
Blog Metrics

Managing Posts

The following plugins improve the procedure of posting in some way for you and/or your staff.

9. Co Authors Plus

A simple yet useful little plugin that lets you assign more than one author to a post or page. Handy for blog owners who publish a lot of collaborative posts.
Co-Authors Plus

10. WP CMS Post Control

Lets you remove certain controls of the post editor area from certain user groups. For example, for contributors you can remove the ability to set the post slug or featured image for any articles they submit.
WP-CMS Post Control

11. WP Document Revisions

A collaborative document and file system that multi-author blogs should find useful. Users can create and modify documents through the admin area and leave notes for others to advise them what they have updated in the article.
This could be particularly useful if you are working on an eBook or preparing fresh content for a new area of your site. Could also be used as a FAQ or Wiki system for staff.
WP Document Revisions

12. Audit Trail

Audit Trail allows you to track the actions of your all users (including admin). It shows you when a user last logged in, their IP address and the article they were working on. The ‘Trail’ allows you to see who has been working online via your site on a given day and see exactly what they did.
Audit Trail

13. Editorial Calendar

Editorial Calendar makes scheduling articles a breeze with its easy to use drag and drop interface. The plugin creates a new calendar page therefore you can still use the traditional posts index page when you want.
Editorial Calendar

14. Future Posts Calendar

Adds a simple calendar into the top of your post editor sidebar that shows dates of upcoming articles. You can also add the calendar to your WordPress admin dashboard.
Future Posts Calendar

15. Auto Schedule Posts

If the publication date of your articles isn’t that important for your website (e.g. a dating website may not be concerned about whether an article publishes today or three weeks from now), then you should find Auto Schedule Posts incredibly useful.
The plugin lets you set certain parameters about when you want your articles to publish every week. It will then schedule articles for any days that don’t already have a post scheduled.
Auto Schedule Posts

16. Insights

Adds a productive box underneath your post editor that allows you to search the web for blogs, images, videos, news, Wikipedia articles and more. Authors can then insert or link to the items they find. If your authors are writing articles for you every day they should find the plugin saves them a lot of time.
Insights

Author Profiles

Authors are a vital part of every blogs success, therefore it’s only fair that they get some credit for their work. Noupe, for example, clearly displays the authors name at the top of an article and includes a bio box at the bottom of every article too.
The following plugins will give your authors more exposure and let your readers get to know them better.

17. WP Biographia

Arguably the best looking author bio plugin available for WordPress, WP Biographia gives you complete control over what is shown in the bio area and adds Facebook, Twitter, LinkedIn and Google+ profile fields to every users profile. You can choose whether the box is shown on posts, pages, archives and/or the home page and you can customise the colour scheme and border too.
Without a doubt the plugins best feature is the ability to display author bios in the RSS feed. 99% of blogs don’t include a link to the authors posts or website through their RSS feed therefore the guest poster loses a lot of potential traffic from RSS readers. WP Biographia corrects this by displaying a beautiful looking bio at the end of every post in the RSS feed.
WP Biographia

18. Top Authors

A highly configurable top authors widget that lets you list your most frequent authors using their username, avatar or both. You can exclude admin and authors without posts if required.
Top Authors

19. Post Avatar

Let authors choose from a pre-defined list of images for their profile avatar. Images can be inserted automatically or manually into posts.
Post Avatar

20. User Photo

Allow a user to assign a photo to their profile for use in posts and comments. You can set the dimensions for the photo and the JPEG compression level via the admin area.
User Photo

21. Post Author

Adds an author information box above or below your content. Post revisions can be shown and an avatar can be added to the bio box too.
Post Author

22. Cool Author Box

A simple plugin that automatically adds a cool looking author bio box underneath your posts and pages.
Cool Author Box

23. Author Exposed

Once installed an author box will appear when someone clicks on the link of an author. The box shows the authors name, email address and website. It also links to their Gravatar image, and shows a short bio for the author with links to the author’s other posts.
Author Exposed

Advertising

Two WordPress plugins for those of you who want to share advertising revenue with your authors:

24. Author Advertising Plugin

Lets you set aside a percentage of advertising space to be shared amongst authors on your website. It supports any advertising program such as Google Adsense, Yahoo Publisher etc. Authors need to input their publisher ID in order to take part in the program (you can determine what user groups can take part in the program).
In order to install the plugin properly you will need to create the table manually via phpMyAdmin (the code is provided via the admin area).
Author Advertising

25. WordPress Multiple Author Ad management

Allows authors to have control over the advertisements that are displayed on their own posts. Custom banners, text links, PayPal donations and Google Adsense are all supported.
WordPress Multiple Author Ad management

Overview

If you don’t set things up correctly for your authors, you may find yourself in a position where you are spending more time managing authors and correcting their mistakes than you would if you wrote the articles yourself. By automating as many aspects of the moderating process and making things easier for your staff you can save both you and them a lot of time."
read more