


"Ever wondered how you might use Version Control with WordPress? If you prefer to work on your WordPress projects locally but have to get them to sync remotely, this tutorial is for you. You have probably tried to synchronize between the two setups by manually uploading the changed files and using PHPmyAdmin to export and import your database once changed, and (very likely) broke something in the process. In this tutorial, we are going to automate the syncing process; so you can concentrate on what you are supposed to do instead of wrestling with never-ending migrations.
The Problem
We usually start WordPress development on our local machines. It’s always faster and easier especially when you have a slow internet connection. But there are times when you need to work remotely. You might want to make a small change, fix some padding or simply publish a new post. The modifications are not saved to your WordPress local machine install and that’s when the mess begins.The mess starts because you may need to release a new version, and since you work locally, changes that you made remotely need to be brought off-line. It’s a real pain. You need to figure out what files you changed and download/FTP them. Sometimes the changes happen in the Database, so you need a special tool like phpmyAdmin to bring the changes.
In the process, you may break something or forget a modification. That’s when everything becomes messy. In this case, you need two things: version control and synchronization. In this tutorial, I’m going to describe the solution that I’m following to organize my development and sync between my local machine and my remote server.
Step 1 Setting Up The Foundation
Explaining The Plan
First, let me explain what we are going to do. Our aim is to sync easily between the remote and local version. You’ll work in which version you please and then makes them identical. To do that, we need first to account for differences between the remote and the local setup.WordPress stores information about your blog in both static files and your database. Some of this information is relative to your current hosting. That’s why when you upload your whole WordPress directory and replace the remote version, it will not work.
The information is unluckily split into two parts:
- Static files: WordPress puts your database server information in the wp-config.php file.
- Database: WordPress puts the site and home page URL in the wp-options table.
Integrating Version Control
I use Mercurial for version control. Git is more popular in the web development arena, but in our case they are almost similar: You just need a version control tool.Pick Mercurial if you are on a Windows machine. It has Tortoise, a user-friendly interface, to manage your repositories. The version control tool must be installed in both your local and remote machines. That being said, you’ll need a dedicated server or a VPS to be able to install the third-party application.
To initialize a repository in Mercurial, type the following in your console
cd /mydev_directory
hg init
hg add
hg commit
In the first line, we change our working directory to the folder that we want to enable version control in. This will be your WordPress directory (where you’ll install WordPress). The next line initializes the repository. The third line tells mercurial to version control all the files in the directory. This will include sub-folders too. The last line creates a new changeset in the directory; your text editor will open, and you’ll be prompted to write a description of this commit.
This tutorial doesn’t cover how to use Mercurial. If you don’t know version control, then you should learn it. That’s an important tool to add to your skills set. Here are a few tutorials that I suggest:
- Hginit: Definitively the best tutorial on Mercurial, yet.
- Mercurial on Ubuntu: This tutorial shows how to setup Mercurial on Ubuntu. Useful if you run Ubuntu on your VPS or dedicated server.
Step 2 Setting Up Your Local WordPress Blog
We will make a fresh install of WordPress in our local machine. Download the latest WordPress version, extract it inside an empty directory of your choice in your web server, and install it from your browser or by changing the wp-config.php file.Now we are going to activate version control in our WordPress directory
cd /testpress
Hg init
Hg add
Hg commit
These commands initialize the repository and create the first changeset. Now, we can simply clone this repository in our server, install WordPress, and be able to sync back and forth between the local and remote distribution.
However, there are differences as we said earlier. Before implementing the syncing process, we need to implement a script that checks where the WordPress installation is running and loads the right settings. The settings that need to be changed are the database information. They are located in the wp-config.php file and WordPress loads them from this file. My local version looks like this
// ** MySQL settings - You can get this info from your web host ** //
/** The name of the database for WordPress */
define('DB_NAME', 'test');

/** MySQL database username */
define('DB_USER', 'root');

/** MySQL database password */
define('DB_PASSWORD', 'xxxxx');

/** MySQL hostname */
define('DB_HOST', 'localhost');

/** Database Charset to use in creating database tables. */
define('DB_CHARSET', 'utf8');

/** The Database Collate type. Don't change this if in doubt. */
define('DB_COLLATE', '');
Note that I only copied the part that matters. In my remote server, this part should differ slightly// ** MySQL settings - You can get this info from your web host ** //
/** The name of the database for WordPress */
define('DB_NAME', 'user_blog');
/** MySQL database username */
define('DB_USER', 'root');
/** MySQL database password */
define('DB_PASSWORD', 'xyxyx');
/** MySQL hostname */
define('DB_HOST', 'localhost');
/** Database Charset to use in creating database tables. */
define('DB_CHARSET', 'utf8');
/** The Database Collate type. Don't change this if in doubt. */
define('DB_COLLATE', '');
The trick is to write some code that detects where WordPress is located. The variable to use is the PHP variable _SERVER["HTTP_HOST"]. The code evaluates the variable and assigns the database settings./*
* Unified variables
*/
$user_name = 'root';
$hostname = 'localhost';
$charset = 'UTF-8';
$collate = '';
/*
* Check for the current environment
*/
if ($_SERVER["HTTP_HOST"] === 'onlineqrlab.com') {
$db_name = 'user_wordpress';
$password = 'xyxyxy';
} else if ($_SERVER["HTTP_HOST"] === 'localhost') {
$db_name = 'test';
$password = 'xxxxxx';
}
// ** MySQL settings - You can get this info from your web host ** //
/** The name of the database for WordPress */
define('DB_NAME', $db_name);
/** MySQL database username */
define('DB_USER', $user_name);
/** MySQL database password */
define('DB_PASSWORD', $password);
/** MySQL hostname */
define('DB_HOST', $hostname);
/** Database Charset to use in creating database tables. */
define('DB_CHARSET', $chartset);
/** The Database Collate type. Don't change this if in doubt. */
define('DB_COLLATE', $collate);
In the example above, I only have two parameters that changed: Database name and password. You may have more than that. For example, if you are hosting mySql in an external server, you’ll need to change the host name for your remote server setup. You’d better also limit the access of the WordPress blog to user level with limited capabilities instead of administrator level.Check that your WordPress local version works. If it did, then you are half done!
Step 3 Syncing The Mercurial Repositories
Setting The Remote Server Repository
You can start now working on your local WordPress installation. Each time you do a major modification make a commit with Mercurial to track the changes. In the remote server, assuming that you have Apache installed, create a new folder where you’ll upload your WordPress repository.cd /apache mkdir mywp_repo cd mywp_repo
Note that these commands should be executed on your remote server. You’ll require SSH access and a command line too. I’m using Putty on Windows to connect to my server. Once our repository is initialized, we can push (upload) and pull (download) changesets from other repositories to keep it up to date. For this process to happen, you’ll need either your local or remote server to publish the repository so you can pull/push from it.
Mercurial web server is missing some important features like access control, authentication and SSL. So it’s unsecure to use it on your remote server. Preferably, you’ll need to run the Mercurial web server locally and pull the changes from the local server to the remote server. To run the Mercurial server, type the following in your local machine:
hg serveNow you should be able to access your repository from your browser. Type the URL that gets displayed on your command line. Usually, it’s localhost:8000. The repository is also available online. You can access it from any computer connected to the internet using youripaddress:8000.
Hg pull  192.xxx.xxx.xxx:8000
Hg update
But I don’t recommend this method because it’s not secure. There is an easy and secure way to do that. It’s a middle repository hosted by a third-party service. I’m using BitBucket. It has a good and reliable service and also offers bugs tracking and a wiki.
Register and create an account in BitBucket. They offer unlimited private and public repositories with up to 5 users for free. Create a new repository in BitBucket and you should be taken to this page.
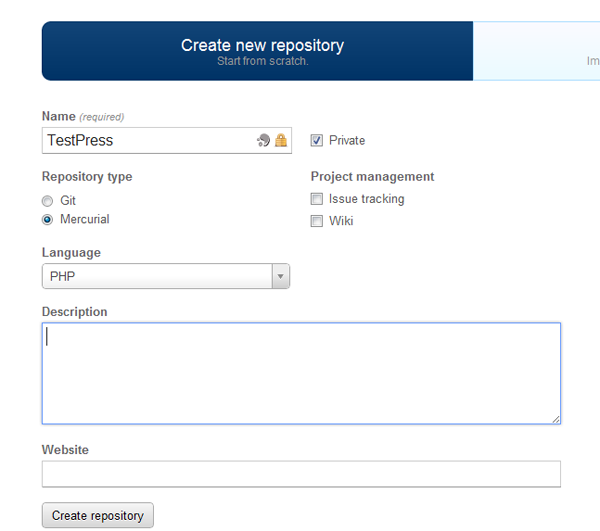
BitBucket has HTTPS and SSH support. If your repository is private, as in my case, you’ll need to authenticate with your username and password to be able to push and pull from the repository. After creating your new repository in BitBucket, execute the following commands in your local machine
hg push https://username@bitbucket.org/username/repositoryYou’ll be asked to provide your password and the repository will get uploaded to BitBucket. After uploading to BitBucket, clone the repository to your remote server.
hg clone https://username@bitbucket.org/username/repository
hg update
Cloning download the files to a new directory (with the name being the same as your repository directory); you can rename this directory. This will make the first step in this section (where we created the WordPress setup directory) rather obsolete.Think of BitBucket as a middle-man between your computer and your remote host. It’s possible to have your own secure Mercurial server in your remote server, but this is beyond the scope of this tutorial. The advantage is being independant from the middle-man. This allows pushing changes directly to your web server.
So how is this better than FTP?
- You don’t have to figure out which files have changed.
- It’s more convenient and takes less time.
- A lot faster since Mercurial pushes only the files that changed.
Installing The Remote Server Blog
Already tired? Don’t worry, we are almost there. After pulling the repository either from your local machine or BitBucket, you’ll need to run the WordPress install again; this time on the remote server site. Make sure the settings you put in the wp-config.php file we made earlier are correct, and load your WordPress remote site.You’ll be asked to install your WordPress blog again, that’s because your database is empty. After the install, your WordPress blog is ready. You can make changes in the remote or local version and sync them with Mercurial.
But there still an important issue: The database doesn’t sync with the files. This is important because things like blog posts, comments, plug-in custom tables… will not be the same in the local and remote version. WordPress has an import/export feature. But it’s not useful, since it doesn’t do a real synchronization. What you need is to go to your phpmyadmin, export all your WordPress tables in one side (remote or local) and then go to the other side phpmyadmin and replace the tables.
After doing this, your WordPress databases will become the same. You’ll need to change, however, the site_url row in the wp_options table. This process gets painful as the database gets heavier.
Step 4 Synchronizing The Databases
As we saw earlier, the database is a little bit problematic. It doesn’t get synchronized with the files, is harder to reach, and requires updating two fields each time you synchronize. It’s not fun doing it over and over again. Automation is the solution; actually, that’s our job.What we need is a script that synchronizes the local and remote databases without breaking anything. The idea that came to my mind is to include the database in the revision control. The database content will be exported to a file that is tracked by the revision control. Each time we pull changes, the database content will be replaced by this file, making our database up-to-date.
Since there are a couple of rows that differ from a host to another (the site url and home page url), we need another mysql script that updates these ones with the right values. Another important thing is conflicts. If you are working and making changes (commits) to both the remote and local version, this will create a conflict. A typical scenario is when you are working and committing to your local version, and someone (online) is adding new content to your blog. I can’t help in this situation, you need to learn about Mercurial (or your revision control system) merging and team work.
To avoid conflicts, make sure that you pull the repository from BitBucket before making changes; and also to commit and push the changes to BitBucket after making them. This will ensure that BitBucket always has the latest version, and you are also working on the latest version.This step is a little bit sensitive, so make sure you are following the steps carefully. First, I’m going to explain how the end solution works. You are going to have two scripts: push and pull. Depending on your operating system, it’s going to be push.sh and pull.sh (Linux) or push.bat or pull.bat (Windows). I’m using Windows locally, and Linux (Ubuntu) remotly, so this tutorial will cover both operating systems.
The first script will push the changes to the Bitbucket server. When you make some database changes, use the push script to upload the changes to your BitBucket repository. Push will dump the current database to a file (/db/db_sync.sql) that is tracked by the version control system. The file will be pushed along with the other files and uploaded to BitBucket.
The second script will pull the changes from the Bitbucket server. The pull script will also read the (/db/db_sync.sql) file and replace the database. This will update the database with the version you pushed with. Since they have different hostnames, the pull script will modify the necessary fields, namely the site url and home page url.
Pushing to BitBucket
In the remote and local server, create a new directory called “db”. The exported database file will be saved there. In your local server (I’m assuming you are using Windows) create a new file called push.bat. It doesn’t really matter where you put the file (just make sure you are using the right paths). I put the file in the root directory of my WordPress repository.mysqldump -u username -ppassword database_name > db/db_sync.sql hg add db/db_sync.sql hg commit hg push https://username@bitbucket.org/username/repository
You can remove the “hg add db/db_sync.sql” command after executing the script for the first time. This is only required once.In the server side (Linux/Ubuntu), things aren’t really much different. The file extension changes from .bat to .sh, and possibly your mySql server username, password and database name. The file content is exactly the same.
Pulling from BitBucket
Pulling is a little bit harder. It requires importing the SQL file, and also changing some critical fields that differs from an environment to another.In your local machine, create a file called pull.bat
hg pull https://username@bitbucket.org/username/repository
hg update
cd db
mysql -u username -ppassword testpress < db_sync.sql
mysql -u username -ppassword testpress < db.sql
In your db folder, add a file called "db.sql". This file has SQL statements that will do the required changes to match the host settings. You can add more statements if you need to.
USE testpress;
UPDATE wp_options SET option_value="http://localhost/testpress" WHERE option_name="siteurl";
UPDATE wp_options SET option_value="http://localhost/testpress" WHERE option_name="home";
Apart from the file extension, mySql settings and databas namee nothing really changes in the remote server. This is because we are executing programs commands. The commands and their usage is platform agnostic. Make sure that you enter the correct values for the website URL in the "db.sql" file. They should match your blog URL, if you are not sure you can alwyas check the values in the wp_options table.
To run the scripts, in Windows double click the “.bat” file and in your remote server terminal run the command “sh script_name.sh”.
The Process
You should now have 2 executable files in each environment (pull and push). You should also have a sql script (db.sql) which should not get added to version controlling. We can now test our small system.- In your local machine, add a new blog post
- Push the changes from your local machine
- Pull the changes in the remote machine
- Check if the blog is running correctly and the blog post was added
"
 Posted in:


