"Today we will be discussing a few very important aspects of WordPress Multisite. If you are new to WordPress Multisite please go through the WordPress installation tutorial first to get an overall idea of the Multisite feature in WordPress. In this tutorial I shall be discussing a few key things essential for WordPress Multisite installation, along with some common troubleshooting tips. Finally I shall discuss WordPress Multisite Domain Mapping in detail.
To create a Wildcard DNS entry please login to your Control Panel provided by your host and look for the Domain section. Under Domain click on the Subdomain option. This is the place to enable sub-domains for your website.
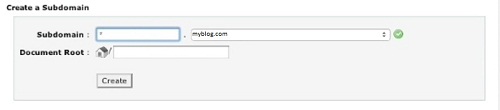
Once you click on the Subdomain option in the control panel, under Create a Subdomain enter an asterisk ‘*’ in the Subdomain field and then click on Create. The Document Root should point to the root directory of your WordPress installation.
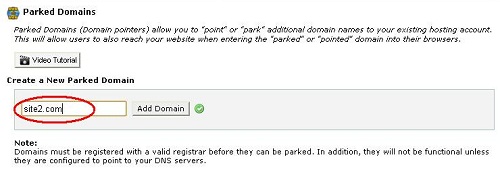
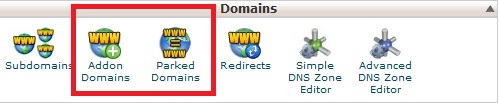 Here we will be using the Parked Domains option since we have our WordPress installation in the root directory. The Addon Domain option can be used if you are utilizing WordPress outside the root directory. Under Parked Domains enter the name of the new domain you want to park on your primary domain and then click on Add Domain. The parked domain should automatically point to the root directory of your installation which is generally public_html.
 Here you can use either of the four options to set up your Name Server.
Open your wp-config.php file and enter the following line of code under the code where you have enabled your multisite feature.
After that you will be able to see the Domain Mapping option under the Settings menu of your Network Admin dashboard.
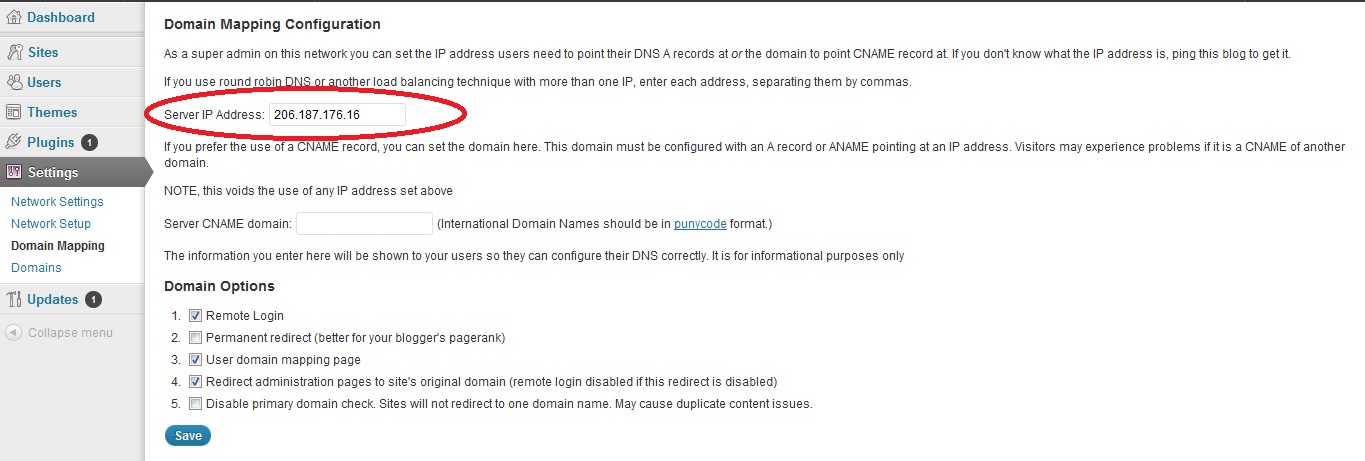
Under Server IP Address put the IP address of your web server. You may contact your host for this address or visit this site to find your site’s IP address.
 Finally click on Save.
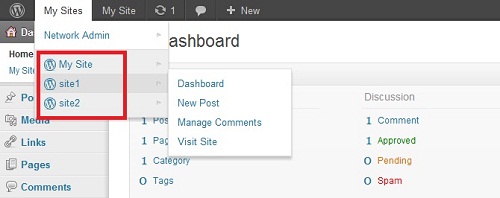
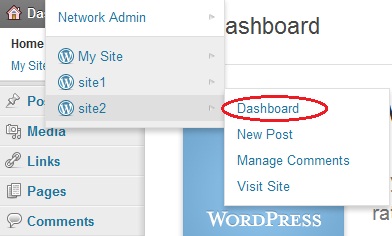
Next go to the Dashboard of one of your child sites for which you want to map the domain.
 Then under Tools > Domain Mapping add the external domain which we have registered. Check the Primary Domain For this Blog checkbox to make it a primary domain for this site. Finally click on Add.
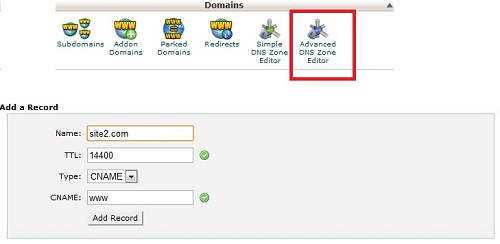
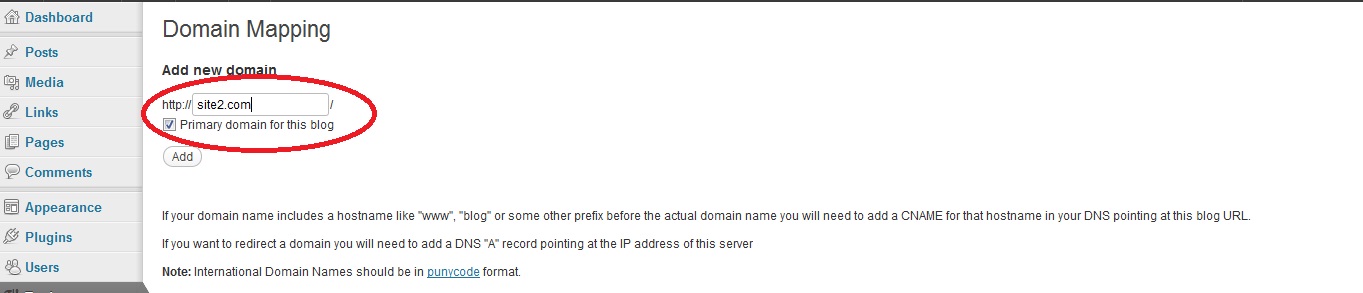 If your domain name includes a hostname like "www", "blog" or some other prefix before the actual domain name you will need to add a CNAME record for that hostname in your DNS pointing at this blog URL. For this please log in to your host cPanel and click on Advanced DNS Zone Editor under the Domains section and set up your CNAME record.
 That’s it you have successfully mapped an external domain to your site. To verify please check the URL by visiting your child site.
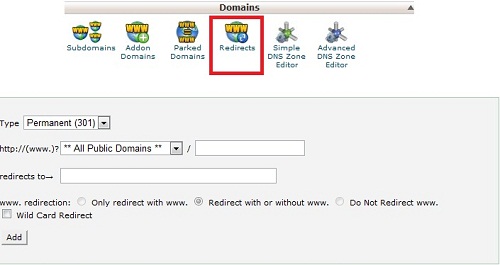
 In order to redirect users who type the old URL, please log into your cPanel and click on Redirects under the Domain section. Here you need to select the Type, the URL to be redirected and the URL to which it will be redirected. Finally click on Add.
 That’s it for now, in my next tutorial I shall be explaining the WordPress Multisite Database in detail using phpMyAdmin and some really cool functions to be used in WordPress Multisite. Thanks a lot for reading."
read more
Key Things to Know About WordPress Multisite Installation
Installing WordPress Multisite Using Plugin
You can install WordPress Multisite using two methods. One is using the plugin Enable Multi-Site and another is manual installation. It’s recommended to use manual installation since the installation changes will then be transparent and can be easily altered later.Changing From Sub-Directory to Sub-Domain
In case you want to change your installation type from sub-directory to sub-domain, please use the following steps:- You need to delete all the sites which were created under your main site
- Enable the sub-domain option from the
wp-config.phpfile by modifying the following code:define( 'SUBDOMAIN_INSTALL', true );
- Finally update your Permalinks
Since you will need to delete all your sites it’s recommended to make the decision carefully while choosing between sub-domain and sub-directory during installation.
Keeping a Default Theme for All Your New Sites
If you want to keep a default theme for all your newly created sites then please go to yourwp-config.php file and add the following line of code below the specified line:// Below this line
define('WPLANG', '');
// Add this line
define('WP_DEFAULT_THEME', 'classic');
Replace ‘classic’ with the folder name of the theme you like.Add Yourself to All Your Sites
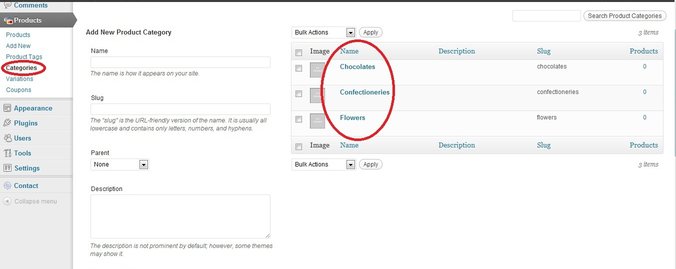
The different sites created will only be visible under My Sites if you have been added as a user for that site. If you are a Network Admin then please add yourself as a regular user for all your created sites so that you can manage them straight from your dashboard.Let Users Define Custom CSS
Generally the users are not able to edit the themes for their sites but once you (as a Network Administrator) install and activate the Custom User CSS plugin then the site owners can design their themes by defining custom CSS.Common WordPress Multisite Troubleshooting
Created Sub-Domains Not Working
Your hosting platform should support the Wildcard DNS feature. Please check with your hosting provider prior to installing WordPress Multisite.To create a Wildcard DNS entry please login to your Control Panel provided by your host and look for the Domain section. Under Domain click on the Subdomain option. This is the place to enable sub-domains for your website.
Once you click on the Subdomain option in the control panel, under Create a Subdomain enter an asterisk ‘*’ in the Subdomain field and then click on Create. The Document Root should point to the root directory of your WordPress installation.
Created Sub-Directories Not Working
The Apache mod_rewrite module should be supported by your hosting provider. This is required in the creation of multiple sites. If you are using WAMP you can enable it by going to Apache > Apache modules > mod_rewrite.Network Cannot Be Enabled Error
This error occurs if the Site URL is not the same as the WordPress URL, so under WordPress’ Admin Dashboard Settings > General please ensure that they are the same prior to installing Multisite.Wildcard Sub-Domain Incorrect Error
In order to solve this problem please go to your hosting provider’s control panel where you have defined the wildcard DNS and then update the Document Root of your sub-domain to point to the correct location.My Uploaded Media Not Working
All the uploaded media including images are located under your created blogs.dir folder. Please check your .htaccess file if the following line of code is in the same format or not. Also ensure that mod_rewrite is enabled for your server.# uploaded files RewriteRule ^([_0-9a-zA-Z-]+/)?files/(.+) wp-includes/ms-files.php?file=$2 [L]If you find any other issue with WordPress Multisite please feel free to refer to the Official Multisite Support Forum, it contains hundreds of solutions for your common Multisite problems.
Domain Mapping
One of the coolest parts of WordPress Multisite installation is the mapping of domains to turn your network sites into unique domains that carry their own identities. Using Domain Mapping lets you define a custom domain for your blog/site instead of the default address you get when you sign up or create a new site. For example, using a sub-domain install, if you create a new site you will have the URL newsite.parentsite.com. But using Domain Mapping you can turn it into www.newsite.com. Thus Domain Mapping can be used to point external domains to your network sites.Domain Mapping hides the fact that the site is a part of a Multisite network.Let’s discuss Domain Mapping in detail.
Step 1 A Little Bit of Your Host cPanel
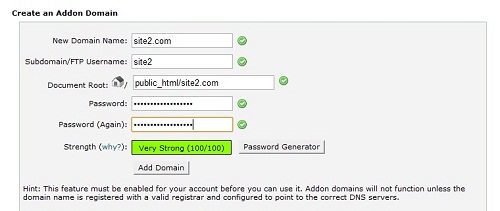
Before going for the Domain Mapping let’s do a bit of backend work from our cPanel. Please login to your host’s cPanel. Generally the URL of your cPanel will look something like http://www.hostname.com/cpanel or http://www.hostname.com:2082 . Once you log in, you will find two options under the Domains section named Addon Domains and Parked Domains.The new domain name should be registered prior to parking.If you are using the Addon Domains option then you are probably not using your Primary Domain for mapping purposes. After clicking the Addon Domains option fill in all the required details in the window and click on Add Domain.
Step 2 The DNS Settings
After your new domain has been parked, you need to be sure that the DNS Settings are properly configured for your domain. For this you should have your DNS / Name Server information. This can usually be found in the Account Information section of your host’s cPanel. Once you have that info you need to login to your registrar’s website where the domain was registered. Here we have used Go Daddy for registration. Once you login, under My Account > Domain select the required domain name to open the domain editor and then click on Set Nameservers option under the Nameserver section.- I want to park my domains: This option will park your domain on GoDaddy’s parked servers.
- I want to forward my domains: This option will forward your domain to another URL.
- I have a hosting account with these domains: This option is used if the domain is hosted with GoDaddy.
- I have specific nameservers for my domains: This option is used if your domain is hosted by another company. Here you need to enter the Name Servers provided by your hosting company. We will be using this option for this tutorial.
If the nameserver info is changed it may take some time to propagate.Although I have used GoDaddy and Host Gator in this tutorial, these options are very similar to any other vendor’s interface.
Step 3 WordPress MU Domain Mapping Plugin Installation
Now you need to manually install the WordPress MU Domain Mapping plugin in order to activate your domain mapping. Please download the plugin and extract the files. Copy all files (except the sunrise.php file) to your wp-content > plugins folder. Then copy the sunrise.php file to your wp-content folder.Open your wp-config.php file and enter the following line of code under the code where you have enabled your multisite feature.
define('WP_DEBUG', false);
define('WP_ALLOW_MULTISITE', true);

define('SUNRISE', 'on'); // Add this line here:

define( 'MULTISITE', true );
define( 'SUBDOMAIN_INSTALL', false );
$base = '/';
define( 'DOMAIN_CURRENT_SITE', 'localhost' );
define( 'PATH_CURRENT_SITE', '/' );
define( 'SITE_ID_CURRENT_SITE', 1 );
define( 'BLOG_ID_CURRENT_SITE', 1 );

/* That's all, stop editing! Happy blogging. */
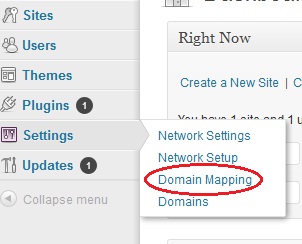
Save the changes.After that you will be able to see the Domain Mapping option under the Settings menu of your Network Admin dashboard.
Step 4 Mapping The External Domain to One Of Your Child Sites
Now you are ready to map the external domain to one of your child sites. For this please click on the Settings > Domain Mapping option of your Network Admin Dashboard.Under Server IP Address put the IP address of your web server. You may contact your host for this address or visit this site to find your site’s IP address.
Next go to the Dashboard of one of your child sites for which you want to map the domain.
Step 5 Final Steps
If you don’t want to utilize the original sub-domain URL of your child site any more, you may remove all the traces of the URL from the Network Admin Dashboard. For this go to Sites > All Sites and Edit the Site which you have mapped. In each of the tabs search for the old URL and replace it with the new URL. Posted in: