


"This is the second and final part of the WordPress E-Commerce tutorial. Here we will go through the final steps of completing our WordPress e-commerce web site. You will be shown with the process of adding products to your site, using different widgets to enhance your site, using different reports to keep track of the sales and efficient use of shortcodes.
Once done with the wp-ecommerce settings, adding your products and selling becomes child’s play.
Before We Move On
Before we dive straight into the process, let’s look at a few changes we made to the e-commerce site since part 1.1. We have installed the latest version of Liquorice theme, i.e Liquorice 2.2 by Nudge Design.
2. We have updated WordPress to the latest WordPress 3.3 version.
3. Under Settings -> Store -> Shipping we have edited the Flat Rate option and put $ 0.00 under all the fields. This is done since we will use different shipping rates for different products (without any base rates). Putting $ 0.00 keeps this feature enabled. If you want to keep a Base rate to be added to the individual shipping cost of each product, you may enter your Base rates here.


Adding Products
Lets discuss a few useful options before we add our first product.1. The Product -> Coupons page lets us add special discount coupons for the products. Here you can specify the Coupon Code, Discount, Coupon Expiry Date and other conditions as per your requirements.

Supose you are selling T-Shirts and you want to specify its variations in Size or Color. This options lets you define your Variations Set first and then define the different variations under it. You can also set a price for each of the variations.


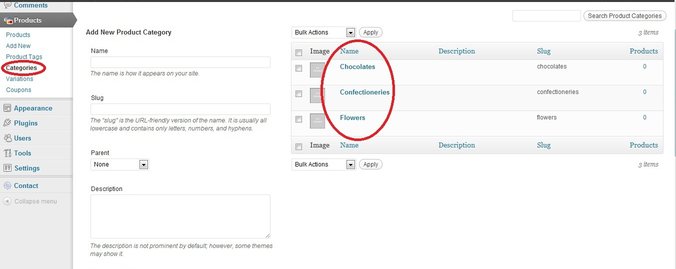
Adding Product Categories
Before adding a product lets add our product categories from the Products -> Categories page.While adding a category you need to specify the Name, Parent Category (if any) and Description. You may specify a Thumbnail image and also restrict a few countries from accessing this product. As of now we have added three categories- Flowers, Confectioneries and Chocolates.
Adding Your First Product
The Products -> Add New option lets you add products to your e-commerce site.Here you need to specify the Product Name, Product Description, Product Tags and categorize your product under the created Categories. The Variations option lets you add your created Variations to this product.


Please upload Product image by clicking the Manage Products Images link. Here you have the option to upload the image form your local hard disk, URL or using your WordPress Media Library. You can also Drag and Drop your images in this page.


Now your product appears under the Products -> Products option. You can edit/delete the product from here.


Using a Few Essential Widgets
Under the Appearance -> Widgets, you will find many useful widgets. You just need to drag and drop it in the area of the page where you want to place it. Lets discuss a few of these one by one.1. Latest Products– Using the Latest Products widget will display the recently added products on your sidebar or the area where you are placing this widget.
2. Products Categories – Using this widget will show all your product categories in your sidebar. The customer can search for products using those categories.
3. Product Specials – This widget displays those products that is on Sale in your site, i.e if the product has any discounted price or the Table Rate Price.
4. Product Tags- This widget displays the specified product tags in your sidebar so that customer can search for their required products using those Tags.
5. Price Range – This widget adds the price range of the products in your sidebar through which the customer can search for the products using different price ranges.


Reporting
Once the products have been purchased, you can see the purchase reports under the Sales Summary, Sales by Quarter and Sales by Month. Under the Sales Summary you will get to know the current month’s sales as well as the Total Income. The Sales by Quarter displays the sales by Financial Quarters and Sales by Month displays Last four months of sales on a per product basis.

Importance of Shortcodes
IntroductionA shortcode is a specific code in WordPress that lets you do great things using very little effort. The other name of Shortcode is Shortcut, you can embed files or create objects using just one line of shortcode which otherwise would have required lots of ugly codes.
Here are the details of a few important shortcodes used in our site.
productspage shortcode helps in displaying the complete list of products and their presentation in the website. This is a very important shortcode in Wp e-commercerce that is used within Products Pages, Products Categories and single Product Templates.
shoppingcart shortcode displays the checkout page or the checkout template in the site.
transactionresults shortcode displays the transaction page which shows the customers the status and the summary of their purchase.
userlog shortcode displays the My Account page of the site. Its is used by already registered customers to see their details regarding purchase history, downloads and account details.
Some other examples of shortcodes-
[wpsc_products product_id='288'] – Displays the product which has ID of 288 [buy_now_button product_id='198'] – Displays a PayPal buy now button for the product(ID-198). [add_to_cart=112] – Displays an add to cart button for the product(ID-112).
 Posted in:


