• Feed RSS

PHP Database Access: Are You Doing It Correctly?

We've covered PHP's PDO API a couple of times here on Nettuts+, but, generally, those articles focused more on the theory, and less on the application. This article will fix that!
To put it plainly, if you're still using PHP's old mysql API to connect to your databases, read on!


What?

It's possible that, at this point, the only thought in your mind is, "What the heck is PDO?" Well, it's one of PHP's three available APIs for connecting to a MySQL database. "Three," you say? Yes; many folks don't know it, but there are three different APIs for connecting:
  • mysql
  • mysqli – MySQL Improved
  • pdo – PHP Data Objects
The traditional mysql API certainly gets the job done, and has become so popular largely due to the fact that it makes the process of retrieving some records from a database as easy as possible. For example:
/*
 * Anti-Pattern
 */

# Connect
mysql_connect('localhost', 'username', 'password') or die('Could not connect: ' . mysql_error());

# Choose a database
mysql_select_db('someDatabase') or die('Could not select database');

# Perform database query
$query = "SELECT * from someTable";
$result = mysql_query($query) or die('Query failed: ' . mysql_error());

# Filter through rows and echo desired information
while ($row = mysql_fetch_object($result)) {
    echo $row->name;
}
Yes, the code above is fairly simple, but it does come with its significant share of downsides.
  • Deprecated: Though it hasn't been officially deprecated – due to widespread use – in terms of best practice and education, it might as well be.
  • Escaping: The process of escaping user input is left to the developer – many of which don't understand or know how to sanitize the data.
  • Flexibility: The API isn't flexible; the code above is tailor-made for working with a MySQL database. What if you switch?
PDO, or PHP Data Objects, provides a more powerful API that doesn't care about the driver you use; it's database agnostic. Further, it offers the ability to use prepared statements, virtually eliminating any worry of SQL injection.

How?

When I was first learning about the PDO API, I must admit that it was slightly intimidating. This wasn't because the API was overly complicated (it's not) – it's just that the old myqsl API was so dang easy to use!
Don't worry, though; follow these simple steps, and you'll be up and running in no time.

Connect

So you already know the legacy way of connecting to a MySQL database:
# Connect
mysql_connect('localhost', 'username', 'password') or die('Could not connect: ' . mysql_error());
With PDO, we create a new instance of the class, and specify the driver, database name, username, and password – like so:
$conn = new PDO('mysql:host=localhost;dbname=myDatabase', $username, $password);
Don't let that long string confuse you; it's really very simple: we specify the name of the driver (mysql, in this case), followed by the required details (connection string) for connecting to it.
What's nice about this approach is that, if we instead wish to use a sqlite database, we simply update the DSN, or "Data Source Name," accordingly; we're not dependent upon MySQL in the way that we are when use functions, like mysql_connect.

Errors

But, what if there's an error, and we can't connect to the database? Well, let's wrap everything within a try/catch block:
try {
    $conn = new PDO('mysql:host=localhost;dbname=myDatabase', $username, $password);
    $conn->setAttribute(PDO::ATTR_ERRMODE, PDO::ERRMODE_EXCEPTION);
} catch(PDOException $e) {
    echo 'ERROR: ' . $e->getMessage();
}
That's better! Please note that, by default, the default error mode for PDO is PDO::ERRMODE_SILENT. With this setting left unchanged, you'll need to manually fetch errors, after performing a query.
echo $conn->errorCode();
echo $conn->errorInfo();
Instead, a better choice, during development, is to update this setting to PDO::ERRMODE_EXCEPTION, which will fire exceptions as they occur. This way, any uncaught exceptions will halt the script.
For reference, the available options are:
  • PDO::ERRMODE_SILENT
  • PDO::ERRMODE_WARNING
  • PDO::ERRMODE_EXCEPTION

Fetch

At this point, we've created a connection to the database; let's fetch some information from it. There's two core ways to accomplish this task: query and execute. We'll review both.

Query

/*
 * The Query Method
 * Anti-Pattern
 */

$name = 'Joe'; # user-supplied data

try {
    $conn = new PDO('mysql:host=localhost;dbname=myDatabase', $username, $password);
    $conn->setAttribute(PDO::ATTR_ERRMODE, PDO::ERRMODE_EXCEPTION);

    $data = $conn->query('SELECT * FROM myTable WHERE name = ' . $conn->quote($name));

    foreach($data as $row) {
        print_r($row);
    }
} catch(PDOException $e) {
    echo 'ERROR: ' . $e->getMessage();
}
Though this works, notice that we're still manually escaping the user's data with the PDO::quote method. Think of this method as, more or less, the PDO equivalent to use mysql_real_escape_string; it will both escape and quote the string that you pass to it. In situations, when you're binding user-supplied data to a SQL query, it's strongly advised that you instead use prepared statements. That said, if your SQL queries are not dependent upon form data, the query method is a helpful choice, and makes the process of looping through the results as easy as a foreach statement.

Prepared Statements

/*
 * The Prepared Statements Method
 * Best Practice
 */

$id = 5;
try {
    $conn = new PDO('mysql:host=localhost;dbname=myDatabase', $username, $password);
    $conn->setAttribute(PDO::ATTR_ERRMODE, PDO::ERRMODE_EXCEPTION);    

    $stmt = $conn->prepare('SELECT * FROM myTable WHERE id = :id');
    $stmt->execute(array('id' => $id));

    while($row = $stmt->fetch()) {
        print_r($row);
    }
} catch(PDOException $e) {
    echo 'ERROR: ' . $e->getMessage();
}
In this example, we're using the prepare method to, literally, prepare the query, before the user's data has been attached. With this technique, SQL injection is virtually impossible, because the data doesn't ever get inserted into the SQL query, itself. Notice that, instead, we use named parameters (:id) to specify placeholders.
Alternatively, you could use ? parameters, however, it makes for a less-readable experience. Stick with named parameters.
Next, we execute the query, while passing an array, which contains the data that should be bound to those placeholders.
$stmt->execute(array('id' => $id));
An alternate, but perfectly acceptable, approach would be to use the bindParam method, like so:
$stmt->bindParam(':id', $id, PDO::PARAM_INT);
$stmt->execute();

Specifying the Ouput

After calling the execute method, there are a variety of different ways to receive the data: an array (the default), an object, etc. In the example above, the default response is used: PDO::FETCH_ASSOC; this can easily be overridden, though, if necessary:
while($row = $stmt->fetch(PDO::FETCH_OBJ)) {
    print_r($row);
}
Now, we've specified that we want to interact with the result set in a more object-oriented fashion. Available choices include, but not limited to:
  • PDO::FETCH_ASSOC: Returns an array.
  • PDO::FETCH_BOTH: Returns an array, indexed by both column-name, and 0-indexed.
  • PDO::FETCH_BOUND: Returns TRUE and assigns the values of the columns in your result set to the PHP variables to which they were bound.
  • PDO::FETCH_CLASS: Returns a new instance of the specified class.
  • PDO::FETCH_OBJ: Returns an anonymous object, with property names that correspond to the columns.
One problem with the code above is that we aren't providing any feedback, if no results are returned. Let's fix that:
$stmt->execute(array('id' => $id));

# Get array containing all of the result rows
$result = $stmt->fetchAll();

# If one or more rows were returned...
if ( count($result) ) {
    foreach($result as $row) {
        print_r($row);
    }
} else {
    echo "No rows returned.";
}
At this point, our full code should look like so:
$id = 5;
  try {
    $conn = new PDO('mysql:host=localhost;dbname=someDatabase', $username, $password);
    $stmt = $conn->prepare('SELECT * FROM myTable WHERE id = :id');
    $stmt->execute(array('id' => $id));

    $result = $stmt->fetchAll();

    if ( count($result) ) {
      foreach($result as $row) {
        print_r($row);
      }
    } else {
      echo "No rows returned.";
    }
  } catch(PDOException $e) {
      echo 'ERROR: ' . $e->getMessage();
  }

Multiple Executions

The PDO extension becomes particularly powerful when executing the same SQL query multiple times, but with different parameters.
try {
  $conn = new PDO('mysql:host=localhost;dbname=someDatabase', $username, $password);
  $conn->setAttribute(PDO::ATTR_ERRMODE, PDO::ERRMODE_EXCEPTION);

  # Prepare the query ONCE
  $stmt = $conn->prepare('INSERT INTO someTable VALUES(:name)');
  $stmt->bindParam(':name', $name);

  # First insertion
  $name = 'Keith';
  $stmt->execute();

  # Second insertion
  $name = 'Steven';
  $stmt->execute();
} catch(PDOException $e) {
  echo $e->getMessage();
}
Once the query has been prepared, it can be executed multiple times, with different parameters. The code above will insert two rows into the database: one with a name of “Kevin,” and the other, “Steven.”

CRUD

Now that you have the basic process in place, let’s quickly review the various CRUD tasks. As you’ll find, the required code for each is virtually identical.

Create (Insert)

try {
  $pdo = new PDO('mysql:host=localhost;dbname=someDatabase', $username, $password);
  $pdo->setAttribute(PDO::ATTR_ERRMODE, PDO::ERRMODE_EXCEPTION);

  $stmt = $pdo->prepare('INSERT INTO someTable VALUES(:name)');
  $stmt->execute(array(
    ':name' => 'Justin Bieber'
  ));

  # Affected Rows?
  echo $stmt->rowCount(); // 1
} catch(PDOException $e) {
  echo 'Error: ' . $e->getMessage();

Update

$id = 5;
$name = "Joe the Plumber";

try {
  $pdo = new PDO('mysql:host=localhost;dbname=someDatabase', $username, $password);
  $pdo->setAttribute(PDO::ATTR_ERRMODE, PDO::ERRMODE_EXCEPTION);

  $stmt = $pdo->prepare('UPDATE someTable SET name = :name WHERE id = :id');
  $stmt->execute(array(
    ':id'   => $id,
    ':name' => $name
  ));

  echo $stmt->rowCount(); // 1
} catch(PDOException $e) {
  echo 'Error: ' . $e->getMessage();
}

Delete

$id = 5; // From a form or something similar

try {
  $pdo = new PDO('mysql:host=localhost;dbname=someDatabase', $username, $password);
  $pdo->setAttribute(PDO::ATTR_ERRMODE, PDO::ERRMODE_EXCEPTION);

  $stmt = $pdo->prepare('DELETE FROM someTable WHERE id = :id');
  $stmt->bindParam(':id', $id); // this time, we'll use the bindParam method
  $stmt->execute();

  echo $stmt->rowCount(); // 1
} catch(PDOException $e) {
  echo 'Error: ' . $e->getMessage();
}

Object Mapping

One of the neatest aspects of PDO (mysqli, as well) is that it gives us the ability to map the query results to a class instance, or object. Here’s an example:
class User {
  public $first_name;
  public $last_name;

  public function full_name()
  {
    return $this->first_name . ' ' . $this->last_name;
  }
}

try {
  $pdo = new PDO('mysql:host=localhost;dbname=someDatabase', $username, $password);
  $pdo->setAttribute(PDO::ATTR_ERRMODE, PDO::ERRMODE_EXCEPTION);

  $result = $pdo->query('SELECT * FROM someTable');

  # Map results to object
  $result->setFetchMode(PDO::FETCH_CLASS, 'User');

  while($user = $result->fetch()) {
    # Call our custom full_name method
    echo $user->full_name();
  }
} catch(PDOException $e) {
  echo 'Error: ' . $e->getMessage();
}

Closing Thoughts

Bottom line: if you’re still using that old mysql API for connecting to your databases, stop. Though it hasn’t yet been deprecated, in terms of education and documentation, it might as well be. Your code will be significantly more secure and streamlined if you adopt the PDO extension.
read more

How to Process Credit Cards with PayPal Payments Pro Using PHP

PayPal is one of the most popular payment processing platforms available today for many reasons. Its ease of use and its connection to the eBay platform are just the tip of the iceberg. While one of its most popular features is the ability to simply sign in to your PayPal account to submit payments, merchants using PayPal can also accept credit cards directly just like a traditional merchant account solution would provide.

PayPal calls this solution Payments Pro, and I’m going to show you exactly how you can process credit cards directly with PayPal’s API using their Payments Pro web service API’s.

Step 1: Setup the Directory Structure

The first thing I like to do with any project is to create a basic structure organized for the project.  In this case, our structure is very simple as our project will consist of only 2 files:
Directory Structure
 As you might have guessed, we’ll be storing our configuration information in config.php, and we’ll actually handle the processing code in process-credit-card.php.

Step 2: Setup the Config File

Our /includes/config.php file will house our values for the PayPal API information we need including the end-point URL, API version, and our API username, password, and signature that we’ll be using. 
// Set sandbox (test mode) to true/false.
$sandbox = TRUE;

// Set PayPal API version and credentials.
$api_version = '85.0';
$api_endpoint = $sandbox ? 'https://api-3t.sandbox.paypal.com/nvp' : 'https://api-3t.paypal.com/nvp';
$api_username = $sandbox ? 'SANDBOX_USERNAME_GOES_HERE' : 'LIVE_USERNAME_GOES_HERE';
$api_password = $sandbox ? 'SANDBOX_PASSWORD_GOES_HERE' : 'LIVE_PASSWORD_GOES_HERE';
$api_signature = $sandbox ? 'SANDBOX_SIGNATURE_GOES_HERE' : 'LIVE_SIGNATURE_GOES_HERE';
Reviewing the config.php code, you can see that first we set a variable for $sandbox.  For now, we’ll leave this to TRUE because we want to interact with PayPal’s sandbox (test) servers for development purposes.  You’ll need to remember to change this to FALSE when you’re ready to move your project to a live server.
Then, based on the value of $sandbox we’re setting values to other variables for our API information.  You’ll just want to fill in those placeholders with your own details accordingly.  Now we’re ready to build our credit card processing script.

Step 3: Create an API Request

Now we can begin to build our process-credit-card.php page.  The first thing we need to do here is include our config file.
// Include config file
require_once('includes/config.php');
Next, we need to build a name-value-pair string that includes all of the data we need to send PayPal in order to process this payment.  A name-value-pair string looks just like something you might see when passing data via URL parameters.  We just need to make sure our parameter names are in all caps.
PARAM1=value1&PARAM2=value2&PARAM3=value3…etc.
So, you might be thinking to yourself “How do I know what to use for my variable names in my string?”  The good news is PayPal provides very good documentation on this.  We can see all of the possible variables that we can pass PayPal including customer details, order item details, and credit card information.  Some of this information is required in order to process a payment, but many of the variables available are optional.  For demonstration purposes, we’ll keep this pretty simple and just pass the required information.
We’ll store all of our request parameters in an array so that we can loop through this array to easily generate our NVP string.  All requests require the following parameters by default:
  • METHOD – The name of the API call you’re making.
  • USER – The API username
  • PWD – The API password
  • SIGNATURE – The API signature
  • VERSION – The API version
Then you can refer to the PayPal documentation for any API request you’d like to make to see what other parameters should be included.  For the sake of this demonstration, our array will be built as follows.
// Store request params in an array
$request_params = array
     (
     'METHOD' => 'DoDirectPayment',
     'USER' => $api_username,
     'PWD' => $api_password,
     'SIGNATURE' => $api_signature,
     'VERSION' => $api_version,
     'PAYMENTACTION' => 'Sale',
     'IPADDRESS' => $_SERVER['REMOTE_ADDR'],
     'CREDITCARDTYPE' => 'MasterCard',
     'ACCT' => '5522340006063638',
     'EXPDATE' => '022013',
     'CVV2' => '456',
     'FIRSTNAME' => 'Tester',
     'LASTNAME' => 'Testerson',
     'STREET' => '707 W. Bay Drive',
     'CITY' => 'Largo',
     'STATE' => 'FL',
     'COUNTRYCODE' => 'US',
     'ZIP' => '33770',
     'AMT' => '100.00',
     'CURRENCYCODE' => 'USD',
     'DESC' => 'Testing Payments Pro'
     );
You’ll notice we’re using our config variables from config.php, and then I’m simply loading static data for the other values.  In a standard project, though, you’ll most likely be populating these values with form data, session data, or some other form of dynamic data.
Now we can simply loop through this array to generate our NVP string.
// Loop through $request_params array to generate the NVP string.
$nvp_string = '';
foreach($request_params as $var=>$val)
{
 $nvp_string .= '&'.$var.'='.urlencode($val);
}
The value of $nvp_string is now:
METHOD=DoDirectPayment&USER=sandbo*****e.com&PWD=12***74&SIGNATURE=AiKZ******6W18v&VERSION=85.0&PAYMENTACTION=Sale&IPADDRESS=72.135.111.9&CREDITCARDTYPE=MasterCard&ACCT=5522340006063638&EXPDATE=022013&CVV2=456&FIRSTNAME=Tester&LASTNAME=Testerson&STREET=707+W.+Bay+Drive&CITY=Largo&STATE=FL&COUNTRYCODE=US&ZIP=33770&AMT=100.00&CURRENCYCODE=USD&DESC=Testing+Payments+Pro
This string is what we’ll send to PayPal for our request.

Step 4: Send the HTTP Request to PayPal

Now that our NVP string is ready to go we need to send this to the PayPal server to be processed accordingly.  To do this, we’ll use PHP’s CURL methods.
// Send NVP string to PayPal and store response
$curl = curl_init();
  curl_setopt($curl, CURLOPT_VERBOSE, 1);
  curl_setopt($curl, CURLOPT_SSL_VERIFYPEER, FALSE);
  curl_setopt($curl, CURLOPT_TIMEOUT, 30);
  curl_setopt($curl, CURLOPT_URL, $api_endpoint);
  curl_setopt($curl, CURLOPT_RETURNTRANSFER, 1);
  curl_setopt($curl, CURLOPT_POSTFIELDS, $nvp_string);

$result = curl_exec($curl);
curl_close($curl);
Here you can see that we’ve setup CURL with a few simple options and we’re using our $api_endpoint and $nvp_string variables accordingly.
This data will be sent over to PayPal and we will receive the API response back in our $result variable so that we can see the result and send the user to a successful or failure page based on whether or not the call succeeded or not.

Step 5: Parse the API Response

The value that we get back in $result from the previous step will be an NVP string just like the one we generated and sent to PayPal.  When we run our current script we get a successful response back that looks like this:
TIMESTAMP=2012%2d04%2d16T07%3a59%3a36Z&CORRELATIONID=9eb40cd84a7d3&ACK=Success&VERSION=85%2e0&BUILD=2764190&AMT=100%2e00&CURRENCYCODE=USD&AVSCODE=X&CVV2MATCH=M&TRANSACTIONID=160896645A8111040
One very simple way to parse this result is to use PHP’s parse_str() function.  This will load all of the response data into PHP variables matching the names and values returned in the response.  For example, if we do the following:
// Parse the API response
  $nvp_response_array = parse_str($result);
  
We would end up with access to the following PHP variables:
  • $TIMESTAMP
  • $CORRELATIONID
  • $ACK
  • $VERSION
  • $BUILD
  • $AMT
  • $CURRENCYCODE
  • $AVSCODE
  • $CVV2MATCH
  • $TRANSACTIONID
We can then proceed to use these variables to present information back to our customer, populate values in email receipts we’d like to generate, update database information, or anything else we need to do once an order is completed.
The $ACK value is what will tell us whether or not the API call was successful or not.  Values for $ACK can be:
  • Success
  • SuccessWithWarning
  • Failure
  • FailureWithWarning
  •   You can simply redirect your user where they need to go and show them information based on this value. A failing API call will result in additional parameters that provide information about why the transaction failed.  If I run this test again with an invalid credit card number, for example, I get the following response back from PayPal:
    TIMESTAMP=2012%2d04%2d16T08%3a08%3a52Z&CORRELATIONID=590d41dbb31e0&ACK=Failure&VERSION=85%2e0&BUILD=2764190&L_ERRORCODE0=10527&L_SHORTMESSAGE0=Invalid%20Data&L_LONGMESSAGE0=This%20transaction%20cannot%20be%20processed%2e%20Please%20enter%20a%20valid%20credit%20card%20number%20and%20type%2e&L_SEVERITYCODE0=Error&AMT=100%2e00&CURRENCYCODE=USD
    Now, when we use parse_str() we end up with the following PHP variables available to us:
    • $TIMESTAMP
    • $CORRELATIONID
    • $ACK
    • $VERSION
    • $BUILD
    • $L_ERRORCODE0
    • $L_SHORTMESSAGE0
    • $L_LONGMESSAGE0
    • $L_SEVERITYCODE0
    • $AMT
    • $CURRENCYCODE
    In this case, $ACK shows a Failure so we know the call did not succeed and we can check the error parameters for more details about what went wrong.

    Additional Data Parsing Option

    While the previous method of parsing the response works just fine, I personally prefer to work with data arrays.  As such, I use the following function to convert the PayPal response into an array.
    // Function to convert NTP string to an array
    function NVPToArray($NVPString)
    {
     $proArray = array();
     while(strlen($NVPString))
     {
      // name
      $keypos= strpos($NVPString,'=');
      $keyval = substr($NVPString,0,$keypos);
      // value
      $valuepos = strpos($NVPString,'&') ? strpos($NVPString,'&'): strlen($NVPString);
      $valval = substr($NVPString,$keypos+1,$valuepos-$keypos-1);
      // decoding the respose
      $proArray[$keyval] = urldecode($valval);
      $NVPString = substr($NVPString,$valuepos+1,strlen($NVPString));
     }
     return $proArray;
    }
    
    This allows me to see all of the response data available by simply looking at the contents of the array: If I run my script again now I get the following result on screen:
    Array
    (
        [TIMESTAMP] => 2012-04-16T08:15:41Z
        [CORRELATIONID] => 9a652cbabfdd9
        [ACK] => Success
        [VERSION] => 85.0
        [BUILD] => 2764190
        [AMT] => 100.00
        [CURRENCYCODE] => USD
        [AVSCODE] => X
        [CVV2MATCH] => M
        [TRANSACTIONID] => 6VR832690S591564M
    )
    
    And If I were to cause an error again I get the following:
    Array
    (
        [TIMESTAMP] => 2012-04-16T08:18:46Z
        [CORRELATIONID] => 2db182b912a9
        [ACK] => Failure
        [VERSION] => 85.0
        [BUILD] => 2764190
        [L_ERRORCODE0] => 10527
        [L_SHORTMESSAGE0] => Invalid Data
        [L_LONGMESSAGE0] => This transaction cannot be processed. Please enter a valid credit card number and type.
        [L_SEVERITYCODE0] => Error
        [AMT] => 100.00
        [CURRENCYCODE] => USD
    )
    
    You can see this is a nice, easy to navigate result array that contains everything we might need to move the user through our application and update data sources as necessary.

    Conclusion

    As you can see, processing credit cards using PayPal Payments Pro is actually a very simple procedure.  It just involves a few standard steps for working with API web services, and a basic knowledge of working with array data can help as well. Good luck, and happy coding!
read more

Responsive Web Design: Layouts and Media Queries

With the growing number of Smartphone produced in the last three years and the diversity of screen sizes it’s practically impossible to ignore users that browse on a mobile device. Whether they use an Android phone, Windows Mobile phone, a BlackBerry device or an iPhone, whether they are on a tablet, on a Smartphone or on a big screen, each user deserves the best experience possible. As designers, it is our goal to provide those users a nice experience browsing the websites we created, whatever the device used to browse is.
Today most of the clients want their website to be mobile compatible, so this is particularly challenging. Creating a version for each device is impossible, due to the number and diversity of those devices, but also simply because we don’t know what will be created tomorrow. That’s where the concept of “Responsive Webdesign” comes to the rescue.
Responsive Web Design: Layouts and Media Queries


A responsive website is a website that will respond and adapt to the user’s behavior and screen size. The idea is to resize and reorder the design, adapt images, typography, columns, etc., based on screen - browser size, resolution and orientation instead of providing each device a specific website.

A Look at 3 Different Types of Layout

Basic Fluid Layout

Fluid layout is based on a system of relative units instead of absolute pixels. This kind of layout has been around for a while now, and most of the designers use fluid grids created in percentage to achieve such layouts.
The idea is pretty simple: instead of giving the layout rigid width in pixels, we will give it relative ones in percentage. The fluid layout based websites usually take the whole browser width, hence the 100% in this example.
You can see a demo of a fluid design here.
Fluid
Data JavaScript credit: Andreas Bovens
The style.css gives us common styles for the page (color, typo), but let’s take a look at our fluid.CSS file :
#header {
    width: 100%;
    margin: 0;
    padding: 0;
}
#content {
    float: left;
    width: 60%;
    margin: 0 0 20px 0;
    padding: 0;
}
#content .inner {
    margin-right: 2%;
}
.sidebar{
    float: left;
    margin: 0 0 20px 1%;
    padding: 0;
}
#bar1{
    width:20%;
}
#bar2{
    width:18%;
}
#footer {
    clear: both;
    width: 100%;
    margin: 0;
    padding: 0;
}
Our header and footer have a 100% width, so they’ll take the whole screen available. The main content has a 60%, and our sidebars 20% and 18% so that we will be able to create a design that will fit the whole space available.
This design adapts perfectly on big screens, but we can see that the sidebar content tend to become hard to read when we resize too small.

Adaptive Layout

The adaptive layout is based on a pretty simple idea: instead of using percentage we will give our layout fixe sizes, but we will adapt those sizes depending of the width of the browser/viewport, thus creating a layout with different “break points”.
For each of those break point, we will use media queries (will come back to explain them in detail in the second part of the article) to adapt the layout of our website so that content is not too hard to read.
You can see and example of adaptive layout here.
Adaptive
The HTML and style.css did not change; all we changed was the structure of the page. Let’s take a closer look at our CSS file.
The "normal" website uses this CSS:
body{
    width:1280px;
    margin:0 auto;
}
#header {
    width: 100%;
    margin: 0;
    padding: 0;
}
#content {
    float: left;
    width: 800px;
    margin: 0 0 20px 0;
    padding: 0;
}
#content .bloc{
    margin-right: 10px;
}
.sidebar{
    float: left;
    margin: 0 0 20px 20px;
    padding: 0;
    width:220px;
}
#footer {
    clear: both;
    width: 100%;
    margin: 0;
    padding: 0;
}
I gave the header and footer a 100% width, but the content has a fixed width. Now the good part, the break points with media queries:
/* Media queries */
@media screen and (max-width: 1200px) {
    body{
    width:1000px;
    margin:0 auto;
    }
    #content {
    width: 700px;
    }
    .sidebar{
    width:280px;
    }
}

@media screen and (max-width: 980px) {
body{
    width:850px;
    margin:0 auto;
    }
    #content {
    width: 550px;
    }
    .sidebar{
    width:280px;
    }
}

@media screen and (max-width: 750px) {
    body{
    width:600px;
    margin:0 auto;
    }
    #content {
    width: 400px;
    }
    .sidebar{
    width:190px;
    margin: 0 0 20px 10px;
    }
}

@media screen and (max-width: 540px) {
    body{
    width:450px;
    margin:0 auto;
    }
    #content {
    width: 450px;
    }
    #content .bloc{
    margin:0px;
    }
    .sidebar{
    width:450px;
    margin: 0 0 10px 0;
    }
}

@media screen and (max-width: 380px) {
    body{
    width:360px;
    margin:0 auto;
    }
    #content {
    width: 360px;
    }
    #content .bloc {
    margin:0px;
    }
    .sidebar{
    width:360px;
    margin: 0 0 10px 0;
    }
}
For each break point given by a media query, I changed the size of the body, the content, and the sidebar. Under 540px, the text in the sidebar was too hard to read, so I gave the sidebar the same size as the content, what has the effect of putting the sidebars under the content.
This nice thing about adaptive layout is the possibility to modify and adapt not only the size of the blocs, but the layout and there place on the page.
The big difficulty is then to choose those break points. A first technique could be to base the break points on most "common" device width. Chris Coyier from CSStricks put a nice list of media queries together. Another way to choose the break points it to actually test the design at different screen sizes and see when it gets ugly or when user can’t really read the text easily, and put break point at those size.
Live example of adaptive layout :
Foodsense

Adaptive Example

Responsive Layout

We could define the responsive layout, as a mix between the fluid and adaptive layouts. It will use the relative units of the fluid layout and the break points of the adaptive one.
Here you can see the demo of our previous example, in responsive layout.
Responsive Example
You can see here how fluid the design is: using percentage enables us to create very smooth transition between the different break points of our design.
Here is our stylesheet for the "normal" version:
#page{
    max-width:1280px;
}
#header {
    width: 100%;
    margin: 0;
    padding: 0;
}
#content {
    float: left;
    width: 60%;
    margin: 0 0 20px 0;
    padding: 0;
}
#content .bloc {
    margin-right: 2%;
}
.sidebar{
    float: left;
    margin: 0 0 20px 1%;
    padding: 0;
}
#bar1{
    width:20%;
}
#bar2{
    width:18%;
}
#footer {
    clear: both;
    width: 100%;
    margin: 0;
    padding: 0;
}
What’s important here is the use of max-width (instead of width for an adaptive layout). It’s this property that enables us to create this smooth transition. Using a max-width, we won’t have to use as many break points as for an adaptive layout, and all the other sizes will be given in a relative unit (percentage for our example).
And the CSS for the media queries:
/* The media queries*/
@media screen and (max-width: 1000px) {
    #bar1,
    #bar2{
    width:39%;
    }
    .sidebar{
    float: left;
    margin: 0 0 20px 1%;
    padding: 0;
    }
}

@media screen and (max-width: 540px) {
    #bar1,
    #bar2{
    clear:both;
    width:100%;
    }
    .sidebar{
    float: left;
    margin: 0 0 20px 1%;
    padding: 0;
    }
    #content {
    clear:both;
    width:100%;
    }
    #content .bloc {
    margin:0;
    }
}
All the other size will be once again given in percentage, relative to the max-width of our body.
Note that for screen size under 540px, we once again gave the sidebars and the content a 100% width, and place the sidebars under the content using some clear: both.
The advantage of the responsive layout is that you won’t have to use too many break points. Since the size are given in percentage, they will adapt automatically, so the major role of the break points will be to be place where design breaks, to re-order our layout (putting sidebars under content in our example) and give the user a more pleasant reading.
Fore Fathers Group

Responsive

Media Queries: Create and Define Break Points

Media queries where introduced in the CSS3 specifications. Put in a simple way, media queries enables the web designer to create conditionals stylesheets based on width, height, but also orientation, color, etc. There’s a huge list of media queries available on the official w3c website but we will only use some of them in our case. Here is a list of the most commonly used media queries and what they do :

Media Query Utilisation

Media Query Use
min-width: … px Used when the viewport’s width is bigger or equal to width
max-width: … px Used when the viewport’s width is smaller or equal to width
min-device-width: … px Used when the device’s width is bigger or equal to width
max-device-width: … px Used when the device’s width is smaller or equal to width
orientation : portrait // orientation: landscape Target orientation
-webkit-min-device-pixel-ratio : 1.5 Used to target high density device on android and ios
As for print style sheets, media queries can be used as external or internal styles sheets. An external style sheet is easier to organize, it is not downloaded by browsers which don’t support it, but it uses extra http request. An internal style sheet on the other hand does not require extra http request, but the whole stylesheet is downloaded for browsers even if they do not support media queries, and it can be harder to organize. Both have then pro and cons, you’ll have.
You already saw the internal syntax in the example above:
body {
    background: gray;
}
@media all and (max-width:500px) {
body {
        background: blue;
    }
}
And here is the external syntaxes:
<link rel="stylesheet" type="text/CSS"  media="screen and (max-device-width: 480px) " href="mobile.CSS" />

Some "tricks" Worth Knowing About Media Queries

Cascade Matters

Yeah that’s right, as for any peace of CSS code, cascade matters.
Consider the following example:
#container{
background:rgba(111, 78, 152, 0.9); /*violet */
color:rgb(1, 1, 1);

@media all and (min-width:500px) {
    #container{
    background: rgba(255, 0, 0, 0.9); /* red */
    color: white;
    }
}
@media all and (min-width:700px) {
   #container{
    background: rgba(0, 0, 255,0.9); /*blue */
    font-family: serif;
    }
}
See the example on jsfiddle.
If the width of our browser is bigger than 500px, the color of the text gets white, and the background red. If we enlarge the screen up to more than 700px, the background gets blue, but the color of the text stays white because it inherited the color of the min-width:500px media query applied before (700 being, well, bigger than 500).

Creating Stacked Media Queries

Consider the following example :
#container{
    background:rgba(111, 78, 152, 0.9); /*violet */
    padding:10px 5px;
    color:rgb(1, 1, 1);
}

@media all and (min-width:500px) and (max-width:699px) {
   #container{
   background: rgba(255, 0, 0, 0.9); /* rouge */
   font-family: serif;
   }
}
@media all and (min-width:700px) {
   #container{
   background: rgba(0, 0, 255,0.9); /*bleu */
   color: white;
   font-family: serif;
   }
}
See the example on jsfiddle.
The first media query will only be applied for screen between 500px and 699px, and the second for screen bigger than 700px. In the case of stacked media queries, since property is only applied for a certain width, they are not herited. In our example, if we also want to apply a serif font the layout bigger than 700px, we will have to repeat this property.
You’ll need a viewport meta tag to make the media queries work. The viewport meta tag enables you to take control of the viewport of the device. Basically, if no viewport is set, mobile device will try to fit the whole page on the screen, resulting in very small websites.
The viewport meta tag looks like this:
<meta name="viewport"  content="initial-scale=1, width=device-width">
We basically tell the device, that we will be using the device width as the width of our page, and that there will be no zooming on the page when we first launch it.

It’s Not Only About the Mobile!

In my examples, I showed some media queries used for mobile optimization, tablets and smaller screens. But I wanted as a conclusion, to emphasize the fact that media queries are not only about mobile optimization. We tend to see more and more mobile device, but also more and bigger screens.
We know have an xbox that can connect to internet, some of the box our internet providers provide us are equipped with a browser, and even some television are able to connect to internet. Maybe tomorrow you will get a web browser on your fridge, who knows. If we use responsive webdesign to optimize for smaller screens, we can also use them to optimize for bigger ones.
Let's remember: responsive webdesign is about adapting layout to the user's browser size, orientation, whatever that size might be!

Some Useful Resources:

Conclusion

As you can see, responsive webdesign is not that hard to use and enables web designers to create nice layouts that will adapt to many devices and screen sizes. Your now it’s your turn: did you ever used responsive design? In what kind of projects? Do you have some advice and special tips? How do you define your break points? Let us know in the comments.
read more

15 Stunning jQuery Lightbox Plug-ins for Your Upcoming Designs

If you see a website built on jQuery using images, they must have played with a lightbox in that context. That’s the power of the lightbox, it can transform any simple image library into an attractive and effective gallery. It’s an important and popular contribution from the jQuery side to the design community.
Thanks to the awesome jQuery community who make these stunning lightbox plug-ins, giving huge scope for designers to showcase images on websites. There is a huge collection of plug-ins each giving a different look and style to images.
We collected 15 stunning jQuery lightbox plug-ins for your reference. Hope you’ll find it worth having a look.
jQuery Lightbox Plug-ins


Stunning jQuery Lightbox Plug-ins

Lightview jQuery Plug-in

Lightview was built to change the way you overlay content on a website.
Lightview jQuery Plug-in
TopUp

TopUp is an easy to use JavaScript library for unobtrusively displaying images and Web pages in a Web 2.0 approach of pop-up. The library is jQuery and jQuery UI driven in order to maintain cross-browser compatibility and compactness.
TopUp
Highslide Lightbox Plug-in

Highslide JS is an image, media and gallery viewer written in JavaScript.
Highslide Lightbox Plug-in
Color Box

A lightweight customizable lightbox plug-in for jQuery 1.3+
Color Box
Lightbox 2

Lightbox 2 is a simple, unobtrusive script used to overlay images on the current page. It's a snap to set up and works on all modern browsers.
Lightbox 2
prettyPhoto

prettyPhoto is a jQuery lightbox clone. Not only does it support images, it also supports videos, flash, YouTube, frames and Ajax. It’s a full blown media lightbox.
prettyPhoto
Slimbox 2

Slimbox 2 is a 4 KB visual clone of the popular Light box 2 script by Lokesh Dhaka, written using the jQuery JavaScript library.
Slimbox 2
Shadowbox

Shadowbox is a web-based media viewer application that supports all of the web's most popular media publishing formats. Shadowbox is written entirely in JavaScript and CSS and is highly customizable.
Shadowbox
Pirobox Extended V.1.0.

One of the most important things with this plug-in is the ability to open any kind of file, from inline content to .swf files, from simple images to .pdf files.
Other things are: automatic image resizing and drag and drop.
Pirobox Extended V.1.0
GreyBox

GreyBox can be used to display websites, images and other content in a beautiful way.
GreyBox
jQuery Super Box

jQuery Super box! Is a script which allows you to display windows with the lightbox effect.
This script is a plug-in for jQuery (1.3.x).
jQuery Super Box
Fancy Box

Fancy Box is a tool for displaying images, HTML content and multimedia in a Mac-style "light box" that floats overtop of web page.
Fancy Box
Pirobox Extended V.1.1.

Pirobox Extended V.1.1 advanced version, Zoom In option with dragable image viewer for large dimension images.
Pirobox Extended V.1.1
jQuery Lightbox Plug-in

JQuery lightbox plug-in is simple, elegant, and unobtrusive, no need for extra markup, and is used to overlay images on the current page through the power and flexibility of jQuery´s selector.
jQuery Lightbox Plug-in
Ceebox

An overlay pop-up script for easily embedding flash video, displaying images, or showing HTML (either external sites via iframe or content on your own site via AJAX).
Ceebox

Conclusion

Do you use any of these lightboxes in your website design work? Do you have a favorite lightbox plug-in? If you do and we haven't listed it here, please share the link with us in the comments below. Your comments and opinions are always very welcome.

Written by: Carol Francis for Onextrapixel - Web Design & Development Online Magazine | One comment
read more

WordPress Multisite Beyond Basics: Essentials and Domain Mapping

"Today we will be discussing a few very important aspects of WordPress Multisite. If you are new to WordPress Multisite please go through the WordPress installation tutorial first to get an overall idea of the Multisite feature in WordPress. In this tutorial I shall be discussing a few key things essential for WordPress Multisite installation, along with some common troubleshooting tips. Finally I shall discuss WordPress Multisite Domain Mapping in detail.

Key Things to Know About WordPress Multisite Installation

Installing WordPress Multisite Using Plugin

You can install WordPress Multisite using two methods. One is using the plugin Enable Multi-Site and another is manual installation. It’s recommended to use manual installation since the installation changes will then be transparent and can be easily altered later.

Changing From Sub-Directory to Sub-Domain

In case you want to change your installation type from sub-directory to sub-domain, please use the following steps:
  • You need to delete all the sites which were created under your main site
  • Enable the sub-domain option from the wp-config.php file by modifying the following code:
    define( 'SUBDOMAIN_INSTALL', true );
  • Finally update your Permalinks
Since you will need to delete all your sites it’s recommended to make the decision carefully while choosing between sub-domain and sub-directory during installation.

Keeping a Default Theme for All Your New Sites

If you want to keep a default theme for all your newly created sites then please go to your wp-config.php file and add the following line of code below the specified line:
// Below this line
 define('WPLANG', '');
 // Add this line
 define('WP_DEFAULT_THEME', 'classic');
Replace ‘classic’ with the folder name of the theme you like.

Add Yourself to All Your Sites

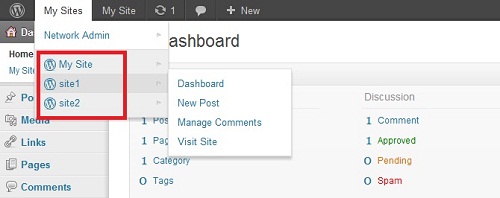
The different sites created will only be visible under My Sites if you have been added as a user for that site. If you are a Network Admin then please add yourself as a regular user for all your created sites so that you can manage them straight from your dashboard.

Let Users Define Custom CSS

Generally the users are not able to edit the themes for their sites but once you (as a Network Administrator) install and activate the Custom User CSS plugin then the site owners can design their themes by defining custom CSS.

Common WordPress Multisite Troubleshooting

Created Sub-Domains Not Working

Your hosting platform should support the Wildcard DNS feature. Please check with your hosting provider prior to installing WordPress Multisite.
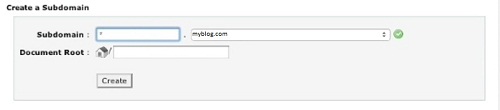
To create a Wildcard DNS entry please login to your Control Panel provided by your host and look for the Domain section. Under Domain click on the Subdomain option. This is the place to enable sub-domains for your website.
Once you click on the Subdomain option in the control panel, under Create a Subdomain enter an asterisk ‘*’ in the Subdomain field and then click on Create. The Document Root should point to the root directory of your WordPress installation.

Created Sub-Directories Not Working

The Apache mod_rewrite module should be supported by your hosting provider. This is required in the creation of multiple sites. If you are using WAMP you can enable it by going to Apache > Apache modules > mod_rewrite.

Network Cannot Be Enabled Error

This error occurs if the Site URL is not the same as the WordPress URL, so under WordPress’ Admin Dashboard Settings > General please ensure that they are the same prior to installing Multisite.

Wildcard Sub-Domain Incorrect Error

In order to solve this problem please go to your hosting provider’s control panel where you have defined the wildcard DNS and then update the Document Root of your sub-domain to point to the correct location.

My Uploaded Media Not Working

All the uploaded media including images are located under your created blogs.dir folder. Please check your .htaccess file if the following line of code is in the same format or not. Also ensure that mod_rewrite is enabled for your server.
# uploaded files
 RewriteRule ^([_0-9a-zA-Z-]+/)?files/(.+) wp-includes/ms-files.php?file=$2 [L]
If you find any other issue with WordPress Multisite please feel free to refer to the Official Multisite Support Forum, it contains hundreds of solutions for your common Multisite problems.

Domain Mapping

One of the coolest parts of WordPress Multisite installation is the mapping of domains to turn your network sites into unique domains that carry their own identities. Using Domain Mapping lets you define a custom domain for your blog/site instead of the default address you get when you sign up or create a new site. For example, using a sub-domain install, if you create a new site you will have the URL newsite.parentsite.com. But using Domain Mapping you can turn it into www.newsite.com. Thus Domain Mapping can be used to point external domains to your network sites.
Domain Mapping hides the fact that the site is a part of a Multisite network.
Let’s discuss Domain Mapping in detail.

Step 1 A Little Bit of Your Host cPanel

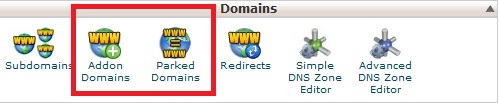
Before going for the Domain Mapping let’s do a bit of backend work from our cPanel. Please login to your host’s cPanel. Generally the URL of your cPanel will look something like http://www.hostname.com/cpanel or http://www.hostname.com:2082 . Once you log in, you will find two options under the Domains section named Addon Domains and Parked Domains.
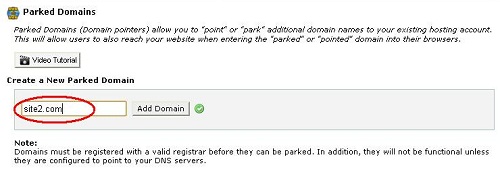
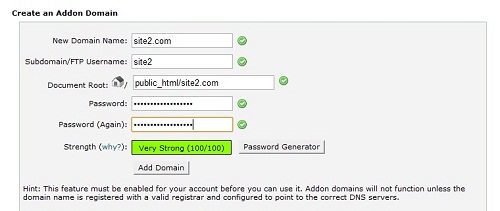
Here we will be using the Parked Domains option since we have our WordPress installation in the root directory. The Addon Domain option can be used if you are utilizing WordPress outside the root directory. Under Parked Domains enter the name of the new domain you want to park on your primary domain and then click on Add Domain. The parked domain should automatically point to the root directory of your installation which is generally public_html.
The new domain name should be registered prior to parking.
If you are using the Addon Domains option then you are probably not using your Primary Domain for mapping purposes. After clicking the Addon Domains option fill in all the required details in the window and click on Add Domain.

Step 2 The DNS Settings

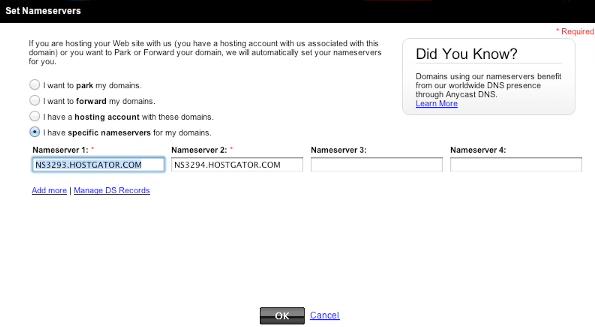
After your new domain has been parked, you need to be sure that the DNS Settings are properly configured for your domain. For this you should have your DNS / Name Server information. This can usually be found in the Account Information section of your host’s cPanel. Once you have that info you need to login to your registrar’s website where the domain was registered. Here we have used Go Daddy for registration. Once you login, under My Account > Domain select the required domain name to open the domain editor and then click on Set Nameservers option under the Nameserver section.
Here you can use either of the four options to set up your Name Server.
  • I want to park my domains: This option will park your domain on GoDaddy’s parked servers.
  • I want to forward my domains: This option will forward your domain to another URL.
  • I have a hosting account with these domains: This option is used if the domain is hosted with GoDaddy.
  • I have specific nameservers for my domains: This option is used if your domain is hosted by another company. Here you need to enter the Name Servers provided by your hosting company. We will be using this option for this tutorial.
Once done click on the OK button.
If the nameserver info is changed it may take some time to propagate.
Although I have used GoDaddy and Host Gator in this tutorial, these options are very similar to any other vendor’s interface.

Step 3 WordPress MU Domain Mapping Plugin Installation

Now you need to manually install the WordPress MU Domain Mapping plugin in order to activate your domain mapping. Please download the plugin and extract the files. Copy all files (except the sunrise.php file) to your wp-content > plugins folder. Then copy the sunrise.php file to your wp-content folder.
Open your wp-config.php file and enter the following line of code under the code where you have enabled your multisite feature.
define('WP_DEBUG', false);
define('WP_ALLOW_MULTISITE', true);

define('SUNRISE', 'on'); // Add this line here:

define( 'MULTISITE', true );
define( 'SUBDOMAIN_INSTALL', false );
$base = '/';
define( 'DOMAIN_CURRENT_SITE', 'localhost' );
define( 'PATH_CURRENT_SITE', '/' );
define( 'SITE_ID_CURRENT_SITE', 1 );
define( 'BLOG_ID_CURRENT_SITE', 1 );

/* That's all, stop editing! Happy blogging. */
Save the changes.
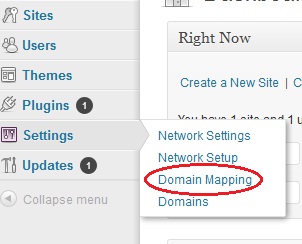
After that you will be able to see the Domain Mapping option under the Settings menu of your Network Admin dashboard.

Step 4 Mapping The External Domain to One Of Your Child Sites

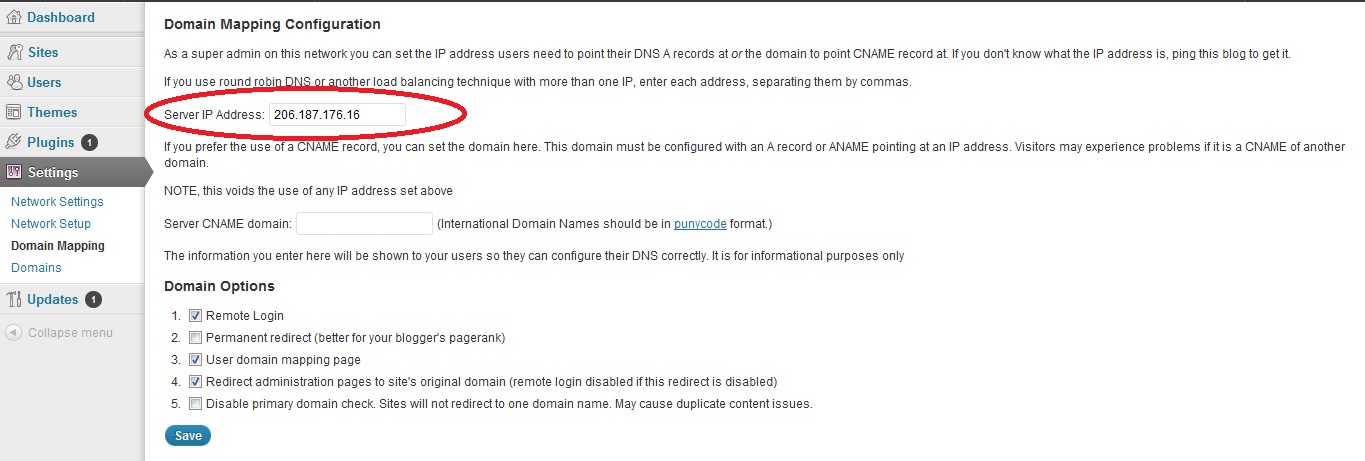
Now you are ready to map the external domain to one of your child sites. For this please click on the Settings > Domain Mapping option of your Network Admin Dashboard.
Under Server IP Address put the IP address of your web server. You may contact your host for this address or visit this site to find your site’s IP address.
Finally click on Save.
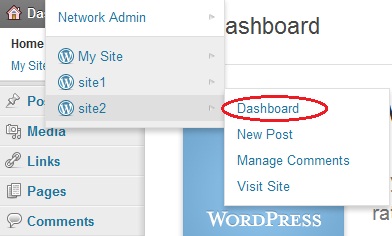
Next go to the Dashboard of one of your child sites for which you want to map the domain.
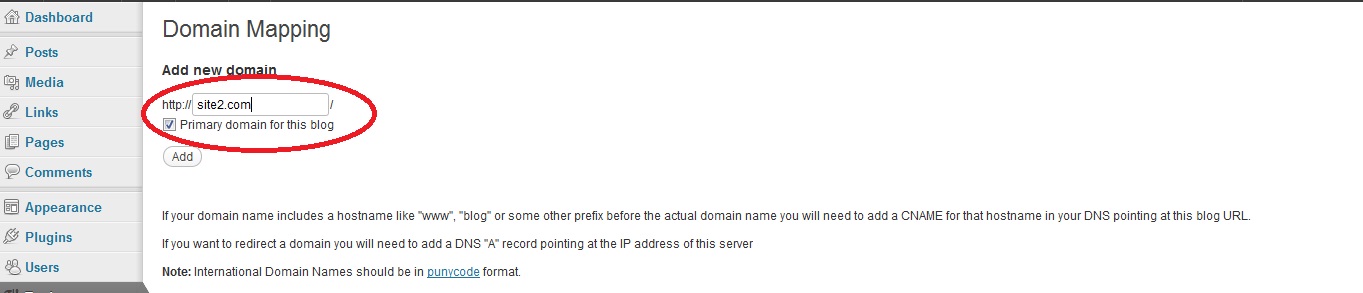
Then under Tools > Domain Mapping add the external domain which we have registered. Check the Primary Domain For this Blog checkbox to make it a primary domain for this site. Finally click on Add.
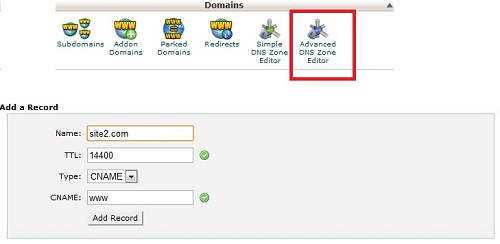
If your domain name includes a hostname like "www", "blog" or some other prefix before the actual domain name you will need to add a CNAME record for that hostname in your DNS pointing at this blog URL. For this please log in to your host cPanel and click on Advanced DNS Zone Editor under the Domains section and set up your CNAME record.
That’s it you have successfully mapped an external domain to your site. To verify please check the URL by visiting your child site.

Step 5 Final Steps

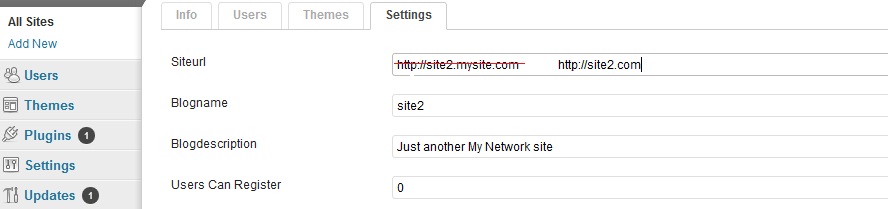
If you don’t want to utilize the original sub-domain URL of your child site any more, you may remove all the traces of the URL from the Network Admin Dashboard. For this go to Sites > All Sites and Edit the Site which you have mapped. In each of the tabs search for the old URL and replace it with the new URL.
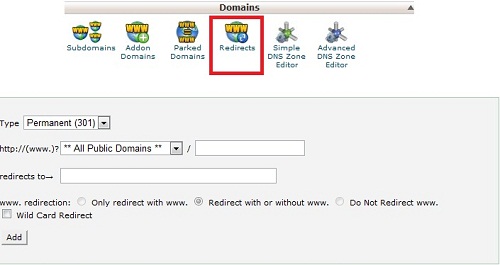
In order to redirect users who type the old URL, please log into your cPanel and click on Redirects under the Domain section. Here you need to select the Type, the URL to be redirected and the URL to which it will be redirected. Finally click on Add.
That’s it for now, in my next tutorial I shall be explaining the WordPress Multisite Database in detail using phpMyAdmin and some really cool functions to be used in WordPress Multisite. Thanks a lot for reading."
read more

How to Include JavaScript and CSS in Your WordPress Themes and Plugins

"Knowing the proper way to include JavaScript and CSS files in your WordPress themes and plugins is very important for designers and developers. If you don’t adhere to best practices, you run the risk of conflicting with other themes and plugins, and potentially creating problems that could have been easily avoided. This article is intended as a reference for playing nicely with others.


Best Practices Make Everyone Happy

If you’ve ever developed a theme or plugin for WordPress, or worked with one that someone else has created, you’ve probably come across several different methods for including JavaScript and CSS. While there are several methods that may appear to work in a specific set of circumstances, there is one primary method recommended in the WordPress Codex. This preferred way will ensure your theme or plugin works in all cases, assuming others also code the correct way.
There’s also some misunderstanding about what exactly the Codex says about this, which I will help clarify.

What’s in the Box?

When you download WordPress, a selection of common JavaScript libraries are already included that you can use for your JavaScript development. A list of included libraries can be found in the WordPress Codex wp_enqueue_script article.
All those libraries are included, but by default WordPress only loads the ones it needs to, and only when it needs them in the admin. If you write JavaScript that utilises one of these libraries, you need to tell WordPress that your script needs the library loaded first.

Telling WordPress About Your Script and What It Needs

Some of the things to think about when you’re coding JavaScript for WordPress are:
  • Is there an included library I can use?
  • Can I use the version that’s included?
  • Do I need to load my script in the front-end and in the admin?
  • Which front-end and admin pages do I need to load my script on?
Answering these questions helps you know what you need to do to register and load your script. This is done using a WordPress function called wp_register_script, and here is its usage according to the WordPress Codex:
wp_register_script( $handle, $src, $deps, $ver, $in_footer );
So what are these variables and do we need them every time? (This is covered on the Codex page, so I’ll be brief and use plain English)
  • $handle – what you’ll use to refer to this particular script wherever you might need to enqueue it, and you have to include this variable at the very least
  • $src – the path to the source file within your plugin or theme
  • $deps – an array containing the $handle for any other scripts your script needs to run (i.e. a dependency)
  • $ver – the version number for your script, which can be used for cache-busting. By default, WordPress will use its own version number as the version number for your script
  • $in_footer – do you want your script to load in the footer? Set this to true or false. It is false by default, so it loads in the header where wp_head() is, and if you specify true it will load where wp_footer() appears in the theme

What Is “Cache-Busting”?

Browsers remember what scripts and stylesheets they’ve downloaded for a particular site based on the URL of the script and stylesheet. If you change the URL, even just by adding a querystring, the browser assumes it’s a new file and downloads it.

Ok, So Let’s Try Some Examples

Here is the most basic example for loading a custom script:
function wptuts_scripts_basic()
{
 // Register the script like this for a plugin:
 wp_register_script( 'custom-script', plugins_url( '/js/custom-script.js', __FILE__ ) );
 // or
 // Register the script like this for a theme:
 wp_register_script( 'custom-script', get_template_directory_uri() . '/js/custom-script.js' );

 // For either a plugin or a theme, you can then enqueue the script:
 wp_enqueue_script( 'custom-script' );
}
add_action( 'wp_enqueue_scripts', 'wptuts_scripts_basic' );
First, we register the script, so WordPress knows what we’re talking about. The way to find the path for our JavaScript file is different whether we’re coding a plugin or a theme, so I’ve included examples of both above. Then we queue it up to be added into the HTML for the page when it’s generated, by default in the <head> where the wp_head() is in the theme.
The output we get from that basic example is:
<script type="text/javascript" src="http://yourdomain.com/wp-content/plugins/yourplugin/js/custom-script.js?ver=3.3.1"></script>
Now if your script relies on one of the libraries included with WordPress, like jQuery, you can make a very simple change to the code:
function wptuts_scripts_with_jquery()
{
 // Register the script like this for a plugin:
 wp_register_script( 'custom-script', plugins_url( '/js/custom-script.js', __FILE__ ), array( 'jquery' ) );
 // or
 // Register the script like this for a theme:
 wp_register_script( 'custom-script', get_template_directory_uri() . '/js/custom-script.js', array( 'jquery' ) );

 // For either a plugin or a theme, you can then enqueue the script:
 wp_enqueue_script( 'custom-script' );
}
add_action( 'wp_enqueue_scripts', 'wptuts_scripts_with_jquery' );
Note: By default, jQuery is loaded with noConflict to prevent clashes with other libraries (such as Prototype). See the noConflict section of the Codex if you don’t know how to deal with that.
See what I did there? You just add an array with the ‘jquery’ handle as a dependency. It uses an array here, because your script could have multiple dependencies. If your script uses jQuery and jQuery UI, you’d add jQuery UI to your dependency array, like array( 'jquery', 'jquery-ui-core' )
So now the output has changed, and we can see that jQuery has also been added into the <head> of the page:
<script type='text/javascript' src='http://yourdomain.com/wp-includes/js/jquery/jquery.js?ver=1.7.1'></script>
<script type='text/javascript' src='http://yourdomain.com/wp-content/plugins/yourplugin/js/custom-script.js?ver=3.3.1'></script>
Let’s try an example with all the bells and whistles:
function wptuts_scripts_with_the_lot()
{
 // Register the script like this for a plugin:
 wp_register_script( 'custom-script', plugins_url( '/js/custom-script.js', __FILE__ ), array( 'jquery', 'jquery-ui-core' ), '20120208', true );
 // or
 // Register the script like this for a theme:
 wp_register_script( 'custom-script', get_template_directory_uri() . '/js/custom-script.js', array( 'jquery', 'jquery-ui-core' ), '20120208', true );

 // For either a plugin or a theme, you can then enqueue the script:
 wp_enqueue_script( 'custom-script' );
}
add_action( 'wp_enqueue_scripts', 'wptuts_scripts_with_the_lot' );
Ok, so I’ve now added a version and specified that this script needs to be loaded in the footer. For the version number, I’ve chosen to use today’s date because it’s easy to keep track of, but you can use any version numbering you like. The output for this one is slightly different too, jQuery is output in the <head> and our script along with jQuery UI is output just before </body>, like this:
<head>
...
<script type='text/javascript' src='http://yourdomain.com/wp-includes/js/jquery/jquery.js?ver=1.7.1'></script>
...
</head>
<body>
...
<script type='text/javascript' src='http://yourdomain.com/wp-includes/js/jquery/ui/jquery.ui.core.min.js?ver=1.8.16'></script>
<script type='text/javascript' src='http://yourdomain.com/wp-content/plugins/yourplugin/js/custom-script.js?ver=20120208'></script>
</body>

Getting Your Priorities Straight

Some people may prefer not to use the proper enqueuing methods because they feel they have less control over the order in which scripts are loaded. For example, in a theme that uses modernizr, the theme author might want to make sure modernizr is loaded early on.
Something I haven’t mentioned earlier is more detail on how the add_action function works, as this is where we can exercise a little influence over the order of things. Here’s the usage of the function according to the WordPress Codex page:
add_action( $tag, $function_to_add, $priority, $accepted_args );
Note that often, and up until now in this article, only the $tag and $function_to_add parameters are used. The $priority parameter defaults to 10, and the $accepted_args parameter defaults to 1. If we want our scripts or styles to be enqueued earlier, we simply lower the value for $priority from the default. For example:
function wptuts_scripts_important()
{
 // Register the script like this for a plugin:
 wp_register_script( 'custom-script', plugins_url( '/js/custom-script.js', __FILE__ ) );
 // or
 // Register the script like this for a theme:
 wp_register_script( 'custom-script', get_template_directory_uri() . '/js/custom-script.js' );

 // For either a plugin or a theme, you can then enqueue the script:
 wp_enqueue_script( 'custom-script' );
}
add_action( 'wp_enqueue_scripts', 'wptuts_scripts_important', 5 );
The output will be the same as we’ve seen previously, but it will occur earlier in the HTML document.

Overriding Default Libraries and Using Content Delivery Networks

There may be times when you want to use a different version of a library that’s included with WordPress. Perhaps you want to use a cutting-edge version or you don’t want to wait for the next release of WordPress before using the latest stable version of jQuery. Another reason might be that you want to take advantage of Google’s CDN version of a library.
It’s important to note that this should only be done on plugins or themes used on sites that you will be personally maintaining. Any plugins or themes that you release for public use should use the libraries included with WordPress.
“Why?!”, I hear you ask. For the simple reason that you don’t control those sites. You don’t know what other plugins and themes might be used there, and you don’t know how often they will update your plugin or theme. Using the libraries packaged with WordPress is the safest option.
Having said that, if you are wanting to do this on a site you control, here’s how it’s done:
function wptuts_scripts_load_cdn()
{
 // Deregister the included library
 wp_deregister_script( 'jquery' );

 // Register the library again from Google's CDN
 wp_register_script( 'jquery', 'http://ajax.googleapis.com/ajax/libs/jquery/1.7.1/jquery.min.js', array(), null, false );

 // Register the script like this for a plugin:
 wp_register_script( 'custom-script', plugins_url( '/js/custom-script.js', __FILE__ ), array( 'jquery' ) );
 // or
 // Register the script like this for a theme:
 wp_register_script( 'custom-script', get_template_directory_uri() . '/js/custom-script.js', array( 'jquery' ) );

 // For either a plugin or a theme, you can then enqueue the script:
 wp_enqueue_script( 'custom-script' );
}
add_action( 'wp_enqueue_scripts', 'wptuts_scripts_load_cdn' );
So first of all, I deregister the included version of the library, otherwise conflicts between different versions could be introduced. Then register the alternate version, using the same handle, and I’ve chosen to specify null as the version (it’s already in the URL!) and specified not in the footer. The rest of our code is the same, because we were depending on whatever script used the ‘jquery’ handle. The output we get now looks like:
<script type='text/javascript' src='http://ajax.googleapis.com/ajax/libs/jquery/1.7.1/jquery.min.js'></script>
<script type='text/javascript' src='http://yourdomain.com/wp-content/plugins/yourplugin/js/custom-script.js?ver=3.3.1'></script>
Note: One of the reasons this is a bad idea to do in a plugin or theme for public release, is that all other plugins and themes used on this site will now have to use this version of jQuery. Also, the newly registered version of jQuery doesn’t have noConflict set, so if any other plugin or theme scripts use Prototype for example, this will break things.

Don’t Be Greedy

So far we haven’t mentioned anything about how to do all this in the admin, only on the front-end. The primary difference is what action to use. Instead of add_action( 'wp_enqueue_scripts', 'wptuts_scripts_basic' ); which we use for the front-end, the action for the admin is add_action( 'admin_enqueue_scripts', 'wptuts_scripts_basic' );
Something that’s important to do for both the front-end and admin is be selective about which pages you load your scripts on. If your plugin or theme has a script that only does something on one front-end or admin page, such as the theme’s options page, or maybe a page with a specific widget, you only need to load your script on that page. No point clogging things up and loading scripts on pages where they’re not being used!
There’s a great example in the WordPress Codex on how to load scripts only on plugin pages. Because plugins and themes can vary a lot in how they’re written, I won’t go into specifics here on how to be choosy about which pages you load scripts on, but it was important to mention so you’re aware of it when you’re coding.

That’s Scripts, Now Styles

The process for styles is almost exactly the same as the process for scripts. It is done using a WordPress function called wp_register_style, and here is its usage according to the WordPress Codex:
wp_register_style( $handle, $src, $deps, $ver, $media );
Note that the only difference there between wp_register_script and wp_register_style is that instead of an $in_footer parameter, we have a $media parameter. This parameter can be set to any of the following: 'all', 'screen', 'handheld', and 'print', or any other W3C recognised media type.
So an example of how you might enqueue a style would be:
function wptuts_styles_with_the_lot()
{
 // Register the style like this for a plugin:
 wp_register_style( 'custom-style', plugins_url( '/css/custom-style.css', __FILE__ ), array(), '20120208', 'all' );
 // or
 // Register the style like this for a theme:
 wp_register_style( 'custom-style', get_template_directory_uri() . '/css/custom-style.css', array(), '20120208', 'all' );

 // For either a plugin or a theme, you can then enqueue the style:
 wp_enqueue_style( 'custom-style' );
}
add_action( 'wp_enqueue_scripts', 'wptuts_styles_with_the_lot' );
This is a fairly comprehensive example, utilising most of the parameters, and the output it produces looks like:
<link rel='stylesheet' id='custom-style-css'  href='http://yourdomain.com/wp-content/plugins/yourplugin/css/custom-style.css?ver=20120208' type='text/css' media='all' />

So, Why Doesn’t Everyone Already Do Things This Way?

Good question, and the other question I guess you might ask is, “What makes you think this is the ‘right’ way and not just your preference?”. Essentially the answer is that this is the approach recommended by WordPress. It ensures that any combination of plugins and themes should be able to work together happily and without doubling up.
I’ve seen a few themes and frameworks around the place that use <script></script> and <link /> tags in their header.php, and even footer.php, files to load the scripts and styles for the theme itself. There’s really no reason to do things this way. As I’ve demonstrated above, it’s perfectly possible to prioritise scripts and styles and nominate whether they load in the header or footer from the comfort and safety of your functions.php. The benefit being that your theme / framework will work with a wider range of other plugins / child themes.
One example was loading jQuery using the <script></script> tags, which might appear to work nicely, but this can actually cause jQuery to be loaded twice! Loading jQuery in this way will not stop WordPress from loading its version of jQuery for other plugins, as WordPress’ version is in noConflict mode by default, and a plugin may specify it as a dependancy. So now you’ll have jQuery working for both noConflict mode and $, and also probably break any plugin that uses the Prototype library.

Conclusion

WordPress is a fantastic system, and it has been developed with a lot of thought. If there’s a mechanism made available to do something, it’s often a good idea to use it. When developing your plugins and themes, try to remember to code thoughtfully and for playing nicely with others.
What do you think about the use of wp_enqueue_script and its associated functions and actions? Do you know of any examples where it’s being done incorrectly? Do you know of any reason not to follow the advice above?"
read more

Quick Tip: Add Extra Contact Methods to User Profiles

"If you Google “add extra fields to WordPress user profile” you’ll find all sorts of involved coding examples for adding extra inputs to the user profile page so you can capture additional user information. But if all you want to do is expand the default contact methods section then there’s a much simpler way to go.

The user_contactmethods Filter

The user_contactmethods filter allows you to set and unset the contact info fields on the user profile page. The great thing about using this method is that WordPress looks after the creation and updating of the fields.
Let’s add fields for Twitter and Facebook info. Put this in your functions.php file:
add_filter('user_contactmethods', 'my_user_contactmethods');

function my_user_contactmethods($user_contactmethods){

 $user_contactmethods['twitter'] = 'Twitter Username';
 $user_contactmethods['facebook'] = 'Facebook Username';

 return $user_contactmethods;
}
Here is what you’ll get:
If you want to remove some fields, just unset them from the array:
function my_user_contactmethods($user_contactmethods){

 unset($user_contactmethods['yim']);
 unset($user_contactmethods['aim']);
 unset($user_contactmethods['jabber']);

 $user_contactmethods['twitter'] = 'Twitter Username';
 $user_contactmethods['facebook'] = 'Facebook Username';

 return $user_contactmethods;
}
To display the user’s info, simply use the get_user_meta function.
echo get_user_meta(1, 'twitter', true);
This will show the Twitter username for the user with an ID of 1. The true argument causes the data to be returned as a single value as opposed to an array.
That’s all there is to it!"
read more

Secure Your WordPress Against User-Agents and Bots

"Lately there have been a lot of WordPress sites compromised only due to the bots that roam the world wide web! There are a lot of plugins out there which can protect your WordPress baby by blocking these “roguish” bots!
In this article you will be learning an easy and useful method of adeptly configuring your .htaccess file to filter these bots which can infect your website and can eat up your server resources. So get your .htaccess file ready for editing!

Step 1 Preparing the Code

The code mainly consists of bot names. I have added the most famous bots in here that I can think of. If there is some bot missing, please mention it in the comments.
The code is pretty straightforward. Go ahead and copy the code below and paste it in your .htaccess file.
# Bot Blocker
<IfModule mod_setenvif.c>
 SetEnvIfNoCase User-Agent ^$ keep_out
 SetEnvIfNoCase User-Agent (pycurl|casper|cmsworldmap|diavol|dotbot) keep_out
 SetEnvIfNoCase User-Agent (flicky|ia_archiver|jakarta|kmccrew) keep_out
 SetEnvIfNoCase User-Agent (purebot|comodo|feedfinder|planetwork) keep_out
 <Limit GET POST PUT>
   Order Allow,Deny
   Allow from all
   Deny from env=keep_out
 </Limit>
</IfModule>

Step 2 Testing the Code

To see whether the code is doing its job, I using recommend this website Bots VS Browsers. This website is a good place to simulate these types of attacks. Once on their website all you have to do is select any bot from the code, which you just added to your .htaccess file, and use that as the user agent. Enter the URL of your site and hit enter. If you see a “403 Error” this means that the code is doing its job. If not the code must’ve gotten messed up while being copied into your .htaccess file, so try again.

Step 3 Adding More Bots

Now you are familiar with the code and how to test it, we can add more bots to the code. You must have noticed the repetition in the code, and by using the same logic, you can add a dozen more bots to be blocked by setting the same parameters. Cool huh!
SetEnvIfNoCase User-Agent (i-IS-evilBOT) keep_out
As you can see in the code above, now I am blocking the “i-IS-evilBOT” (which I just made up). Other than that the name of the bot is not case sensitive and you can add it as per your liking. Go to the Bots VS Browsers page and this time enter the user agent which I just created, and voila, you’ll see that this user agent which was added to my .htaccess file is also blocked! You can add as many bots as you want to be blocked separated with a pipe character “|”

Conclusion

I said in the beginning that there are many plugins which can do the same thing and you can avoid this editing. But by manually editing the .htaccess file you can effectively block bad user-agents and bots with better efficiency and better site performance!"
read more

Using the Envato API with WordPress

"Today we are going to discuss how to use the Envato API in WordPress and create a WordPress shortcode that promotes our Envato Marketplace Items inside our WordPress site. We will combine the powerful Envato API, WordPress’ flexibility and a little bit of creativity, to build an amazing plugin for our site.

Let’s Set Our Goal

In this tutorial we are going to focus on:
  • Some basic knowledge about the Envato API
  • How to use API result data inside WordPress
  • Build a WordPress Shortcode that promotes Envato Marketplace items in our WordPress site.
So let’s get into the first one!

Step 1: Understanding the Envato API

Envato provides an API that allows developers to get some information about Envato Marketplace items, users info, popular projects and so on. All possible queries are listed in the official documentation. In this article we discuss the public API only.
The Envato Public API has the following structure.
http://marketplace.envato.com/api/edge/set.json
The word set must to be replaced with an option listed in the set column of the API documentation. So if we want all information about a marketplace item we have to replace set with item:the_item_id. The final request URL will be:
http://marketplace.envato.com/api/edge/item:1263846.json
You can try to insert the URL above in your web browser and see the returned data.
We can also concatenate more than one set option in a single request to get more data. For example we want the item data and its author information. So the previous URL will become:
http://marketplace.envato.com/api/edge/item:1263846+user:evoG.json
The Envato API returns JSON, so in the next paragraph we are going to show how to manage it in WordPress.

Step 2: How to Use API Results in WordPress

In this tutorial we are not going to discuss how to create a WordPress plugin, but we are going to focus on some techniques to use the API in WordPress:
  • Send the API request
  • Manage the result data (the JSON string)
The function below fetches the data from the Envato server and returns a PHP array that contains all the informations we want.
/**
* @param String $item_id - The ID of an Envato Marketplace item
* @returns Array - The item informations
*/
function WPTP_get_item_info( $item_id ) {

 /* Set the API URL, %s will be replaced with the item ID  */
 $api_url = "http://marketplace.envato.com/api/edge/item:%s.json";

 /* Fetch data using the WordPress function wp_remote_get() */
 $response = wp_remote_get( sprintf( $api_url, $item_id ) );

 /* Check for errors, if there are some errors return false */
 if ( is_wp_error( $response ) or ( wp_remote_retrieve_response_code( $response ) != 200 ) ) {
  return false;
 }

 /* Transform the JSON string into a PHP array */
 $item_data = json_decode( wp_remote_retrieve_body( $response ), true );

 /* Check for incorrect data */
 if ( !is_array( $item_data ) ) {
  return false;
 }

 /* Return item info array */
 return $item_data;

}
We can improve the function above. To prevent stress on the Envato API server we can cache item data and request the info again after a timeout. WordPress offers us some functions to implement this feature. Let’s add it.
/**
* @param String $item_id - The ID of an Envato Marketplace item
* @returns Array - The item informations
*/
function WPTP_get_item_info( $item_id ) {

 /* Data cache timeout in seconds - It send a new request each hour instead of each page refresh */
 $CACHE_EXPIRATION = 3600;

 /* Set the transient ID for caching */
 $transient_id = 'WPTP_envato_item_data';

 /* Get the cached data */
 $cached_item = get_transient( $transient_id );

 /* Check if the function has to send a new API request */
 if ( !$cached_item || ( $cached_item->item_id != $item_id ) ) {

  /* Set the API URL, %s will be replaced with the item ID  */
  $api_url = "http://marketplace.envato.com/api/edge/item:%s.json";

  /* Fetch data using the WordPress function wp_remote_get() */
  $response = wp_remote_get( sprintf( $api_url, $item_id ) );

  /* Check for errors, if there are some errors return false */
  if ( is_wp_error( $response ) or ( wp_remote_retrieve_response_code( $response ) != 200 ) ) {
   return false;
  }

  /* Transform the JSON string into a PHP array */
  $item_data = json_decode( wp_remote_retrieve_body( $response ), true );

  /* Check for incorrect data */
  if ( !is_array( $item_data ) ) {
   return false;
  }

  /* Prepare data for caching */
  $data_to_cache = new stdClass();
  $data_to_cache->item_id = $item_id;
  $data_to_cache->item_info = $item_data;

  /* Set the transient - cache item data*/
  set_transient( $transient_id, $data_to_cache, $CACHE_EXPIRATION );

  /* Return item info array */
  return $item_data;

 }

 /* If the item is already cached return the cached info */
 return $cached_item->item_info;

}
Now the core function of our WordPress plugin is ready. We have used some WordPress functions that help us to save time. All information about them is explained in the official WordPress Codex.

Step 3: Build WordPress Shortcode

In the next steps we are going to code a useful WordPress plugin that allows us to display some informations about an Envato Marketplace item. All code below is well commented so you can easily understand each line. For more details about Writing a WordPress Plugin and the WordPress Shortcode API check out the online documentation in the WordPress Codex.

Let’s start

Let’s write the header informations for our plugin
<?php
/*
Plugin Name: WordPress Tutsplus Envato Item Info
Plugin URI: http://wp.tutsplus.com
Description: Display some informations about Envato Marketplace items
Version: 1.0
Author: Michele Ivani
Author URI: http://evographics.net
*/

Add the WordPress shortcode

Now we write the code to add the shortcode and its functionalities.
<?php
/**
* Add the shortcode using the WordPress function add_shortcode()
* We used as shortcode tag "wptp-envato-item"
*/
add_shortcode( 'wptp-envato-item', 'WPTP_add_shortcode' );

/**
* Hook to run when the shortcode is found
* @param Array $atts - shortcode attributes
* @param String $content - shortcode content (not necessary for our plugin)
* @return String - plugin HTML code
*/
function WPTP_add_shortcode( $atts, $content = null ) {

 /* Default shortcode attributes  */
 $atts = shortcode_atts( array(
  'item_id' => ''
 ), $atts );

 extract( $atts );

 /* Validation */
 if ( empty( $item_id ) ) {
  return "<p>Please insert an Envato Marketplace Item ID.</p>";
 }

 /* Get data from the API*/
 $item = WPTP_get_item_info( $item_id );

 /* Validation - Check if something went wrong */
 if ( $item === false ) {
  return "<p>Oops… Something went wrong. Please check out the item ID and try again.</p>";
 }

 /* Format the $item array */
 $item = $item['item'];
 extract( $item );

 /* Prepare the Plugin HTML */
 $html = '';

 $html .= '
 <div class="wptp_envato_item">

  <div class="wptp_title">'.$item.'</div>

  <div class="wptp_wrap">

   <div class="wptp_top">

    <div class="wptp_rating">

     <span class="wptp_desc">rating</span>'.

     WPTP_get_stars($rating)

    .'</div> <!-- end wptp_rating -->

   </div> <!-- end wptp_top -->

   <div class="wptp_middle">

    <div class="wptp_sales">

     <span class="wptp_img_sales"></span>

     <div class="wptp_text">

      <span class="wptp_num">'.$sales.'</span>
      <span class="wptp_desc">sales</span>

     </div> <!-- end  wptp_text -->

    </div> <!-- end wptp_sales -->

    <div class="wptp_thumb">
     <img src="'.$thumbnail.'" alt="'.$item.'" width="80" height="80"/>
    </div> <!-- end wptp_thumb -->

    <div class="wptp_price">

     <span class="wptp_img_price"></span>

     <div class="wptp_text">

      <span class="wptp_num"><span>${body}lt;/span>'.round($cost).'</span>
      <span class="wptp_desc">only</span>

     </div> <!-- end wptp_text -->

    </div> <!-- end wptp_price -->

   </div> <!-- end wptp_middle -->

   <div class="wptp_bottom">

    <a href="'.$url.'" target="_blank"></a>

   </div> <!-- end wptp_bottom -->

  </div> <!-- end wptp_wrap -->

 </div> <!-- end wptp_envato_item -->'; 

 return $html;
}

Star ratings function

The WPTP_add_shortcode() function above has the WPTP_get_stars() procedure that coverts the rating number to HTML stars. Let’s implement it.
<?php
/**
* Convert the rating number to HTML stars
* @param String $rating - Envato Item rating
*/
function WPTP_get_stars( $rating ) {

 /* If item rating is null the function prints a message */
 if ( ( int ) $rating == 0 ) {
  return '<div class="wptp_not_rating">Not rate yet</div>';
 }

 /* Else if rating is >= 1 the function converts it to HTML stars and returns them as a string */
 $return = '<ul class="wptp_stars">';
 $i=1;
 while ( ( --$rating ) >= 0 ) {
  $return .= '<li class="wptp_full_star"></li>';
  $i++;
 }

 if ( $rating == -0.5 ) {
  $return .= '<li class="wptp_full_star"></li>';
  $i++;
 }

 while ( $i <= 5 ) {
  $return .= '<li class="wptp_empty_star"></li>';
  $i++;
 }

 $return .= '</ul>';

 return $return;

}

Include CSS

When the shortcode functions are completed, we have to include the style.css file that styles our plugin.
<?php
/**
* Add the CSS style file
*/
add_action( 'wp_print_styles', 'WPTP_add_css' );

/**
* Attach the plugin CSS file to the WordPress site
*/
function WPTP_add_css() {
 /* Register style */
 wp_register_style( 'WPTP_css', plugins_url( 'style.css', __FILE__ ) );

 /* Enqueue style */
 wp_enqueue_style( 'WPTP_css' );
}

Step 4: Write CSS Rules

The style.css file is inside the same directory as the main plugin file and it contains all the CSS rules.
/* WordPress Tutsplus Envato Item Info - CSS Rules*/

/* Main layout and typography */
.wptp_envato_item {
 font-family: "Helvetiva Neue", Arial, sans-serif;
 margin: 20px 0;
}

.wptp_wrap { width: 210px; }

.wptp_text { display: block; }

.wptp_num {
 display: block;
 font-size: 24px;
 font-weight: 300;
 margin: 0;
 padding: 0;
 line-height: 24px;
 color: #66696d;
}

.wptp_num span {
 font-size: 14px;
 vertical-align: super;
}

.wptp_desc {
 display: block;
 font-size: 12px;
 font-weight: 300;
 margin: 0;
 padding: 0;
 line-height: 12px;
 color: #96999d;
}

.wptp_not_rating {
 color: #66696d;
 font-size: 13px;
 font-weight: bold;
}

.wptp_title { font-size: 14px; font-weight: 300; color: #66696d; margin-bottom: 10px; }

/* Stars rating section */

.wptp_rating {
 width: 82px;
 text-align: center;
 margin: 0 auto 10px auto;
}

.wptp_stars {
 margin: 0;
 padding: 0;
 list-style: none;
}

.wptp_stars li {
 margin-left: 2px;
 display: inline-block;
 vertical-align: middle;
 width: 13px;
 height: 13px;
}

.wptp_stars li.wptp_full_star { background: url(icons-sprite.png) 0px -64px ; }

.wptp_stars li.wptp_empty_star { background: url(icons-sprite.png) -14px -64px ; }

/* Sales and Price sections */
.wptp_sales, .wptp_thumb, .wptp_price {
 display: inline-block;
 vertical-align: middle;
}

.wptp_sales {
 text-align: right;
 margin-right: 10px;
}

.wptp_sales .wptp_text {
 width: 52px;
}

.wptp_img_sales {
 background: url(icons-sprite.png) 0px 0px;
 width: 32px;
 height: 32px;
 display: block;
 margin: 0 0 12px 20px;
}

.wptp_img_price {
 background: url(icons-sprite.png) 0px -32px ;
 width: 32px;
 height: 32px;
 display: block;
 margin-bottom: 7px;
}

.wptp_price {
 text-align: left;
 margin-left: 10px;
}

.wptp_price .wptp_text { width: 34px; }

/* Purchase button section */
.wptp_bottom a {
 display: block;
 width: 78px;
 height: 33px;
 background: url(icons-sprite.png) -32px 0px;
 margin: 10px auto 0 auto;
}

Conclusion

That’s it, now we can upload the plugin to our Worpdress site and use the power of WordPress shortcodes to display some info about Envato Marketplace items. For more details about Writing a WordPress Plugin and the WordPress Shortcode API check out the online documentation on the WordPress Codex.
I’m Michele Ivani and I hope this tutorial was helpful for your WordPress development. Thanks so much for reading."
read more