


"
Web applications need to provide easy-to-use solutions for uploading and manipulating rich content. This process can create difficulties for some users who have minimal photo editing skills. Cropping is one of the most used photo manipulation techniques, and this step-by-step tutorial will cover the entire development process of an image cropping plug-in for the jQuery JavaScript library.
 Next, you’ll need to download the jQuery JavaScript library and place it inside the
 First, we’ll initialize the image layer.
Above the image will be the overlay layer.
The next layer is the trigger layer; we’ll place it after the overlay layer, just as we did with the previous ones.
We’ll place the outline layer above the trigger layer.
The following conditions are required if the selection exists when the plug-in is loaded.
Let’s write a function to update our layers.
Next, we’ll write the
Now, we need a function to update the cursor when needed. For example, when we make a selection, we want the cursor to remain a
And now, the last function of this step; we need it to update the plug-in’s interface in different situations – on selecting, on resizing, on releasing the selection, and even when the plug-in initializes.
Now, we are almost ready. Close this file and prepare for the next step.
Open the
 And that’s it! Save the file and open up your browser to test it out.
 "
"
Step 1. Setting Up The Workspace
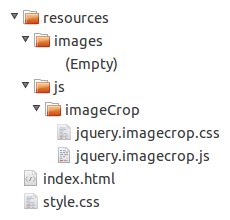
First, we are going to set up our project workspace for this tutorial. Begin by creating a hierarchy of directories and empty files named as exemplified in the image below: /resources/js/ folder. The image used in this tutorial must be named example.jpg and placed inside the /resources/images/ folder. You can use this image (thanks to gsso-stock), provided with the source files of this tutorial, or one of your own. And the last file is the outline.gif file, which must be placed inside the /resources/js/imageCrop/ folder. Step 2. Creating The Test Page
To test our plug-in, we’ll need to attach it to an image. Before starting to work at it, we’ll create a simple page containg that image.The HTML
Open up theindex.html file in your favorite text editor and write the following code. <!DOCTYPE html PUBLIC "-//W3C//DTD XHTML 1.0 Transitional//EN" "http://www.w3.org/TR/xhtml1/DTD/xhtml1-transitional.dtd">
<html lang="en" xml:lang="en" xmlns="http://www.w3.org/1999/xhtml">
<head>
<meta content="text/html; charset=UTF-8" http-equiv="Content-Type" />
<title>jQuery Image Cropping Plug-In</title>
<link href="style.css" media="screen" rel="stylesheet" type="text/css" />
<link href="resources/js/imageCrop/jquery.imagecrop.css" media="screen" rel="stylesheet" type="text/css" />
<script src="resources/js/jquery-1.6.2.min.js" type="text/javascript"></script>
<script src="resources/js/imageCrop/jquery.imagecrop.js" type="text/javascript"></script>
</head>
<body>
<div id="wrapper">
<h1>jQuery Image Cropping Plug-In</h1>
<div class="image-decorator">
<img alt="jQuery Image Cropping Plug-In" height="360" id="example" src="resources/images/example.jpg" width="480" />
</div><!-- .image-decorator -->
</div><!-- #wrapper -->
</body>
</html>
There’s nothing fancy here: just plain HTML code. We have loaded a stylesheet for the page, jQuery, our plug-in files (which are currently empty) and placed an image inside the document. The CSS
Now editstyle.css as shown above. * {
margin : 0;
outline : 0;
padding : 0;
}
body {
background-color : #ededed;
color : #646464;
font-family : 'Verdana', 'Geneva', sans-serif;
font-size : 12px;
text-shadow : 0 1px 0 #ffffff;
}
h1 {
font-size : 24px;
font-weight : normal;
margin : 0 0 10px 0;
}
div#wrapper {
margin : 25px 25px 25px 25px;
}
div.image-decorator {
-moz-border-radius : 5px 5px 5px 5px;
-moz-box-shadow : 0 0 6px #c8c8c8;
-webkit-border-radius : 5px 5px 5px 5px;
-webkit-box-shadow : 0 0 6px #c8c8c8;
background-color : #ffffff;
border : 1px solid #c8c8c8;
border-radius : 5px 5px 5px 5px;
box-shadow : 0 0 6px #c8c8c8;
display : inline-block;
height : 360px;
padding : 5px 5px 5px 5px;
width : 480px;
}
We’ve customized the aspect of our page by changing the background color and adding some basic styling to the title and image. Step 3. Writing A Basic jQuery Plug-In
Let’s begin by creating a basic jQuery plug-in."Learn more about how to write your own plug-in, via this post. It outlines the basics, best practices and common pitfalls to watch out for as you begin writing your plug-in."Open
/resources/js/imageCrop/jquery.imagecrop.js and add the following code. // Always wrap a plug-in in '(function($) { // Plug-in goes here }) (jQuery);'
(function($) {
$.imageCrop = function(object, customOptions) {};
$.fn.imageCrop = function(customOptions) {
//Iterate over each object
this.each(function() {
var currentObject = this,
image = new Image();
// And attach imageCrop when the object is loaded
image.onload = function() {
$.imageCrop(currentObject, customOptions);
};
// Reset the src because cached images don't fire load sometimes
image.src = currentObject.src;
});
// Unless the plug-in is returning an intrinsic value, always have the
// function return the 'this' keyword to maintain chainability
return this;
};
}) (jQuery);
We have just extended jQuery by adding a new function property to the jQuery.fn object. Now we have a very basic plug-in that iterates over each object and attaches imageCrop when the object is loaded. Note that the cached images don’t fire load sometimes, so we reset the src attribute to fix this issue. Step 4. Adding Customizable Options
Allowing for customization options makes a plug-in far more flexible for the user.$.imageCrop = function(object, customOptions) {
// Rather than requiring a lengthy amount of arguments, pass the
// plug-in options in an object literal that can be extended over
// the plug-in's defaults
var defaultOptions = {
allowMove : true,
allowResize : true,
allowSelect : true,
minSelect : [0, 0],
outlineOpacity : 0.5,
overlayOpacity : 0.5,
selectionPosition : [0, 0],
selectionWidth : 0,
selectionHeight : 0
};
// Set options to default
var options = defaultOptions;
// And merge them with the custom options
setOptions(customOptions);
};
We have defined an array with the default options, then merged them with the custom options by calling the setOptions function. Let’s go further and write the body of this function. ...
// Merge current options with the custom option
function setOptions(customOptions) {
options = $.extend(options, customOptions);
};
The $.extend() function merges the content of two or more objects together into the first object. The Options
The following list describes each option of the plug-in.- allowMove – Specifies if the selection can be moved (default value is
true). - allowResize – Specifies if the selection can be resized (default value is
true). - allowSelect – Specifies if the user can make a new selection (default value is
true). - minSelect – The minimum area size to register a new selection (default value is
[0, 0]). - outlineOpacity – The outline opacity (default value is
0.5). - overlayOpacity – The overlay opacity (default value is
0.5). - selectionPosition – The selection position (default value is
[0, 0]). - selectionWidth – The selection width (default value is
0). - selectionHeight – The selection height (default value is
0).
Step 5. Setting Up The Layers
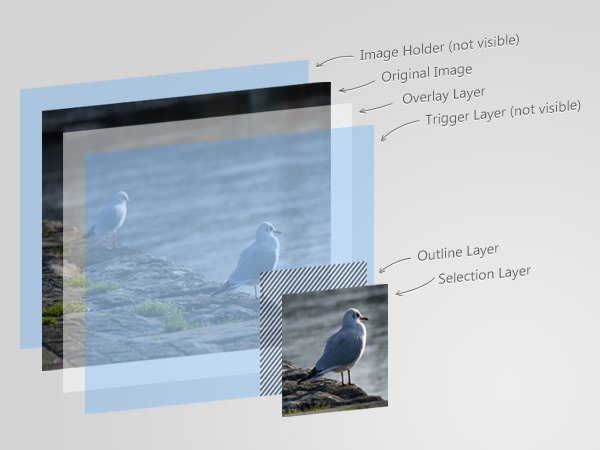
On this step, we’ll modify the DOM to get prepared for the next step: the plug-in’s interface. ... // Initialize the image layer var $image = $(object);Now initialize an image holder.
...

// Initialize an image holder
var $holder = $('<div />')
   .css({
       position : 'relative'
   })
   .width($image.width())
   .height($image.height());

// Wrap the holder around the image
$image.wrap($holder)
   .css({
       position : 'absolute'
   });
As you can see, the holder layer has the same size as the image and a relative position. Next, we call the .wrap() function to place the image inside the holder. Above the image will be the overlay layer.
...

// Initialize an overlay layer and place it above the image
var $overlay = $('<div id="image-crop-overlay" />')
   .css({
       opacity : options.overlayOpacity,
       position : 'absolute'
   })
   .width($image.width())
   .height($image.height())
   .insertAfter($image);
This layer is the same size as the image, but also has been given absolute positioning. We get the value for the opacity from the options.overlayOpacity and let jQuery apply it. This element has also an id, so we can change its properties through the plug-in’s stylesheet. At the bottom, we call the .insertAfter() method to place the overlay layer right after the image. The next layer is the trigger layer; we’ll place it after the overlay layer, just as we did with the previous ones.
...

// Initialize a trigger layer and place it above the overlay layer
var $trigger = $('<div />')
   .css({
       backgroundColor : '#000000',
       opacity : 0,
       position : 'absolute'
   })
   .width($image.width())
   .height($image.height())
   .insertAfter($overlay);
The background color doesn’t really matter but it must be different than transparent (which is by default). This layer is invisible from the user but it will handle some events. We’ll place the outline layer above the trigger layer.
...

// Initialize an outline layer and place it above the trigger layer
var $outline = $('<div id="image-crop-outline" />')
   .css({
       opacity : options.outlineOpacity,
       position : 'absolute'
   })
   .insertAfter($trigger);
And finally the last layer. ...
// Initialize a selection layer and place it above the outline layer
var $selection = $('<div />')
.css({
background : 'url(' + $image.attr('src') + ') no-repeat',
position : 'absolute'
})
.insertAfter($outline);
The .attr() method returns the value of a specified attribute. We used it to get the image src, and set it as the background for the selection layer. Absolute Positioning Inside Relative Positioning
You might already know this, but an element with a relative positioning provides you with the control to absolutely position elements inside of it. This is why the holder layer has a relative position and all of its children an absolute position.An excellent explanation of this trick is covered in this article.
Step 6. Updating The Interface
First, we’ll initialize some variables.... // Initialize global variables var selectionExists, selectionOffset = [0, 0], selectionOrigin = [0, 0];The
selectionExists will inform us if a selection exists. The selectionOffset will contain the offset relative to the image origin, and the selectionOrigin will indicate the origin of the selection. Things will be much more clear after a few steps. The following conditions are required if the selection exists when the plug-in is loaded.
...

// Verify if the selection size is bigger than the minimum accepted
// and set the selection existence accordingly
if (options.selectionWidth > options.minSelect[0] &&
   options.selectionHeight > options.minSelect[1])
       selectionExists = true;
   else
       selectionExists = false;
Next we’ll call the updateInterface() function for the first time to initialize the interface. ... // Call the 'updateInterface' function for the first time to // initialize the plug-in interface updateInterface();We’ll write the body of this function shortly. Right now, let’s take care of our first event.
...

if (options.allowSelect)
   // Bind an event handler to the 'mousedown' event of the trigger layer
   $trigger.mousedown(setSelection);
We call
.mousedown() if options.allowSelect is true. This will bind an event handler to the mousedown event of the trigger layer. So, if a user clicks the image, the setSelection() will be invoked. ...
// Get the current offset of an element
function getElementOffset(object) {
var offset = $(object).offset();
return [offset.left, offset.top];
};
// Get the current mouse position relative to the image position
function getMousePosition(event) {
var imageOffset = getElementOffset($image);
var x = event.pageX - imageOffset[0],
y = event.pageY - imageOffset[1];
x = (x < 0) ? 0 : (x > $image.width()) ? $image.width() : x;
y = (y < 0) ? 0 : (y > $image.height()) ? $image.height() : y;
return [x, y];
};
The first function, getElementOffset(), returns the left and top coordinates of the specified object relative to the document. We’ve retrieved this value by calling the .offset() method. The second function, getMousePosition(), returns the current mouse position, but relative to the image position. So, we’ll work with values that are only between 0 and the image width/height on the x/y-axis, respectively. Let’s write a function to update our layers.
...

// Update the overlay layer
function updateOverlayLayer() {
   $overlay.css({
       display : selectionExists ? 'block' : 'none'
   });
};
This function checks the value of the selectionExists variable, and determines if the overlay layer should be displayed or not. ...
// Update the trigger layer
function updateTriggerLayer() {
$trigger.css({
cursor : options.allowSelect ? 'crosshair' : 'default'
});
};
The updateTriggerLayer() function changes the cursor to crosshair or default, depending on the options.allowSelect value. Next, we’ll write the
updateSelection() function. It will update not only the selection layer, but the outline layer as well. ...
// Update the selection
function updateSelection() {
// Update the outline layer
$outline.css({
cursor : 'default',
display : selectionExists ? 'block' : 'none',
left : options.selectionPosition[0],
top : options.selectionPosition[1]
})
.width(options.selectionWidth)
.height(options.selectionHeight);
// Update the selection layer
$selection.css({
backgroundPosition : ( - options.selectionPosition[0] - 1) + 'px ' + ( - options.selectionPosition[1] - 1) + 'px',
cursor : options.allowMove ? 'move' : 'default',
display : selectionExists ? 'block' : 'none',
left : options.selectionPosition[0] + 1,
top : options.selectionPosition[1] + 1
})
.width((options.selectionWidth - 2 > 0) ? (options.selectionWidth - 2) : 0)
.height((options.selectionHeight - 2 > 0) ? (options.selectionHeight - 2) : 0);
};
First, this function sets the properties of the outline layer: the cursor, the display, the size and its position. Next comes the selection layer; the new value of the background position will make the images overlap seamlessly. Now, we need a function to update the cursor when needed. For example, when we make a selection, we want the cursor to remain a
crosshair no matter which layer we are over. ...
// Update the cursor type
function updateCursor(cursorType) {
$trigger.css({
cursor : cursorType
});
$outline.css({
cursor : cursorType
});
$selection.css({
cursor : cursorType
});
};
Yes, it’s as simple as it looks. Just change the cursor type to the specified one! And now, the last function of this step; we need it to update the plug-in’s interface in different situations – on selecting, on resizing, on releasing the selection, and even when the plug-in initializes.
...

// Update the plug-in's interface
function updateInterface(sender) {
   switch (sender) {
       case 'setSelection' :
           updateOverlayLayer();
           updateSelection();

           break;
       case 'resizeSelection' :
           updateSelection();
           updateCursor('crosshair');

           break;
       default :
           updateTriggerLayer();
           updateOverlayLayer();
           updateSelection();
   }
};
As you can see, the updateInterface() function filters some cases and calls the necessary functions we’ve just written. Step 7. Setting The Selection
Up until now, we took care of the customization options and the interface, but nothing related to how the user interacts with the plug-in. Let’s write a function that sets a new selection when the image is clicked....
// Set a new selection
function setSelection(event) {
// Prevent the default action of the event
event.preventDefault();
// Prevent the event from being notified
event.stopPropagation();
// Bind an event handler to the 'mousemove' and 'mouseup' events
$(document).mousemove(resizeSelection).mouseup(releaseSelection);
// Notify that a selection exists
selectionExists = true;
// Reset the selection size
options.selectionWidth = 0;
options.selectionHeight = 0;
// Get the selection origin
selectionOrigin = getMousePosition(event);
// And set its position
options.selectionPosition[0] = selectionOrigin[0];
options.selectionPosition[1] = selectionOrigin[1];
// Update only the needed elements of the plug-in interface
// by specifying the sender of the current call
updateInterface('setSelection');
};
First, the setSelection function calls two methods: event.preventDefault() and event.stopPropagation(). This prevents the default action and any parent handlers from being notified of the event. The .mousemove() method binds an event handler to the mousemove event. This will call the resizeSelection() function every time the user moves the mouse pointer. To notify that a new selection is being made, the selectionExists variable is made true and the selection size is set to 0. Next, we get the selection origin by calling our previously written function, getMousePosition(), and pass its value to the options.selectionPosition. Finally, we call the updateInterface() function to update the plug-in’s interface according to the changes made. Step 8. Resizing The Selection
In the previous step, we wrote a function for setting a new selection. Let’s now write a function for resizing that selection....
// Resize the current selection
function resizeSelection(event) {
// Prevent the default action of the event
event.preventDefault();
// Prevent the event from being notified
event.stopPropagation();
var mousePosition = getMousePosition(event);
// Get the selection size
options.selectionWidth = mousePosition[0] - selectionOrigin[0];
options.selectionHeight = mousePosition[1] - selectionOrigin[1];
if (options.selectionWidth < 0) {
options.selectionWidth = Math.abs(options.selectionWidth);
options.selectionPosition[0] = selectionOrigin[0] - options.selectionWidth;
} else
options.selectionPosition[0] = selectionOrigin[0];
if (options.selectionHeight < 0) {
options.selectionHeight = Math.abs(options.selectionHeight);
options.selectionPosition[1] = selectionOrigin[1] - options.selectionHeight;
} else
options.selectionPosition[1] = selectionOrigin[1];
// Update only the needed elements of the plug-in interface
// by specifying the sender of the current call
updateInterface('resizeSelection');
};
To resize the selection, we need to retrieve the current mouse position. Because the returned value is relative to the image size, we need to take care only of the negative values. It will never exceed the image bounds. As you know, we can’t have a negative value for the width or height properties of an element. To solve this, we call Math.abs() to get the absolute value and then we reposition the selection. Step 9. Releasing The Selection
And now the final function:...
// Release the current selection
function releaseSelection(event) {
// Prevent the default action of the event
event.preventDefault();
// Prevent the event from being notified
event.stopPropagation();
// Unbind the event handler to the 'mousemove' event
$(document).unbind('mousemove');
// Unbind the event handler to the 'mouseup' event
$(document).unbind('mouseup');
// Update the selection origin
selectionOrigin[0] = options.selectionPosition[0];
selectionOrigin[1] = options.selectionPosition[1];
// Verify if the selection size is bigger than the minimum accepted
// and set the selection existence accordingly
if (options.selectionWidth > options.minSelect[0] &&
options.selectionHeight > options.minSelect[1])
selectionExists = true;
else
selectionExists = false;
// Update only the needed elements of the plug-in interface
// by specifying the sender of the current call
updateInterface('releaseSelection');
};
When the selection is being released, the releaseSelection() function removes the previously attached event handlers in the setSelection() function by calling the .unbind() method. Next, it updates the selection origin and tests the minimum size accepted for the selection to exist. Now, we are almost ready. Close this file and prepare for the next step.
Step 10. Styling The Plug-In
Open the/resources/js/imageCrop/jquery.imagecrop.css stylesheet, and add the following lines. div#image-crop-overlay {
background-color : #ffffff;
overflow : hidden;
}
div#image-crop-outline {
background : #ffffff url('outline.gif');
overflow : hidden;
}
There’s nothing complicated here; we’ve added some styling to the overlay and outline layers. Step 11. Testing The Final Result
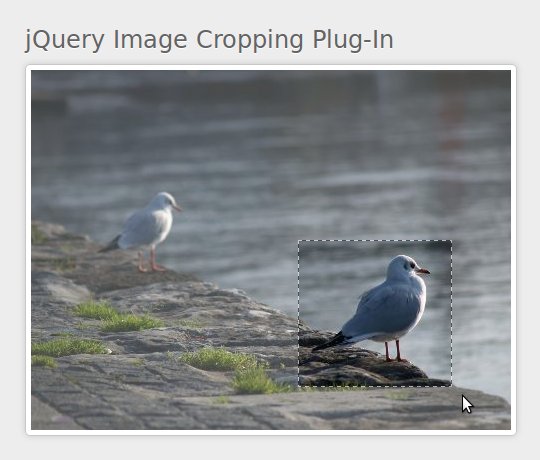
To test our plug-in, we need to attach it to an image. Let’s do that and edit theindex.html page. Open the
script tag … <script type="text/javascript"> ... </script>… and write the following JavaScript code.
$(document).ready(function() {
   $('img#example').imageCrop({
       overlayOpacity : 0.25
   });
});
We’ve attached our plug-in to the image element with the example id, and set some custom options. We used the .ready() method to determine when the DOM is fully loaded.  Posted in:


