


"WordPress continually proves itself time, time, and again that it has very few limitations, and is rapidly pushing itself to being, if not the best, but certainly the most versatile CMS available. Out of the box it is certainly not perfect, but you can change it however you want. In the previous tutorial, we went over how to add fonts to your theme via a plugin. Now, we’ll integrate font options directly into the theme’s options.
Again, we will be using Google Web Fonts because it’s easy, fast and, most importantly, free. With Google Web Fonts there is no need to worry about using the proper font formats, everything is handled by Google.
Step 1 Add a Settings Page
First, make sure you have a theme options page. If you don’t know how to make one, I suggest reading Create a Settings Page by Jarkko Laine. In this tutorial, I’m going to assume that you know the basics and build from there. So let’s go into our functions.php file and add a simple typography settings page:add_action( 'admin_menu', 'my_fonts' );
function my_fonts() {
add_theme_page( 'Fonts', 'Fonts', 'edit_theme_options', 'fonts', 'fonts' );
}
Step 2 Add the Form
Now that we’ve added a settings page, we have to code the callback function we’re using to render the page itself, which would be typography. All we need is a basic form that shows a dropdown of all the fonts that users can choose from and allow them to change it.function fonts() {
?>
<div class="wrap">
<div><br></div>
<h2>Fonts</h2>
<form method="post" action="options.php">
<?php wp_nonce_field( 'update-fonts' ); ?>
<?php settings_fields( 'fonts' ); ?>
<?php do_settings_sections( 'fonts' ); ?>
<?php submit_button(); ?>
</form>
</div>
<?php
}
Okay, we’ve added our fonts form to the page, just some basic settings_fields, but WordPress has no idea. Now we use the admin_init action to initialize our settings and add the callbacks:add_action( 'admin_init', 'font_init' );
function font_init() {
register_setting( 'fonts', 'fonts' );
// Settings fields and sections
add_settings_section( 'font_section', 'Typography Options', 'font_description', 'fonts' );
add_settings_field( 'body-font', 'Body Font', 'body_font_field', 'fonts', 'font_section' );
}
All we’re doing here is creating a settings section for our fonts forms and the field for a single font, you can add more if you want, in this tutorial I’m only going over the body tag. Just add more by copying that field and replace body with something else like h1. We also now have a setting called fonts, where we will be storing our font data/options. Let’s go ahead and define the callback functions, font_description and body_font_field.function font_description() {
echo 'Use the form below to change fonts of your theme.';
}
function body_font_field() {
$options = (array) get_option( 'fonts' );
$fonts = get_fonts();
if ( isset( $options['body-font'] ) )
$current = $options['body-font'];
else
$current = 'arial';
?>
<select name="fonts[body-font]">
<?php foreach( $fonts as $key => $font ): ?>
<option <?php if($key == $current) echo "SELECTED"; ?> value="<?php echo $key; ?>"><?php echo $font['name']; ?></option>
<?php endforeach; ?>
</select>
<?php
}
We have to get the font options that we just made in the init action and the fonts we have available, get_fonts(). Set the current font in the form to whatever is in the options, otherwise it’ll default to Arial. Then, use a foreach loop to go through our array of available fonts. You can also add a description or make it a brief tutorial on how to use it.Step 3 Getting the Fonts
As you noticed in the previous snippet of code, we need to define the get_fonts() function to retrieve the fonts we need. You can either include the Google Webfonts or just stick with the basic CSS fonts. We’ll just use an array to store all of the fonts, and then distinguish them by their font name. You can do this with any fonts, but for the purposes of this tutorial, we’ll just be using Arial, Ubuntu and Lobster.function get_fonts() {
$fonts = array(
'arial' => array(
'name' => 'Arial',
'font' => '',
'css' => "font-family: Arial, sans-serif;"
),
'ubuntu' => array(
'name' => 'Ubuntu',
'font' => '@import url(http://fonts.googleapis.com/css?family=Ubuntu);',
'css' => "font-family: 'Ubuntu', sans-serif;"
),
'lobster' => array(
'name' => 'Lobster',
'font' => '@import url(http://fonts.googleapis.com/css?family=Lobster);',
'css' => "font-family: 'Lobster', cursive;"
)
);
return apply_filters( 'get_fonts', $fonts );
}
Note: You are not limited to only using Google Webfonts. If you want to use a custom font that is hosted on your FTP or on Amazon S3, then replace @import with @font-face and change the url to where your font file is hosted. Step 4 Add the CSS
Before you apply any of fonts in your CSS, you should remove all instances of Google Webfonts of in your CSS files. This way when we make the import call to get the Ubuntu font, we’re not wasting an extra 100 ms getting the Lobster font too.Now that we have all of our fonts set, we have to create a wp_head action that adds the styling to your WordPress. If you are using this script for multiple tags, simply duplicate the code, just changing “body” to whichever tag you’re editing.
add_action( 'wp_head', 'font_head' );
function font_head() {
$options = (array) get_option( 'fonts' );
$fonts = get_fonts();
$body_key = 'arial';
if ( isset( $options['body-font'] ) )
$body_key = $options['body-font'];
if ( isset( $fonts[ $body_key ] ) ) {
$body_font = $fonts[ $body_key ];
print_ '<style>';
echo $body_font['font'];
echo 'body { ' . $body_font['css'] . ' } ';
echo '</style>';
}
}
We start by checking if a font is chosen in our options, if not, then set the font to our default, Arial. Now we print out the style tag, the import statement and our CSS code. What You Get in the End
This is what you should’ve ended up with: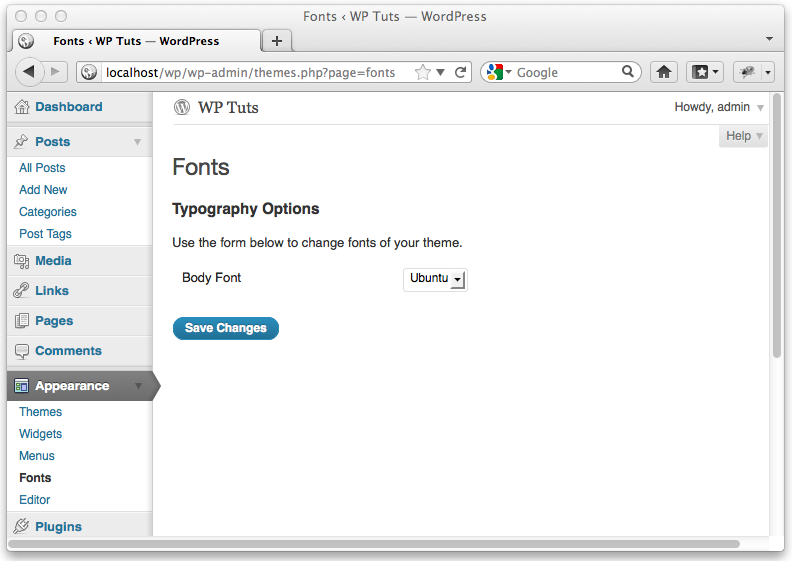
Full Source Code
For anyone who is having some trouble putting it all together. Here is the full source code, ready to just paste into the functions.php file:<?
// Changing the Fonts of Your WordPress - Part 2: Theme Integration
// Tutorial on WP Tuts
// by Fouad Matin
// Please credit this tutorial, by putting a link back to http://wp.tutsplus.com/tutorials/changing-the-fonts-of-your-wordpress-site-part-2-theme-integration/
// Enjoy!
add_action( 'admin_menu', 'my_fonts' );
function my_fonts() {
   add_theme_page( 'Fonts', 'Fonts', 'edit_theme_options', 'fonts', 'fonts' );
}
function fonts() {
?>
<div class="wrap">
<div><br></div>
<h2>Fonts</h2>
<form method="post" action="options.php">
<?php wp_nonce_field( 'update-fonts' ); ?>
<?php settings_fields( 'fonts' ); ?>
<?php do_settings_sections( 'fonts' ); ?>
<?php submit_button(); ?>
</form>
<img style="float:right; border:0;" src="http://i.imgur.com/1qqJG.png" />
</div>
<?php
}
add_action( 'admin_init', 'my_register_admin_settings' );
function my_register_admin_settings() {
register_setting( 'fonts', 'fonts' );
add_settings_section( 'font_section', 'Font Options', 'font_description', 'fonts' );
add_settings_field( 'body-font', 'Body Font', 'body_font_field', 'fonts', 'font_section' );
add_settings_field( 'h1-font', 'Header 1 Font', 'h1_font_field', 'fonts', 'font_section' );
}
function font_description() {
echo 'Use the form below to change fonts of your theme.';
}
function get_fonts() {
   $fonts = array(
       'arial' => array(
           'name' => 'Arial',
           'font' => '',
           'css' => "font-family: Arial, sans-serif;"
       ),
       'ubuntu' => array(
           'name' => 'Ubuntu',
           'font' => '@import url(http://fonts.googleapis.com/css?family=Ubuntu);',
           'css' => "font-family: 'Ubuntu', sans-serif;"
       ),
       'lobster' => array(
           'name' => 'Lobster',
           'font' => '@import url(http://fonts.googleapis.com/css?family=Lobster);',
           'css' => "font-family: 'Lobster', cursive;"
       )
   );

   return apply_filters( 'get_fonts', $fonts );
}
function body_font_field() {
$options = (array) get_option( 'fonts' );
$fonts = get_fonts();
$current = 'arial';
if ( isset( $options['body-font'] ) )
$current = $options['body-font'];
?>
<select name="fonts[body-font]">
<?php foreach( $fonts as $key => $font ): ?>
<option <?php if($key == $current) echo "SELECTED"; ?> value="<?php echo $key; ?>"><?php echo $font['name']; ?></option>
<?php endforeach; ?>
</select>
<?php
}
function h1_font_field() {
$options = (array) get_option( 'fonts' );
$fonts = get_fonts();
$current = 'arial';
if ( isset( $options['h1-font'] ) )
$current = $options['h1-font'];
?>
<select name="fonts[h1-font]">
<?php foreach( $fonts as $key => $font ): ?>
<option <?php if($key == $current) echo "SELECTED"; ?> value="<?php echo $key; ?>"><?php echo $font['name']; ?></option>
<?php endforeach; ?>
</select>
<?php
}
add_action( 'wp_head', 'font_head' );
function font_head() {
$options = (array) get_option( 'fonts' );
$fonts = get_fonts();
$body_key = 'arial';
if ( isset( $options['body-font'] ) )
$body_key = $options['body-font'];
if ( isset( $fonts[ $body_key ] ) ) {
$body_font = $fonts[ $body_key ];
echo '<style>';
echo $body_font['font'];
echo 'body { ' . $body_font['css'] . ' } ';
echo '</style>';
}
$h1_key = 'arial';
if ( isset( $options['h1-font'] ) )
$h1_key = $options['h1-font'];
if ( isset( $fonts[ $h1_key ] ) ) {
$h1_key = $fonts[ $h1_key ];
echo '<style>';
echo $h1_key['font'];
echo 'h1 { ' . $h1_key['css'] . ' } ';
echo '</style>';
}
}
?>
 Posted in:


