


Progressively Enhance a Form to a Modal Form: "
With something as important as a contact form, you want it working properly for all visitors—even the JavaScript challenged. How do you handle this if you want to use a modal (pop-up) form? The answer is progressive enhancement; start with baseline, usable functionality; then increase the user experience for those who have browsers to support it.
Step 1: Decide on the Project Goals
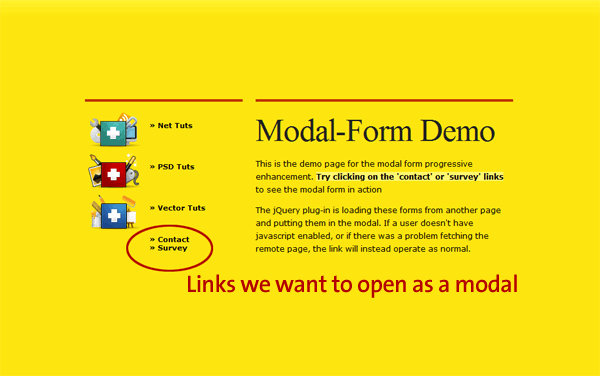
Before starting any journey, it helps (most times) to have a destination. The goal of this project is to take a standard link to a page containing a contact form and enable that form to pop-up on the current page in a modal dialog.
There’s several reasons for this approach:
- If the user has JavaScript disabled, they are sent to the contact form page as usual.
- Only one version of the form must be maintained.
- The additional content (the form) can be loaded asynchronously.
Step 2: List the Tools
To write this from scratch in raw JavaScript would be a lot of code. Fortunately for us, there are existing tools we can leverage to make the task easier. This tutorial relies on:
To make this code as reusable as possible, we’ll write a plug-in. If you are unfamiliar with authoring a plug-in, you can get an introduction from Jeffrey Way’s article here on Nettuts+. The modal functionality will come from jQuery-UI’s $.dialog.
Step 3: Design the Plug-in Interface
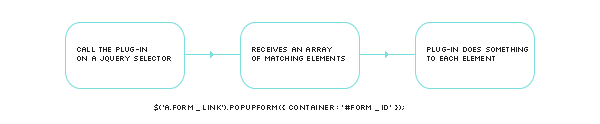
We’re going to follow the normal pattern for a jQuery plug-in: calling the plug-in on a selector and setting options via array. What options are needed? There will be options both for the modal window and for the plug-in itself. We’re going to expect the plug-in to be called on an anchor, and enforce that in the code.
$('a.form_link').popUpForm({
container   : '',
modal       : true,
resizeable  : false,
width       : 440,
title       : 'Website Form',
beforeOpen  : function(container) {},
onSuccess   : function(container) {},
onError     : function(container) {}
});
Examining the options
Container: This is how the plug-in user will specify the ID of the form on the remote page. The link itself specifies the page, but container option will allow us to fetch the relevant part. This will be the only required option when calling the plug-in.
Modal, Resizeable, Width, Title: These options are all going to be passed along to jQuery UI’s $.dialog. The values above are defaults and the plug-in will run just fine without any of these being set when $.popUpForm is called.
beforeOpen, onSuccess, onError: These are all callbacks, and expect a function. The function will be passed the object for the link that was clicked as ‘this’ and the container to which that link is targeted. Callbacks are designed to allow custom functionality for the users of a plug-in. The default for these callbacks will be an empty function.
The minimum code required to use the plug-in would then look like this:
$('a.form_link').popUpForm({ container : '#form_id' });
That seems simple, doesn’t it? When you call a plug-in like this, the plug-in’s code is called with a jQuery collection of all the DOM elements matching the selector, which will be available in the special variable ‘this’.
Step 4: The Plug-In’s Skeleton
Most jQuery plug-ins follow a very similar pattern. They iterate over the group of selectors and do whatever it is they do. I’ve got a basic plug-in “outline” I generally work from, and it will fit in here nicely. This would be the start of your plug-in file, popUpForm.jquery.js.
(function($) {
$.fn.popUpForm = function(options) {

// Defaults and options
var defaults = {
container   : '',
modal       : true,
resizeable  : false,
width       : 440,
title       : 'Website Form',
beforeOpen  : function(container) {},
onSuccess   : function(container) {},
onError     : function(container) {}
};
var opts = $.extend({}, defaults, options);

self.each(function() {

// The REAL WORK happens here.
// Within the scope of this function 'this' refers to a single
// DOM element within the jQuery collection (not a jQuery obj)
});
}
})(jQuery);
The code is wrapped in a self-executing function, and adds itself to jQuery using the $.fn namespace. The identifier following $.fn is the method name you’ll use to invoke it.
We’re also following good coding practices by passing in the jQuery variable explicitly. This will keep us from getting into trouble if the plug-in is used on a page with other JavaScript frameworks, some of which use $ as a variable.
Next, an array of default values is created, and these defaults will be used if they aren’t defined when the plug-in is called. The line immediately following the defaults array merges the passed in options with the defaults and stores them all in the opts array.
Finally, a loop is created for iterating over the jQuery collection identified by the selector when the plug-in is called.. While chances are in most situations it will be a single item ( an anchor), it will still handle multiple links with a single call – assuming they all load the same form.
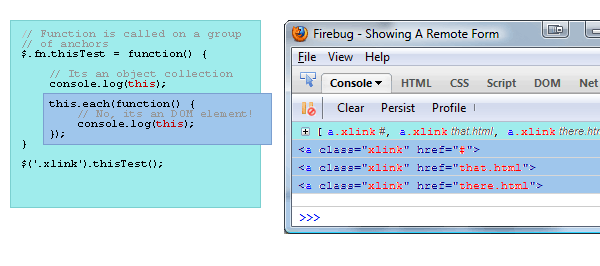
An important thing to understand is that the value of the special variable ‘this’ changes when we enter the self.each loop; it’s a special jQuery method designed to make looping DOM collections easier. The callback function uses the context of the current DOM element, so the variable ‘this’ refers to that element within the loop.
You can see in a very simple example how ‘this’ refers to a jQuery collection of jQuery objects in the plug-in function scope, but inside the each loop, ‘this’ refers to a single, non-jQuery DOM element.
Step 5: Starting the Guts
The code for the next few sections is all contained within the self.each block of our skeleton. What do we do now? For each jQuery element passed in, there are going to be several steps to take:
- Make sure it is a link, and that it goes somewhere
- Fetch the part of the remote page specified
- Attach the remote form to the page, and create a hidden dialog for it
- Steal the link so it creates our pop-up
- Handle form submissions AJAX style
Before doing any of that, however, we’re going to add one line of code inside the callback, at the very top
var $this = $(this);
This is more then just convenience; the variable ‘this’ will go out of scope in any closures within the each loop, and we’re going to need access to the current object later. Since we’ll almost always want it as a jQuery object, we’re storing it as one.
Step 6: Make Sure the Element Is Valid
$.popUpForm is only going to operate on anchor tags, and the anchor tag must have a href value so we know where to fetch the form from. If either of those conditions is not met, we’re going to leave the element alone. The second line of our ‘guts’ will be:
if (!$this.is('a') || $this.attr('href') == '') { return ; }
Some people hate multiple return points in a function, but I’ve always found having one at the start can make a function more readable, as opposed to using an if(condition) to wrap the rest of the function. Performance wise, they’re identical.
Step 7: Fetch the From From the Remote Page
The $.load method has nice functionality that allows a call to specify and ID in order to only attach part of a fetched document. The script won’t attach the returned HTML directly to the DOM, because $.load only overwrites, it doesn’t append.
var SRC = $this.attr('href') + ' ' + opts.container;
var formDOM = $("<div />").load(SRC, function() {
The variable opts.container has the ID of the form element on the remote page. The second line loads this remote page, and attaches the form and its contents to a div, the entirety of which is stored in the variable formDOM. Notice that $.load includes a callback (the function) — we’ll use formDOM inside that callback.
Step 8: Attach the HTML and Create the Dialog
Inside the $.load callback, the code is going to attach the form, override the click event of the anchor, and override the submit event of the form.
The form’s HTML is stored in the formDOM variable at this point, and attaching it to the existing page is easy.
$('#popUpHide').append(formDOM);
The id #popUpHide refers to a hidden div that will attached to the page by the plug-in. In order to provide that div, the following line will be added at the top of the plug-in. If it already exists, we don’t recreate it.
$("#popUpHide").length || $('<div id="popUpHide" />').appendTo('body').css('display','none');
Now that the form is hidden safely away on our page, it is time to use a call to the $.dialog method to create the form. Most of the set-up params are taken from our plug-in. The ‘autoopen’ option is hard coded since we want the dialog to open when the link is clicked, and not when the dialog is created.
// Create and store the dialog
$(opts.container).dialog({
autoOpen    : false,
width       : opts.width,
modal       : opts.modal,
resizable   : opts.resizeable,
title       : opts.title
});
Step 9: Override Default Event Handling
If we stopped here, the plug-in wouldn’t be doing much. The link would still take us to the next page. The behavior we desire is for the link to open the dialog.
$this.bind('click', function(e) {
e.preventDefault();
opts.beforeOpen.call($this[0], opts.container);
$(opts.container).dialog('open');
});
The first line of this click handler is very important. It stops the link from loading the new page when it is clicked.
The second line is our ‘beforeOpen’ callback. The variable opts.beforeOpen contains a function reference – that much is obvious. The .call method is used to invoke the function in a way where we can provide context — the ‘this’ variable for that function. The first argument passed becomes ‘this’ to the called function.
When a function has access to the variable ‘this’ there are some contracts JavaScript has with the programmer that we should maintain.
- The ‘this’ variable should be the object the function acts on
- The ‘this’ variable is a single DOM object
In order to maintain that contract, we pass $this[0] instead of $this. $this[0] represents a single, non-jQuery DOM object.
To help understand this a little better, imagine the following callback function:
opts.beforeOpen = function(container) {

// Gives the value of the link you just clicked
alert('The remote page is ' + this.href);

// Gives the id container assigned to this link
alert('And the container is ' + container);
}
The link click isn’t the only default behavior to override. We also want the form to submit via AJAX, so the normal form onsumbit event needs to be prevented and new behavior coded.
$(opts.container).bind('submit', function(e) {
e.preventDefault();
ajaxSubmit();
});
Again, we use preventDefault() to stop the event, and in this case add a new function to handle the form submission. The ajaxSubmit() code could go directly in the callback, but it has been moved to a new function for readability.
Step 10: Handle Form Submissions, AJAX-Style
This function would be added immediately after the end of the self.each loop ( don’t worry, you’ll see the entire plug-in code in one shot in just a bit ). It takes the form, submits it to a remote script, and fires the appropriate callbacks.
The first step is to get the form as a jQuery object, and to determine the form’s method, either GET or POST.
function ajaxSubmit() {
var form    = $(opts.container);
var method  = form.attr('method') || 'GET';
If you remember, we stored the form’s ID in opts.container. The next line checks the form for a method, and assigns ‘GET’ if no method is present. This is consistent with HTML which uses GET by default on forms if no method is specified.
Use the $.ajax method to submit the form:
$.ajax({
type    : method,
url     : form.attr('action'),
data    : form.serialize(),
success : function() {
$(opts.container).dialog('close');
opts.onSuccess.call($this[0], opts.container);
},
error   : function() {
$(opts.container).dialog('close');
opts.onError.call($this[0], opts.container);
}
});
The URL option is determined from the action attribute of the form tag. The data is produced by using the serialize method on the jQuery object containing the form.
The success and error options are $.ajax callbacks, which we’re in turn using to call our callbacks, in the same way the beforeOpen callback was invoked.
We’re also closing the dialog in for both the success and error handlers.
Step 11: The Entire Plug-In
As a review, let’s look at the code we’ve written so far as a whole, including some helpful code comments:
(function($) {
var alog = window.console ? console.log : alert;

$.fn.popUpForm = function(options) {
// REQUIRE a container
if(!options.container) { alert('Container Option Required'); return; }

// Give us someplace to attach forms
$("#popUpHide").length || $('<div id="popUpHide" />').appendTo('body').css('display','none');

// Defaults and options
var defaults = {
container   : '',
modal       : true,
resizeable  : false,
width       : 440,
title       : 'Website Form',
beforeOpen  : function(container) {},
onSuccess   : function(container) {},
onError     : function(container) {}
};
var opts = $.extend({}, defaults, options);

// The "this" within the each loop refers to the single DOM item
// of the jQuery collection we are currently operating on
this.each(function() {
/* We want to keep the value 'this' available to the $.load
* callback */
var $this = $(this);

/* we only want to process an item if it's a link and
* has an href value
*/

if (!$this.is('a') || $this.attr('href') == '') { return ; }

/* For a $.load() function, the param is the url followed by
* the ID selector for the section of the page to grab
*/
var SRC = $this.attr('href') + ' ' + opts.container;

/* the event binding is done in the call back in case the
* form fails to load, or the user clicks the link before
* the modal is ready
*/
var formDOM = $("<div />").load(SRC, function() {
// Append to the page
$('#popUpHide').append(formDOM);

// Create and store the dialog
$(opts.container).dialog({
autoOpen    : false,
width       : opts.width,
modal       : opts.modal,
resizable   : opts.resizeable,
title       : opts.title
});

/* stops the normal form submission; had to come after
* creating the dialog otherwise the form doesn't exist
* yet to put an event handler to
*/
$(opts.container).bind("submit", function(e) {
e.preventDefault();
ajaxSubmit($this[0]);
});

// create a binding for the link passed to the plug-in
$this.bind("click", function(e) {
e.preventDefault();
opts.beforeOpen.call($this[0], opts.container);
$(opts.container).dialog('open');
});
});

});

function ajaxSubmit(anchorObj) {
console.log(anchorObj);
var form    = $(opts.container);
var method  = form.attr('method') || 'GET';

$.ajax({
type    : method,
url     : form.attr('action'),
data    : form.serialize(),
success : function() {
$(opts.container).dialog('close');
opts.onSuccess.call(anchorObj, opts.container);
},
error   : function() {
opts.onError.call(anchorObj, opts.container);
}
});
}
}
})(jQuery);
This code should all be saved in a file called popUpForm.jquery.js
Step 12: Setting Up the Plug-In
The first step in plug-in usage would be to include all the required dependencies on your HTML page. Personally I prefer to use the Google CDN. The files being on a separate domain can help page load speed, and the servers are fast. Also, it increases the chances that a visitor will already have these files cached.
In the HEAD of the HTML document, add the following:
<link rel="stylesheet" href="http://ajax.googleapis.com/ajax/libs/jqueryui/1.8/themes/black-tie/jquery-ui.css" type="text/css" />
<link rel="stylesheet" href="css/main.css" type="text/css" />

<script src='http://ajax.googleapis.com/ajax/libs/jquery/1.4.2/jquery.min.js'></script>
<script src='http://ajax.googleapis.com/ajax/libs/jqueryui/1.8.2/jquery-ui.min.js'></script>
The main.css file is for our site specific styles, everything else is from Google’s CDN. Notice you can even use jQuery-UI themes from the CDN in this fashion.
Step 13: Invoking the Plug-In
Remember, we only want to invoke the plug-in on links that go to a form page. In the online demo, the forms are contained in form.html, and only two links go to that page.
<script>
$(document).ready(function() {
$('.contact a').popUpForm({
container   : '#modalform',
onSuccess   : function() { alert('Thanks for your submission!'); },
onError     : function() { alert('Sorry there was an error submitting your form.'); }
});

$('.survey a').popUpForm({ 'container' : '#othercontainer' });
});
</script>
The calls are wrapped in a document.ready block so we can be sure the anchor elements exist before trying to act upon them. The second call, $(‘.survey a’) is an example of the minimum amount needed to use our new plug-in. The first example sets a callback for both onSuccess and onError.
Step 14: Styling the Modal
If you’ve gotten this far, and you created examples forms and a page to call them from, you’d notice the form in the modal is probably, well, ugly. The modal itself isn’t bad, because we’re using a jQuery-UI theme. But the form inside the modal is mostly unstyled, so we should make some efforts to pretty it up.

There are some things to keep in mind when creating styles for use in a jQuery-UI modal:
- The modal itself is only a child of the page’s BODY element
- The contents of the modal are all children of a div of class ‘ui-dialog’
Using these small bits of information we can begin applying styles to the form in the modal. First we give the modal a background color we’re happy with, and also modify the font for the title bar.
.ui-dialog {
background: rgb(237,237,237);
font: 11px verdana, arial, sans-serif;
}
.ui-dialog .ui-dialog-titlebar  {
font: small-caps bold 24px Georgia, Times, serif;
}
Next, we want to separate each item in the form with lines. Since the form structure alternates h3s with divs containing form elements, we add the following rules:
.ui-dialog h3,
.ui-dialog div {
border-top:1px solid rgb(247,247,247);
border-bottom:1px solid rgb(212,212,212);
padding:8px 0 12px 10px;
}
And we only want lines between the sections, not at the very top or very bottom.
.ui-dialog .puForm div:last-child {
border-bottom:none;
}
.ui-dialog .puForm h3:first-child {
border-top:none;
}
Lets not forget to style the h3s, and the form elements. The radio buttons need to display inline so they are all in a row.
.ui-dialog h3 {
font: 18px Georgia, Times, serif;
margin: 0;
}
.ui-dialog select,
.ui-dialog textarea,
.ui-dialog input {
width:76%;
display: block;
}
.ui-dialog #rating input,
.ui-dialog #rating label {
display: inline;
width:auto;
}
Remember, these styles are specific to this project, you’ll have to style your own forms depending on what structure you use. To target the form elements specifically, you can either target descendants of .ui-dialog, or to style each form individually, include styles descending from the form ID you’ve included.
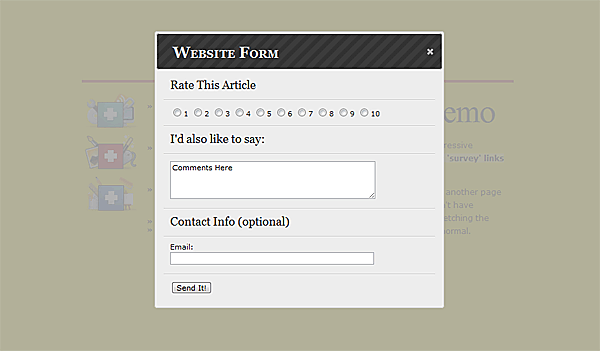
The styled form:
Step 15: Conclusion
So what have we really done? We’ve taken a normal link leading to a contact form (or forms) and caused that form to load up in a modal dialog, and submit via ajax. For users without javascript, nothing happens and the links behave normally, so we haven’t stopped anyone from filling out your forms.
If you click on the survey link in the demo, be sure to submit something. I’ll post the results in the comments for fun after a week or so!
"
 Posted in:


