


Building Persistant Sticky Notes with Local Storage: "
HTML5 local storage is like cookies on steroids; it’s incredibly simple to use and yet still so powerful. In this tutorial, I’ll show you how to create “sticky notes” functionality, that allows your users to take persistent notes while browsing your site.
Step 1: The HTML
Because of the dynamic nature of this project, there isn’t really much to code in the way of regular old semantic markup. We’ll just simulate a web page by putting together some filler content:
<!DOCTYPE html>
<html>
<head>
<meta charset='utf-8' />
<title>HTML 5 complete</title>
<link rel="stylesheet" href="default.css" />
<link rel="stylesheet" href="stickies/stickies.css" />
<!--[if IE]>
<script src="http://html5shiv.googlecode.com/svn/trunk/html5.js"></script>
<![endif]-->
</head>
<body>
<article>
<header>
<h1> Sample Article Title</h1>
</header>
<p>Lorem ipsum dolor. . . </p>
<!-- a few lorem-ipsum paragraphs later . . . -->
<footer>
<p>Copyright 2010 Andrew Burgess</p>
</footer>
</article>

<script src="http://ajax.googleapis.com/ajax/libs/jquery/1.4.2/jquery.min.js"></script>
<script src="http://ajax.googleapis.com/ajax/libs/jqueryui/1.8.2/jquery-ui.min.js"></script>
<script src="json2.js"></script>
<script src="stickies/stickies.js"></script>
<script>
</script>
</body>
</html>
There are a few important things to notice here: we’re including two CSS files: the first one is the simple styling for the page, which we’ve called
default.css. Then, we’ve got a special CSS files for styles relating to our sticky notes; it’s called stickies.css, and as you can see, it lives in the “stickies” folder. At the bottom, we’re including four scripts:- jQuery, from Google’s CDN
- JQuery UI, from Google’s CDN
- JSON2, from Douglas Crockford
- Our own
stickies.js, which lives in the “stickies” directory
Then, we’ve got an empty script tag that we’ll use to start the engine a bit later.
And that’s it for HTML!
Step 2: The CSS
The contents of
default.css is incredibly simple:body {
margin:0;
padding:0;
background:#ccc;
font:14px/1.5 "Helvetica Neue", Helvetica, Arial, san-serif;
}
article, footer, header { display: block; }
article {
width:880px;
background:#fff;
margin:auto;
padding:40px;
}
article header {
color:#474747;
border-bottom:1px solid #474747
}
article footer {
font-size:90%;
color:#ccc;
}That’s it; now, there’s the CSS from
stickies.css to look after … but we don’t have that markup yet. So let’s start some JavaScript, and when that’s done, we’ll look at the CSS for the sticky notes.Step 3: The JavaScript
Here’s the skeleton for our JavaScript application:
var STICKIES = (function () {
var initStickies = function () {},
openStickies = function () {},
createSticky = function (data) {},
deleteSticky = function (id) {},
saveSticky   = function () {},
markUnsaved  = function () {};

return {
open   : openStickies,
init   : initStickies
};
}());
We’ve got a few interesting techniques going on here. First is the self-involking function: it might look like we’re assigning a function to the variable
STICKIES, but if you look closely at the end of the function, you’ll see that we’re running it right away. As a hint—to remind us that this isn’t a normal function—we’re wrapping the entire function in parentheses. So, STICKIES isn’t a function, it’s the returned value from that function, which is an object, in this case.That brings us to the next technique: closure. Notice that of the six functions we create, only two of them are exposed to the user (really, only one is necessary for the usage we’re planning; if we wanted to build support for creating notes into your website, we could expose the
createSticky and deleteSticky). Even though the self-involking function finishes executing before we even use the methods, we’ll be able to use the other functions that we’ve defined.Okay, let’s move on to the content of these function.
initStickies
We’ll start by looking at the
initStickies function:var initStickies = function initStickies() {
$("<div />", {
text : "+",
"class" : "add-sticky",
click : function () { createSticky(); }
}).prependTo(document.body);
initStickies = null;
},This is pretty simple. We’ll be using jQuery to create elements quite a bit, and we’re using some special syntax in v. 1.4: that’s passing an object literal with the specs for the element as a second parameter to the jQuery function. Here, we’re creating a button to create a new note. That mean we need a new
div; we’re setting the text to ”+” and giving it a class “add-sticky”; then, we’re setting a click handler to call the createSticky method (it’s important to call createSticky from inside a function, and not have the click handler call directly to createSticky; this is because createSticky can take a single parameter, and we don’t want that to be the event object). Finally, we’re prepending this div to the body. We end by setting initStickies to null; yes, we’re essentially getting rid of the function that we’re running. This assures us that this function will only be run once; we don’t want the user of our API to inadvertantly add multiple “add note” buttons to page.openStickies
Let’s move on to the next method,
openStickies:openStickies = function openStickies() {
initStickies && initStickies();
for (var i = 0; i < localStorage.length; i++) {
createSticky(JSON.parse(localStorage.getItem(localStorage.key(i))));
}
},We start by running
initStickies … but what’s with the fancy syntax? Well, you’re probably familiar with && operator: the boolean AND operator. You’d usually use it to check multiple conditions in an if-statement. Here’s what it actually does: it evaluates the first expression, and if that comes out true, it will go on to evaluate the second expression. In this case, if initStickies has not been set to null yet, we’ll run the function. This avoids the error that would come from trying to run a null variable as a function.Next, we’re looping over each item in localStorage. Here’s what we do in that for-loop (from inside to outside):
localStorage.key()is a great function that returns the key name oflocalStoragevalue; it takes a number as a paramter. It’s a great way to loop over each item inlocalStorage.- Once we have the key for a stored item, we can pass it to
localStorage.getItem()to get its value. - Then, we pass that value to
JSON.parse(); this comes from Crockford’s library. Because we’re storing a few values for each note, we’re usingJSON.stringify()on the other end to turn an object into a JSON string, which we store. Here, we’re converting it from a string back into an object. - Finally, we pass that object to
createSticky(), which turns it back into a sticky note.
createSticky
Now, let’s look at that
createSticky method.createSticky = function createSticky(data) {
data = data || { id : +new Date(), top : "40px", left : "40px", text : "Note Here" }
return $("<div />", {
"class" : "sticky",
'id' : data.id
})
.prepend($("<div />", { "class" : "sticky-header"} )
.append($("<span />", {
"class" : "status-sticky",
click : saveSticky
}))
.append($("<span />", {
"class" : "close-sticky",
text : "trash",
click : function () { deleteSticky($(this).parents(".sticky").attr("id")); }
}))
)
.append($("<div />", {
html : data.text,
contentEditable : true,
"class" : "sticky-content",
keypress : markUnsaved
}))
.draggable({
handle : "div.sticky-header",
stack : ".sticky",
start : markUnsaved,
stop : saveSticky
})
.css({
position: "absolute",
"top" : data.top,
"left": data.left
})
.focusout(saveSticky)
.appendTo(document.body);
},Yes, it’s long, but it’s not going to be too hard. First, notice that this function takes a data object; as we just saw in
openStickies, we’re passing the stored data to this function. However, if we aren’t passing in any data (i.e., we’re creating a brand new note), we’ll create the default note object. Since all notes have to be created at one point, all notes will start with this configuration. Notice that for the note id, we’re using +new Date(); that prepended unary plus operator converts the date we get from new date to a number, so this statement results in a number representing the number of milliseconds since January 1, 1970. Obviously, this number will be continually changing, so it’s a great way to uniquely identify each note.The rest of the function is a long string of chained jQuery methods. Before we go through this, notice that we’re returning the result. If we exposed this method to developers using our mirco-API, it would return a reference to the sticky note div element.
So, here’s what’s going on:
First, we create thedivthat is the shell of the sticky note. Using that helpful jQuery 1.4 syntax, we give it a class of “sticky” and the id from the data object.
Then, we prepend adivto that one; thisdivgets a class “sticky-header”.div.sticky-headerthen gets two spans appended to it. The first,span.sticky-status, gets a click handler that calls thesaveStickyfunction. However, that’s actually a hidden feature: this span will display the status of the sticky: saved or unsaved. There will be a few ways the sticky saves its data tolocalStorage; it’s possible that the user will think that clicking ‘unsaved’ will save the note, so we’ll provide them with that functionality. The second span,span.close-sticky, will be the delete button: when the user clicks it, we’ll remove the sticky fromlocalStorage, via thedeleteStickymethod. We pass that method the note id.
Next, we’re appending another div to the maindiv.sticky; notice that we set thehtmlproperty todata.text; when we save the note’s text, we’re using jQuery’shtml()method, because usingtext()gets rid of line-breaks. We also setcontentEditable:trueon this div, because it’s the content of the note. As such, it also gets the classsticky-content. Finally, when a key is pressed on this div (meaning the user is changing the content), we want to mark it as unsaved, so we’ll call that function (which we’ll make soon).
Now, we’re using the jQuery UI draggable feature to make our sticky note moveable. In our parameter object, we’re using thehandleproperty to make our notes only movable from the header bar. Thestackproperty is a selector for the draggable elements to want to “stack”; by setting this, the currently dragged note will always come to the top. Finally, when we start dragging the note, we want to mark it as “unsaved” (because we have to save its coordinates, too), and when we stop dragging, we’ll save that sticky.
Next, we’re setting some styles for ourdiv.sticky; we position it absolutely, and then set its top and left values to the ones in the data object. This way, the note will keep its position as well as its content when we refresh the page.
Finally, we’ll set an event handler for when wefocusoutof the sticky (essentially, click outside it after clicking inside it): we want to save the sticky. Lastly, we’ll append it to the body. For reference, here’s the html structure that we should have generated:
<div class="sticky ui-draggable" id="1281194825332" style="position: absolute; top: 40px; left: 40px;">
<div class="sticky-header">
<span class="sticky-status"></span>
<span class="close-sticky">trash</span>
</div>
<div contenteditable="true" class="sticky-content">
Note Here
</div>
</div>
And that’s our
createSticky function.deleteSticky
Now we have the
deleteSticky function; it’s really simple:deleteSticky = function deleteSticky(id) {
localStorage.removeItem("sticky-" + id);
$("#" + id).fadeOut(200, function () { $(this).remove(); });
},As you recall, the
deleteSticky function takes the id of a note as its parameter. localStorage.removeItem() is the method of the hour: we pass it the key to a locally-stored value to remove that key-value pair (Notice that when we store the note data, we’re prepending “sticky-” to the id). Then, we find the element with the given id, fade it our, and remove it. Note deleted!saveSticky
Second-to-last might be the most important method today:
saveSticky: this is the glue that makes it all work.saveSticky = function saveSticky() {
var that = $(this), sticky = (that.hasClass("sticky-status") || that.hasClass("sticky-content")) ? that.parents('div.sticky'): that,
obj = {
id : sticky.attr("id"),
top : sticky.css("top"),
left: sticky.css("left"),
text: sticky.children(".sticky-content").html()
}
localStorage.setItem("sticky-" + obj.id, JSON.stringify(obj));
sticky.find(".sticky-status").text("saved");
},The first line is a bit of resolution: there are three different elements we can call this function from. First, we’ll “jQuerify”
this into that; then, if the element has either the “sticky-status” or “sticky-content” classes, we’ll get the parent div.sticky; if it doesn’t have either of those classes, then it’s div.sticky itself, so we’ll just use that.Then, we need to get the values we want to store. As you can see, we’re getting the id, offset from the top and left, and the html of the child
.sticky-content; remember, we’re using html() instead of text() because we want to keep the line breaks. Then, we use localStorage.setItem to store the data. Remember, it takes two parameters: the key and the value to store. Since localStorage only stores strings, we use JSON.stringify() to convert the object to a string.Lastly, change the sticky status to “saved.”
markUnsaved
We’ve got one last function, which is just a helper function:
markUnsaved = function markUnsaved() {
var that = $(this), sticky = that.hasClass("sticky-content") ? that.parents("div.sticky") : that;
sticky.find(".sticky-status").text("unsaved");
}
Again, we have to start by resolving the reference to
div.sticky; once we do, we can simply find the status span and set the text to “unsaved.”Believe it or not, that’s all the JavaScript.
Step 4: The CSS, Revisited
Now that we know what our sticky note markup is, we can style it. It’s pretty simple; but look it over, and I’ll make a few comments at the end:
:focus {
outline:0;
}
.add-sticky {
cursor: default;
position:absolute;
top:1px;
left:1px;
font-size:200%;
background:#000;
color:#fff;
border:2px solid #fff;
border-radius:40px;
-webkit-border-radius:40px;
-moz-border-radius:40px;
text-align:center;
line-height:25px;
width:30px;
height:30px;
}
.add-sticky:hover {
background: #474747;
}
.sticky {
width:300px;
background:#fdfdbe;
box-shadow:3px 3px 10px rgba(0,0,0,0.45);
-webkit-box-shadow:3px 3px 10px rgba(0,0,0,0.45);
-moz-box-shadow:3px 3px 10px rgba(0,0,0,0.45);
}
.sticky-content {
min-height:150px;
border-left:3px double rgba(238, 150, 122, .75);
margin-left:30px;
padding:5px;
}
.sticky-header {
padding:5px;
background:#f3f3f3;
border-bottom:2px solid #fefefe;
box-shadow:0 3px 5px rgba(0,0,0,0.25);
-webkit-box-shadow:0 3px 5px rgba(0,0,0,0.25);
-moz-box-shadow:0 3px 5px rgba(0,0,0,0.25);
}
.sticky-status {
color:#ccc;
padding:5px;
}
.close-sticky {
background:#474747;
float:right;
cursor:default;
color:#ececec;
padding:1px 5px;
border-radius:20px;
-webkit-border-radius:20px;
-moz-border-radius:20px;
}
There are a few points of interest here:
- Some browsers put an outline around elements with
contenteditable=truewhen you’re editing the content. We don’t want that, so we’re getting rid of it with our:focusdeclaration. - The “Add Sticky” button is positioned in the upper-left corner; it looks vaguely similar to the “Add Dashboard Widget” in Mac OS X.
- We’re using the border-radius and box-shadow CSS3 properties (and their appropriate vendor-prefix incarnations).
- We’re also using
rgba()for our shadow colours. It takes four parameters: the red, greed, and blue colours, and the alpha (transparency) value.
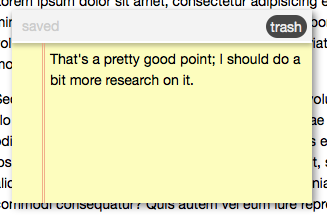
Other than that, it’s just your standard CSS. Here’s what a styled note should look like:
Step 5: Starting The Stickies
Now that we’ve made our API, it’s time to get it started; we can do that from the extra empty
script tag in our index.html file:STICKIES.open();
Conclusion: The Final Product
Well, we’re done! Here’s the final product in action:
That’s all I’ve got for today; how do you plan to use HTML5 local storage to spice up your web projects? Let me know in the comments!
"
 Posted in:


