• Feed RSS

How to Access and Use Google Body Browser

How to Access and Use Google Body Browser: "
Google, the omnipresent search provider, launched, with very little fanfare, something called, Google Body Browser in December 2010; and has maintained its presence on the web, though has not updated it as yet, as promised.

The Google Body Browser is to the human body what Google Earth is, well, to planet Earth. It’s a web application that allows the user to look very closely at the human body (currently just the female version) in great detail, in the same ways that Google Earth has allowed users to see different parts of the world.

Google Body Browser also has labels for different parts, and unlike Google Earth, allows the user to strip away parts of the body to see what lies beneath.

To access Google Body Browser, you first need to make sure you have a browser that is capable of handling this advanced app, e.g. one that supports WebGl, which only the newest versions of most browsers support. Next, you need to go to the Google Browser Site.

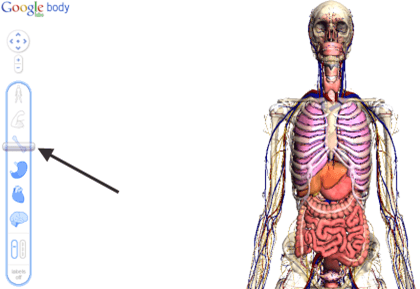
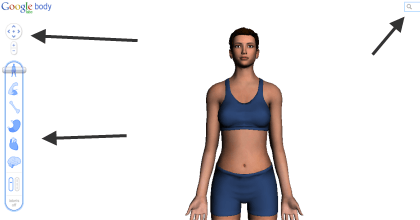
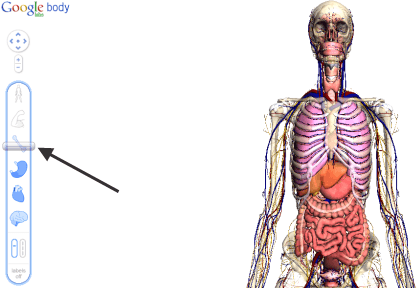
When it first loads, it looks like this:

Initial Screen

Note: On the left side of the screen are controls, in the center is the body to be viewed, and on the top right of the screen there is a search box.

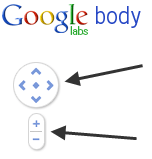
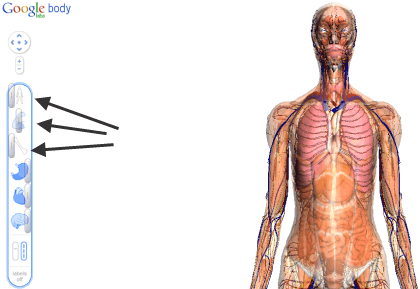
The controls are separated into two parts, the top part…

Top Controls

…is used to control the placement of the body. The up and down arrows move the body up and down in the viewing window. The left and right arrows case the body to spin left or right. The diamond in the middle causes the body to move back to its original position.

Zomed and Turned

Note: The up and down arrows also cause the body to spin towards or away from you if you keep pressing them after the body has been moved to the top or bottom of the viewing pane.

Added Note: You can also move the body around in the viewing pane by clicking on your mouse, holding the button down and moving your cursor around.

The “+” and “-“ buttons allow you to zoom in or out.

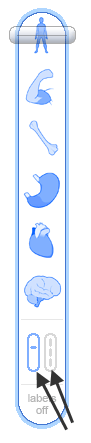
The bottom controls are used to view different parts of the body:

Bottom Controls

First note the vertical paddle. It controls what happens when you use the controls above them. The default is with the paddle on the left, which means that there is just one slider that you can slide down by clicking on and holding with your left mouse button while you move it lower or higher.

Moving down, you pass through the different types of body parts; from muscle to bone, organs, blood vessels, to the nerve system. As you pass through each system, the changes are reflected on the body in the viewing pane:

Slider Down

If you move the bottom paddle to the right, however, each system gets its own left and right slider that allows you to adjust how much of each system you wish to view; though you have to be aware that if you have an outer body part showing, you won’t be able to see the parts underneath it.

Right Paddle

To get the best effects, it’s best to start with the top slider, as moving left causes succeeding layers of the body to be peeled away, starting with the skin.

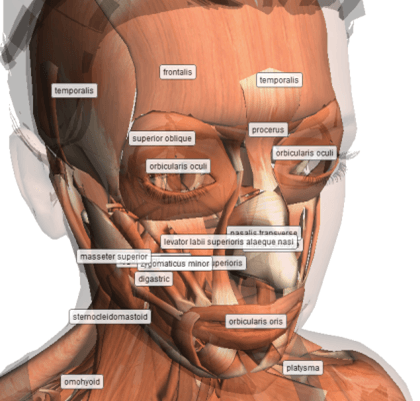
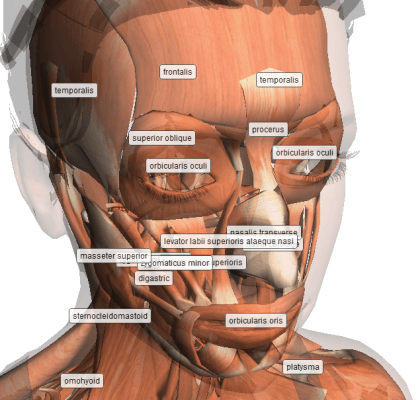
At the bottom of the controls is some text that says: Labels off. Clicking on it will cause body part labels to be turned on:

With Labels

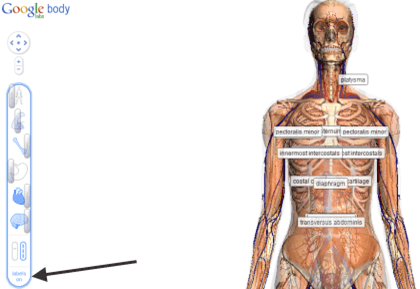
The labels that display correspond to the parts that you choose to reveal. Moving the body around in the viewing pane brings up labels that correspond to parts seen from that angle, as does zooming in.

Labels Closer

At the top right of the screen is the search box:

Scapula Search

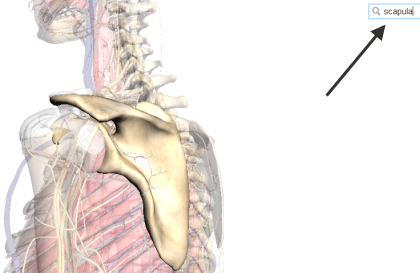
Typing in a body part, causes the part you’ve searched for to be zoomed to and to be highlighted, as well as labeled, if labels are turned on. The browser also shits the controls to create the best view of the part you’ve searched for.

Google Body Browser is a great tool for students and adults alike; whether learning for school, or just on your own, Body Browser allows you see the human body in ways you likely never have before.

Copyright © 2007
Online Tech Tips.
Aseem Kishore (digitalfingerprint: a59a56dce36427d83e23b501579944fcakmk1980 (74.125.94.90) )
"
read more

Use Microsoft’s Optimizing Tools to Keep your Windows 7 Computer Running Fast

Use Microsoft’s Optimizing Tools to Keep your Windows 7 Computer Running Fast: "
You see a lot of products out there purporting to help you get back that speed that your computer has lost over time as you’ve cruised the Internet picking up cookies, installed programs and maybe sometimes unplugged your computer before remembering to shut it off.

Microsoft apparently understands that computers running their operating system need some tweaking and/or maintenance from time to time, so that’s why they’ve included some tools to help users get back some, it not all, of the speed they’ve lost.

First up, is the Performance troubleshooter, a program that looks at a myriad of computer slowing possibilities and then corrects them, if you give your say so. To run the Performance troubleshooter, click on your Start button, then in the search box, type troubleshooter; press Enter and you should get this:

Troubleshooting - Check for Performance Issues

Click where it says Check for performance issues under System and Security, you should get this screen:

Performance PopUp

Click Next, and the program should start analyzing your computer. The screens that you get next will depend on what Trouble shooter finds, in general it will ask you if it’s okay to stop certain programs from launching at startup, etc.

Another thing the performance trouble shooter might recommend is removing programs from your computer that you don’t use, because they cause system files to grow larger which Windows has to scan through every time you want to do something; whether they are there because they came with your computer, or because you installed an app that you don’t use, or downloaded some useless app that you never bothered to delete.

To get rid of old programs, click on the Start button, then choose Control Panel, then click Uninstall a program under Programs:

Control Panel

You should get a screen that looks something like this:

Uninstall Program

It should show you every application you have installed on your computer; to get rid of the ones you don’t want, highlight them and then click the Uninstall button.

Something else that can slow your computer down are unused files; troubleshooter has an option to help you get rid of those too; from the Trouble shooter menu, click on Run maintenance tasks:

Run Maintenance Tasks on Troubleshooter

You should get this popup:

System Maintenance PopUp

Click on Next and let Disk Cleanup get rid of temporary files, empty the Recycle bin for you and clean up your system files.

If Trouble shooter notices that your hard drive needs defragmenting, it’ll suggest you do so; you can find Disk Defragmenter by clicking on the Start button,and then typing Disk Defragmenter in the Search box. Most computers come with Disk Defragmenter assigned to run automatically every so often; if your computer isn’t set that way, you can change it by clicking on the Configure Schedule button on the Disk Defragmenter main screen.

Disk Defragment

And finally, if after running Performance troubleshooter, you don’t see much difference in speed, you can always do what Microsoft suggests, and that is run fewer programs at the same time, or better yet, add more memory to your computer.

Because of the way Windows works, computer’s tend to run slower the longer you own them; using Microsoft’s optimizing tools can help reduce the problem though, so long as you run them periodically.

Copyright © 2007
Online Tech Tips.
Aseem Kishore (digitalfingerprint: a59a56dce36427d83e23b501579944fcakmk1980 (209.85.224.91) )
"
read more

Install Blackberry Mobile OS On PC

Install Blackberry Mobile OS On PC: "
Previously, we posted a tutorial on how to install Android on PC. But, what about the BlackBerry users? Here, we will guide you through the process of installing BlackBerry Mobile OS phone emulators on your PC. Believe it or not, it’s actually easier to install than Android or iPhone SDK.

BlackBerry Logo

Prerequisites

BlackBerry emulators will require that you have the Java framework installed on your PC. So, head on over to the Java website and download and install the latest version of Java on your PC first. You may need to restart your computer after the Java installer completes.

Get Java

Installation

As mentioned above, installing a BlackBerry simulator on your PC is actually quite easy. To get started, head on over to the official BlackBerry developers page. Here, you will need to select some preferences, which will determine which specific BlackBerry emulator you will download.

Select your smartphone model from the first drop down menu, and select your carrier or OS version from the second and third drop down menus.

Download BB Simulators

After you have selected your BlackBerry model, a download link will appear. Click the link to begin download.

bb download link

The download may take a couple of minutes, depending on the speed of your internet connection. After the download completes, double click the installer exe to get started. Installing the BlackBerry simulator on your computer is much the same as installing any other program. You will be presented with the usual installation steps.

BB install screen 1

bb install screen 2

bb install screen 3

bb install screen 4

bb install screen 5

bb install screen final

Once the setup Wizard completes, you will have successfully installed your specific BlackBerry emulator on PC. Next, it’s time to startup the emulator. Navigate to Start – All Programs – Research In Motion – BlackBerry Smartphone Simulators – Your Device.

Once you select your device, it will automatically launch.

Simulator Loading

Once the virtual phone finishes loading, you will need to accept the BlackBerry agreement. From there, you will be presented with the BlackBerry home screen!

BlackBerry home screen

That’s all there is to it. Now you can explore the virtual BlackBerry device in the same way you would an actual phone. You can also browse through the options under Edit, View, and Simulate to change device settings.

Copyright © 2007
Online Tech Tips.
Aseem Kishore (digitalfingerprint: a59a56dce36427d83e23b501579944fcakmk1980 (74.125.94.85) )
"
read more

3 Ways to Unlock a Protected Excel File

3 Ways to Unlock a Protected Excel File: "
Most people protect their Excel files before sharing them—especially if the file is a form. While protecting the file keeps other people from altering the spreadsheet’s calculations, if the calculations are wrong, the other person has no way to correct them without the file creator’s password. Plus, such passwords are easily forgotten by the file’s creator.

There are several ways to unlock a protected Excel file without the password. Here are three of the easiest:

1. Upload the File to Google Docs


google docs

Uploading the Excel file to Google Docs will unlock the file. Simply upload the file, then download it from Google Docs. Be sure to save the file with a different name.

However, Google Docs may change some of the cell spacing in the spreadsheet. You may need to realign the many of the cells after the file is unlocked.

2. Upload the File to Zoho Sheet


zoho

Zoho Sheet works similarly to Google Docs, but grants users a few more features, like the ability to edit spreadsheets stored in SharePoint. The process to unlock an Excel file is the same—upload the file, then download it again with a different file name.

For the most part, the file looked the same as it did before we uploaded it. Zoho did, however, change the font.

3. Upload the File to Ensode’s Unlock Utility


ensode 2

While Ensode’s Web site is by far the messiest of these three, the unlock utility provided there works better than both of the previous methods. Scroll past the advertisements to the bottom of the page. Accept the terms and upload your file. A link to your unlocked file is then provided. Simply download it and continue your edits.

ensode 1

Ensode’s unlock utility preserves the integrity of the original spreadsheet. All fonts, cell sizes and calculations remain completely intact. If you can stand the advertisements, this is definitely the best way to go.

Copyright © 2007
Online Tech Tips.
Aseem Kishore (digitalfingerprint: a59a56dce36427d83e23b501579944fcakmk1980 (209.85.224.89) )
"
read more

Install Android Mobile OS On PC

Install Android Mobile OS On PC: "
Whether you are wanting to try out Android before actually purchasing a phone, or are just interested in the capabilities of the Android mobile OS, installing Android locally on your PC will give you a pretty good idea of what Android has to offer.

Previously, we posted tutorials on how to install Mac Snow Leopard on PC, and even install a Nintendo 64 emulator on PC. Here, we will guide you through the steps of installing a full fledged version of Android.

Android Bot

Prerequisites

As you may have guessed, Android does require a framework to run. So, if you do not already have Java installed on your computer, head on over to the Java homepage and download the latest release. After the download is complete, proceed to install Java onto your PC. A restart after installation may be in order.

Java

After you’re all good to go with Java, the next step is to download the actual Android SDK (software developers kit). You can download it straight from the Google Android website.

Installing Android

Once the Android SDK download is complete, unzip the files and run the setup exe. It should be titled, SDK Setup.exe.

SDK Setup

Once the installation is started, the installer will check Android servers for any available packages and updates.

Check For Updates Android

**Important Note**

You may get an SSL error during installation. If you do, click the Settings tab of the Android SDK and AVD Manager window and uncheck the option Force https://… Click the OK button and reopen the setup. It should work properly this time, without error.

Android SDK Setu

Still during installation, the Choose Packages to Install window will open. Here, you can decide and choose which exactly what you want to install. You will need to Accept the terms, and click Install to proceed with the rest of the SDK installation.

Choose Packages to Install

**Important Note**

By default, Android will have selected all SDK platforms and versions. You can choose to install all of the previous samples and APIs, but they are not necessary if you just want to try out Android. For most purposes, you will want to accept the latest version of Android for install, and reject the others.

The Installing Archives download window will pop up, letting you know of the progress of your Android installation.

Installing Archives

Setting Up Android

Once download and installation of the Android SDK is complete, you can get started with setting up your Android simulator. Select Virtual Devices from the left side menu of the Android SDK and and AVD Manager window, and click the New button.

Android SDK New Sim

The Create new Android Virtual Device window will now open. Type in a name for your Android device, and select the version of Android that you’d like to use from the drop down target menu. Most likely, there will only be one version of Android to choose from in the target menu, if you only chose to download the latest version.

Create a New Android Device

You will also need to enter a SD card size and select a screen size from the skin drop down menu. On an actual android phone, the SD card size would simply be the capacity of the SD card that you have inserted into the phone. Here, the emulator will simply create an IMG file to serve as a “virtual SD card”.

Set SD Card Size

Once you have all of your settings selected, click the Create AVD button.

Create AVD

Android SDK will give you a confirmation prompt if you have done everything correctly.

confirmation prompt android

Now, it’s time to boot up your virtual Android device for the first time. Select your virtual Android machine under the AVD Name window, and click the Start… button.

Start Android

A Launch Options menu will appear, where you can scale the display to real size, and make adjustments to best fit your monitor or screen. Click the Launch button.

Launch Options

Now, you may need to wait a couple of minutes for Android to load, depending on the speed of your PC. Once it does load, you will be ready to go.

Android Ready

You’ve got the emulated phone screen, you’ve got the emulated dial pad, now you can test out all of Androids features from your PC!

Android Home Screen

Copyright © 2007
Online Tech Tips.
Aseem Kishore (digitalfingerprint: a59a56dce36427d83e23b501579944fcakmk1980 (74.125.94.82) )
"
read more