• Feed RSS

The Ultimate Quickstart Guide to Speeding Up Your WordPress Site

"Give your site a boost! Implement crucial optimization techniques that will improve not only your ySlow score, but your Google rank too. In this tutorial we will cover all aspects of W3 caching, ySlow, Google page speed, CSS sprites & htaccess rules, to achieve a high ySlow score like i have done on my blog.


Before We Begin

A quick note before we start, although this tutorial will cover everything in as much detail as is required, there will (wherever possible) be shortcuts, to save you some time.

Step 1: Install the Necessary Components

Install a Caching Plugin: First off, whatever caching plugin you are using, switch it off NOW! Unless it is the mighty W3 Total cache, as that is what we will be working with here. (Ok, so that came on a bit strong, but I’ve used a lot of the caching plugins and W3 is my favorite. If you’re using another for any reason, that’s probably fine – we’ll move along with the W3 recommendation though.) Head over to your “Add new” plugins section within the WordPress, search “W3 Total Cache” download it, install it but don’t switch it on… well not yet anyway.
Install a Database Manager Plugin: Next you will need another plugin called “WP-DBmanager” again search and install this making sure you have no other database plugins installed.
Before we go ahead and start improving your site lets first see what were dealing with. Open up Google chrome or install it if you don’t have it already. Once you are in chrome install the ySlow plugin HERE once installed you will see a new icon in the top right of your screen. Click it. (Ensuring you are on the homepage of your site)
ySlow will then check your site, tell you what’s good, what’s bad and everything in between. We want to focus first on everything that is below a grade B. Below i will run through every W3 setting you need to improve your sites load time.

Step 2: Switch on W3 Total Cache

Once W3 Total Cache is switched on you will see a new sidebar tab called “Performance” click it. Now obviously we will run though all the different sections of W3 but to save you some time you could import the W3 settings file, bundled in the “source files” & jump to step 2C.
This is where all the settings for W3 sit. Let’s first look at the “General Settings”, you will want to tick the following boxes (to enable):
  • Page Cache (select “Disk: Enhanced” in the drop down) – Caching pages will reduce the response time of your site and increase the scale of your web server.
  • Minify (Select “Manual”, leave the other settings) – Minification can decrease file size of HTML, CSS, JS and feeds respectively by ~10% on average.
  • Do not tick Database cache (we will sort this later via a different method)
  • Object cache (select “Disk” in the drop down) – Object caching greatly increases performance for highly dynamic sites (that use the Object Cache API).
  • Browser Cache – Enable HTTP compression and add headers to reduce server load and decrease file load time.
  • Leave CDN, Varnish & cloudflare untouched. (again to do this quick upload the settings file included in the “source files” via the option at the bottom of the “General Settings”)

Step 2B: Get Cracking with Minify

Click the “Minify” tab/link at the top of the W3 panel/page. In the “HTML & XML” section make sure that the first three boxes are checked. Then click the “Help” button at the top.
Once this popover loads up you will be faced with a list of javascript files, followed by stylesheets that your site is linking to. Essentially we want to try and tick everything EXCEPT:
  • Jquery files
  • Google ads (or any ads for that matter)
  • Any stats.wordpress.js files (you will have these if you have jetpack installed
However for CSS you can pretty safely select all of them. Now this isn’t an exact science as this is minifying your theme files (Don’t worry it’s non destructive) and there are alot of different themes all employing a wide range of different files, plugins and functions. Basically preview your changes before submitting them.
Minify is one of the biggest improvements you will be integrating, once you have selected all your files (and done the same with every theme, if you are using more than one) then click “Apply & close”, directly followed by “Save all settings” (Deploy it if your site still looks/works the same).

Step 2C: Head Over to Browser Cache…

Once your in the “Browser Cache” tab/page you will need to change the “Expires header lifetime” to 691200 seconds. This will immediately boost your ySlow score.
Now head back to “General Settings” and click “empty all caches”, then go to your homepage and run the ySlow test again, you should see a nice improvement.

Step 3: Let’s get back to that pesky Database optimization

Below the “Performance” sidebar tab in the WordPress backend there should be another tab with the name “Database” (if not then go back and activate it).
Now this is very simple you need to do three things, backup, repair, optimize.
To backup click the “Backup DB” then at the bottom click “Backup” (Don’t worry about gzipping).
Next up we want to repair your database (just incase) so go to the “Repair DB” in the sidebar. Click the “Repair” button at the bottom.
Lastly, optimize it. Click the “Optimize DB” sidebar button & yep you’ve guessed it, click the “Optimize” button at the bottom.
To avoid this process again pop into the “DB Options” sidebar tab. At the bottom there will be an “Automatic Scheduling” section. Ensure that backups are done EVERY DAY (you can’t be too careful) then set it to optimize say every few days and repair once a week. Then save the changes.

Step 4: CSS Sprites

Now in ySlow you will probably have noticed in the “Make fewer HTTP requests” section a string of text that says something like “This page has 10 external background images. Try combining them with CSS sprites.”
Imagine the savings if all those little images could be just one image… It would sure speed things up. For this we are going to use a free tool called “Spriteme” so head on over to the site HERE (do so in a new tab though, again make sure your site is on the homepage).
Once you have both your homepage open in one tab and spriteme open in another drag the “SpriteMe” text onto the tab that has your site in it. A box will appear in the top right of the tab/window. You’ll want to click the “make sprite” button that resides within the “Suggested Sprites” box. Once it does it’s magic download the image it has created and upload it to somewhere on your site (preferably within the theme you are using).

Now click the “export CSS” button in the top right of the “SpriteMe” popover, copy & paste the css code it has given you ( that’s right ALL of it) directly into the bottom of your themes “style.css” or anywhere it is going to be used instead of the default code (as we don’t really want to overwrite the default theme code). You will need to ensure the second “background-image: url” is changed from “http://www.jaredhirsch.com” to where ever you saved the sprite image from earlier.
Once you have done this please once again “empty all caches” in the “Performance” sidebar tab.

Step 5: Optimize Those Images (compression)

For the most part i personally always use Photoshop to compress my images before uploading but for many of you this is not an option as you don’t have photoshop. So here i will assist you in how to decrease the file size of you images.
First off you will want to make sure any theme images are optimized and you can do this buy grabbing all of them and whacking them in this fantastic little app called “ImageOptim
Once your theme images are nice an compressed you may want to look at plugins such as “Smush.it” for WordPress that will optimize images you may use in posts and the like.

Step 6: GZIP-APPAGE!!!

This is most certainly a crucial optimization technique. To enable PHP GZIP compression, edit the php.ini (example locations such as in /etc/ or /usr/local/lib) with any text editor such as vi, and locate the following directive: zlib.output_compression
The default value is Off, change the setting to On to make the line looks like below:
zlib.output_compression = On
Restart Apache HTTPD server after the change. Every web pages produced by PHP will now be compressed before sending over Internet to the web browser to decode.
PHP also has a directive which can be used to adjust the compression level. To set the compress level, use the following line in php.ini, with valid values between 1 and 9, where 1 is least compress and 9 is most compress. Default compression level is 6, which provides the best compression without degrading server performance.
zlib.output_compression_level = 6
Previously, PHP compression is achieved by entering <?php ob_start(“ob_gzhandler”); ?> code at the beginning of each PHP scripts. The method is not recommended as each and every scripts have to be changed. zlib enabling in php.ini will apply to all PHP scripts on the web server without exclusion.
If it’s impossible to modify php.ini file, or does not have control over php.ini especially on a shared hosting, the PHP GZIP compression can also be setup via .htaccess file, typically located on the root of the website. To enable PHP GZIP compression via Zlib, just add the following line to the .htaccessfile. Note that each website has to be changed individually.
php_flag zlib.output_compression on
The disadvantage of enabling GZIP compression via PHP is that only web pages generated by PHP scripts will be compressed by GZIP encoding. All external CSS or JavaScript files will not be compressed. For the ability to enable GZIP compression on all file types, uses mod_deflate or mod_gzip on HTTPD web server instead.
Do check and verify that GZIP compression is running properly

Step 7: Tidbits

As we come towards the end of this tutorial i just want to run through a few last things. Now that your images have been crushed and sprites have been made you may want to clear both your browser cache and once more “empty all caches” in the “Performance” sidebar tab.
Now let’s head back, log out of WordPress load up your sites homepage and do a ySlow test. Again it should have risen, in the CDN section of ySlow you have the option to “Add as CDN” on some components. Doing this will boost your grade even further.
If you do want to properly add a dedicated CDN may i suggest you follow this TUTORIAL.
Now Fingers crossed you should be looking at a grade A test score and if you compare this with Google’s own page speed report test you will see a very healthy score.
One section of ySlow that i haven’t covered is the “Cookie free domain” which is when the browser makes a request for a static image and sends cookies together with the request, the server doesn’t have any use for those cookies. So they only create network traffic for no good reason. You should make sure static components are requested with cookie-free requests. Create a subdomain and host all your static components there.
If your domain is www.example.org, you can host your static components onstatic.example.org. However, if you’ve already set cookies on the top-level domain example.org as opposed to www.example.org, then all the requests to static.example.org will include those cookies. In this case, you can buy a whole new domain, host your static components there, and keep this domain cookie-free. Yahoo! uses yimg.com, YouTube uses ytimg.com, Amazon uses images-amazon.com and so on.
Another benefit of hosting static components on a cookie-free domain is that some proxies might refuse to cache the components that are requested with cookies. On a related note, if you wonder if you should use example.org or www.example.org for your home page, consider the cookie impact. Omitting www leaves you no choice but to write cookies to *.example.org, so for performance reasons it’s best to use the www subdomain and write the cookies to that subdomain.
I won’t go into this but the above should give you a fair idea. I will go over this in depth in a later tutorial. This does improve the score but it’s not completely essential.

Conclusion

These are the steps i take when building websites and they do a great deal of difference when it comes to improving the speed and allowing for fast response times. For those of you needing more info or that would like some help carrying out the procedures please comment below or send me a message via my author profile."
read more

The WordPress Theme Files Execution Hierarchy

"This article will show the WordPress theme file execution hierarchy. In short, we’ll look at which files get served up when you load a page in WordPress. You might already know that detail post is served by single.php and detail page is served by page.php, but WordPress will search for different files depending on a variety of factors, so we’ll be looking at how this works!

First thing we should establish is this: without index.php and style.css your theme is no longer a valid WordPress theme… so it stands to reason that if all you have is those two files, each page will you try to load will be served up by index.php. Take a quick peek at this “cheatsheet” to see what I’m referring to:
Notice that the flow for each page types will end up with the index.php. That is the reason why index.php is required file for the WordPress theme. If we are missing any other files in WordPress theme (for instance, if there is no “search.php” file included in the theme), then index.php will be served instead.
Now let’s look at some details about the execution order. I am going to show you the flow in which WordPress will search for files in your active theme folder. I hope this will be useful when you create a WordPress theme from now on:
I will go through each type of files one by one and will show the execution hierarchy for the same.

Home Page

This is the first and most important page of any website. So WordPress has provided the scope to customize the page. Let’s have a look at the file hierarchy for the home page.
  1. front-page.php
  2. home.php
  3. index.php
While serving the home page, WordPress will search for front-page.php. If that is not found, it will use home.php. If home.php exists, it’ll use that. If not, it will simply default to using index.php.

WordPress Post Detail

  1. single-[post-type].php
  2. single.php
  3. index.php
WordPress can have as many post types as we need. So this will be easier to get different design for all/some post types. By default ‘post’ is the main and default post type of the WordPress.
So for example, if your custom post type is product then it will be single-product.php
To know more how to add new post types in WordPress you can refer to this link.

WordPress Page Detail

  1. [custom-template].php
  2. page-[slug].php
  3. page-[id].php
  4. page.php
  5. index.php
Just the same as with post types, we can have a different page layout using the custom page template. So WordPress first searches for the files of the selected Page template (if it exists).
If none are found, it will search for the file with the slug of the current page. Basically, if the slug is aboutus, then it will search for the file page-aboutus.php in active theme folder.
WordPress will search for the files with the ID just like searching for the files with slug.

Category Page

  1. category-[slug].php
  2. category-[id].php
  3. category.php
  4. archive.php
  5. index.php
From the above flow, you can understand that how you can have different templates used for the category page. For instance, you could have a custom page based on slug and id, and then use a default “category.php” file for the rest of your categories..

Tag Page

  1. tag-[slug].php
  2. tag-[id].php
  3. tag.php
  4. archive.php
  5. index.php
This will be same case as the category. You can have different pages for tag slug and tag id also.

Taxonomy Page

  1. taxonomy-[tax]-[term].php
  2. taxonomy-[tax].php
  3. taxonomy.php
  4. archive.php
  5. index.php
Here goes the different file hierarchy for the taxonomy Pages.

Author Page

  1. author-[author-nicname].php
  2. author-[author-id].php
  3. author.php
  4. archive.php
  5. index.php
Here you come to know that you can have different designs based on users also. Same as category and tags we can have different files based on slug and ID of the user.

Attachment Page

  1. [mime-type].php
  2. attachment.php
  3. single.php
  4. index.php
Here you can see that you can have different page layout for different types of attachment. These can be differentiate from the mime type of the attached file.

Date Page

  1. date.php
  2. archive.php
  3. index.php
For the date specific layout we can create date.php in theme folder. Then the flow goes to archive.php and then at last index.php.

Archive Page

  1. archive.php
  2. index.php
As we come downwards to the type of files, number of files are reduced in the hierarchy. So this are the basic or we can say most used files in any WordPress themes.

Search Page

  1. search.php
  2. index.php
You can customize your search result with the search.php first. If search.php is not available then index.php will be served.

404 Page

  1. 404.php
  2. index.php
In the case of page or post not found, WordPress will search for 404.php then if not found then it will serve index.php.

Conclusion

You can obviously use this information in a wide range of ways to load up custom templates for various pages… In many cases, even if you’re using an existing theme, you can get a custom solution without modifying the existing files. You will just need to create new file and give it a new name using the information above.
Share your thoughts and any additional file which can be included above hierarchy."
read more

The Ultimate Guide to Implementing Facebook Comments on your Blog

"Using Facebook Comments on your blog offers your readers a way to instantaneously comment on posts, as well as to share them without having to do any work. If you think this type of commenting system will suit your audience, read on to find out how you can implement it the right way.


Step 1: Create A Facebook App

Before you actually generate the Facebook Comments code and implement it on your blog, you need to create an app for your site.
  1. Go to developers.facebook.com
  2. Click Apps
  3. Click Create New App
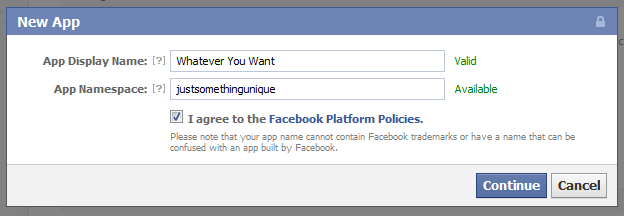
  4. Enter an App Display Name and Namespace
On the next screen, you’ll see your newly created app’s App ID and App Secret Key. You won’t need the secret key, but the App ID will be used later. Take note of it.
Below these keys, go ahead and fill out the Contact Email and App Domain (your blog’s domain). Go down and click on Website. Fill in the same domain that you used for the App Domain. Click Save Changes.

Step 2: Insert the Facebook Comments Code into Your Theme

In this tutorial, we’ll be implementing Facebook Comments alongside the default WordPress comment system instead of replacing it. If you want, you can head over to the Facebook Comments code generator to get the code you’ll need for inserting the comment system; however, I’ve included it here so you can just copy it. You’ll need to customize a few parts of it, however; I’ll note which parts those are for each block.
The code block below should be placed in your theme’s header.php file. Find the opening <body> tag and paste the block directly below it. On the 6th line, replace “Your App ID Here” with your App ID.
<div id="fb-root"></div>
<script>(function(d, s, id) {
 var js, fjs = d.getElementsByTagName(s)[0];
 if (d.getElementById(id)) return;
 js = d.createElement(s); js.id = id;
 js.src = "//connect.facebook.net/en_US/all.js#xfbml=1&appId=Your App ID Here";
 fjs.parentNode.insertBefore(js, fjs);
}(document, 'script', 'facebook-jssdk'));</script>
While you’re still in your header.php file, go up into the <head> section and paste this block of code somewhere. It will ensure that the Facebook Commenting system on your blog posts knows it’s owned by the app you created before. Replace the “Your App ID Here” bit with your App ID (leave the quotes in place).
<meta property="fb:app_id" content="Your App ID Here"/>
The next code block should be placed in your theme’s comments.php file. Since we’re implementing Facebook Comments alongside WordPress comments, you’ll just be pasting it where you want the Facebook Comments box to appear, and you won’t be deleting any of the original code.
<div class="fb-comments" data-href="<?php the_permalink() ?>" data-num-posts="2" data-width="470" data-colorscheme="light" data-mobile="false"></div>
If you generate your Facebook Comments code from the link I gave you earlier, instead of just grabbing it from this tutorial, remember to change the data-href attribute from the original URL to <?php the_permalink() ?>, otherwise Facebook Comments won’t work.
You can also edit the data-num-posts, data-width, and data-colorscheme attributes to your liking. The first defines how many comments will be shown on each post before a user needs to click “See More”, the second defines the width of the commenting system (set it to something slightly smaller than your content area’s width), and the last is the color scheme, which can be set to “light” or “dark”.

Step 3: Display the Combined Facebook and WordPress Comment Count

Your theme most likely has several areas where it will show the number of comments there are on a post. By default, it will only show the number of WordPress comments. Since you’re implementing Facebook Comments alongside WordPress comments now, you’ll want to display the sum of the comments from both systems on each post.
To do this, first open up your theme’s functions.php file. Paste the code shown below at the bottom of the file and save it.
// Get combined FB and WordPress comment count
function full_comment_count() {
global $post;
$url = get_permalink($post->ID);

$filecontent = file_get_contents('https://graph.facebook.com/?ids=' . $url);
$json = json_decode($filecontent);
$count = $json->$url->comments;
$wpCount = get_comments_number();
$realCount = $count + $wpCount;
if ($realCount == 0 || !isset($realCount)) {
   $realCount = 0;
}
return $realCount;
}
Note: This code was built off of a function written by Viceprez on the WordPress Stack Exchange. I’ve simply added a couple of lines to his original function that add in the WordPress comment count. Thanks Viceprez!
Now that you have the function added to your theme, you can use it to replace the original comment count functions used throughout your theme. In my theme, the comments are called using this code:
<?php comments_popup_link('0','1','%'); ?>
Your theme may use this function to display the comment count, or it may not. Once you’ve found whatever does display it, replace it with this code:
<?php echo full_comment_count(); ?>
There will likely be several places within your theme that you’ll need to insert this code. Here’s a list of the most common ones:
  • The comments.php file
  • Near the top of your single.php file
  • The index.php – it’ll be located in the loop that calls each post
  • Any archive files like archive.php, category.php, author.php, etc. In this, it’ll be located in the loop that calls each post as well.
  • On search.php
  • On page.php if you allow comments on pages
If the comment count in your comments.php is diplayed as a sentence, instead of just a number, you can use the code below instead of the one line function call in order to allow for words like “no comments” and “one comment”. I’ve customized mine to be more inviting – I’d recommend that you do the same instead of being generic :)
<?php
 $commentCount = full_comment_count();
 if ( $commentCount == 0 ) {
  echo '<h5>No comments yet - you should start the discussion!</h5>';
 }
 else if ( $commentCount == 1 ) {
  echo '<h5>One comment so far - add yours!</h5>';
 }
 else {
  echo '<h5>' . $commentCount . ' comments so far - add yours!</h5>';
 }
?>

Step 4: Get Immediate Notifications of New Comments

The last part of the tutorial will show you how to get Facebook Notifications whenever someone comments on your blog.
First, you’ll need to access your comments moderation panel. You can do that by pasting the following URL into your browser, substituting “Your App ID Here” with your App ID. You might also want to add this page to your bookmarks once you’re at it.
https://developers.facebook.com/tools/comments/?id=Your App ID Here
Once you’re at your comments moderation panel, hit the Settings button in the top right corner. A window will come up, and you should see a Moderators field in the middle of it. Simply add yourself as a moderator, and you’ll start getting notications whenever someone comments on a blog post.

Conclusion

If you’ve followed all the steps in this tutorial, your blog should now have Facebook Comments implemented right alongside the default WordPress comment system. I believe this is an ideal setup, as it gives your readers the best of both worlds; Facebook Comments is probably the most convenient commenting system out there, if a reader is signed in to Facebook (they most likely are), then there’s absolutely no authentication or identification fields to fill out. They can just comment away. However, if a reader doesn’t want to use Facebook, or wants to add their link or get CommentLuv benefits, you can still let them use WordPress comments.
You also now have a comment count for each post that shows the sum of the comments from each system, and since you’re a moderator for your app, you’ll get immediate notifications of new comments. I hope you enjoy your new and improved commenting solution!"
read more

Creating a Filterable Portfolio with WordPress and jQuery

"Learn in this tutorial how to make a filterable Portfolio with jQuery integrated with WordPress, remember that this portfolio kind can make a big difference on your themes!


Step 1: Introduction

You can use the code from this tutorial in any theme that you’ve created or are creating, we’ll follow simple steps and in my case, I’ll use the default Twenty Eleven theme and running on WordPress 3.3. Okay, let’s work!
You can use the code used in this tutorial in any theme that you’ve created or are creating.

Step 2: Creating the Project Item on Admin

We’ll need to create a section on Admin bar called Project, in this section you’ll create all the portfolio entries with their respective thumbnail and demo link.
Open the functions.php file and at the end, let’s create a function to register the Project item. (You can see the complete function at the end of this step)
add_action('init', 'project_custom_init');   

/* SECTION - project_custom_init */
function project_custom_init()
{
 // the remainder code goes here
}
/* #end SECTION - project_custom_init --*/
In this code we are using the add_action function so that when WordPress begins to load our function will be called.
Inside the project_custom_init function lets add the code that registers a Custom Post Type called Project.
// The following is all the names, in our tutorial, we use "Project"
 $labels = array(
  'name' => _x('Projects', 'post type general name'),
  'singular_name' => _x('Project', 'post type singular name'),
  'add_new' => _x('Add New', 'project'),
  'add_new_item' => __('Add New Project'),
  'edit_item' => __('Edit Project'),
  'new_item' => __('New Project'),
  'view_item' => __('View Project'),
  'search_items' => __('Search Projects'),
  'not_found' =>  __('No projects found'),
  'not_found_in_trash' => __('No projects found in Trash'),
  'parent_item_colon' => '',
  'menu_name' => 'Portfolio'
 );

 // Some arguments and in the last line 'supports', we say to WordPress what features are supported on the Project post type
 $args = array(
  'labels' => $labels,
  'public' => true,
  'publicly_queryable' => true,
  'show_ui' => true,
  'show_in_menu' => true,
  'query_var' => true,
  'rewrite' => true,
  'capability_type' => 'post',
  'has_archive' => true,
  'hierarchical' => false,
  'menu_position' => null,
  'supports' => array('title','editor','author','thumbnail','excerpt','comments')
 );

 // We call this function to register the custom post type
 register_post_type('project',$args);
The code above will add an item on the Admin menu called Portfolio and it will be in this section that we’ll create all the portfolio items.
Now, inside the function, let’s add more code.
// Initialize Taxonomy Labels
 $labels = array(
  'name' => _x( 'Tags', 'taxonomy general name' ),
  'singular_name' => _x( 'Tag', 'taxonomy singular name' ),
  'search_items' =>  __( 'Search Types' ),
  'all_items' => __( 'All Tags' ),
  'parent_item' => __( 'Parent Tag' ),
  'parent_item_colon' => __( 'Parent Tag:' ),
  'edit_item' => __( 'Edit Tags' ),
  'update_item' => __( 'Update Tag' ),
  'add_new_item' => __( 'Add New Tag' ),
  'new_item_name' => __( 'New Tag Name' ),
 );

 // Register Custom Taxonomy
 register_taxonomy('tagportfolio',array('project'), array(
  'hierarchical' => true, // define whether to use a system like tags or categories
  'labels' => $labels,
  'show_ui' => true,
  'query_var' => true,
  'rewrite' => array( 'slug' => 'tag-portfolio' ),
 ));
Attention to the ‘hierarchical’ argument on the register_taxonomy function, if you type true you will have a system like categories for your portfolio items, but if you type false you will have a system like tags. I prefer the category style system.
Oh yeah! The project_custom_init() function is finished! See below for the full code of this function.
add_action('init', 'project_custom_init'); 

 /*-- Custom Post Init Begin --*/
 function project_custom_init()
 {
   $labels = array(
  'name' => _x('Projects', 'post type general name'),
  'singular_name' => _x('Project', 'post type singular name'),
  'add_new' => _x('Add New', 'project'),
  'add_new_item' => __('Add New Project'),
  'edit_item' => __('Edit Project'),
  'new_item' => __('New Project'),
  'view_item' => __('View Project'),
  'search_items' => __('Search Projects'),
  'not_found' =>  __('No projects found'),
  'not_found_in_trash' => __('No projects found in Trash'),
  'parent_item_colon' => '',
  'menu_name' => 'Project'

   );

  $args = array(
  'labels' => $labels,
  'public' => true,
  'publicly_queryable' => true,
  'show_ui' => true,
  'show_in_menu' => true,
  'query_var' => true,
  'rewrite' => true,
  'capability_type' => 'post',
  'has_archive' => true,
  'hierarchical' => false,
  'menu_position' => null,
  'supports' => array('title','editor','author','thumbnail','excerpt','comments')
   );
   // The following is the main step where we register the post.
   register_post_type('project',$args);

   // Initialize New Taxonomy Labels
   $labels = array(
  'name' => _x( 'Tags', 'taxonomy general name' ),
  'singular_name' => _x( 'Tag', 'taxonomy singular name' ),
  'search_items' =>  __( 'Search Types' ),
  'all_items' => __( 'All Tags' ),
  'parent_item' => __( 'Parent Tag' ),
  'parent_item_colon' => __( 'Parent Tag:' ),
  'edit_item' => __( 'Edit Tags' ),
  'update_item' => __( 'Update Tag' ),
  'add_new_item' => __( 'Add New Tag' ),
  'new_item_name' => __( 'New Tag Name' ),
   );
  // Custom taxonomy for Project Tags
  register_taxonomy('tagportfolio',array('project'), array(
  'hierarchical' => true,
  'labels' => $labels,
  'show_ui' => true,
  'query_var' => true,
  'rewrite' => array( 'slug' => 'tag-portfolio' ),
   ));

 }
 /*-- Custom Post Init Ends --*/
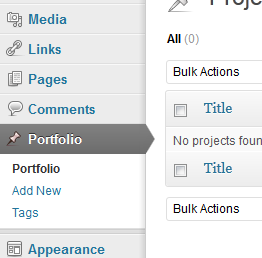
If you go to the Admin now, you will see a new item on menu called Portfolio like the image below:
Let’s create a new function that will ensure nice messages are shown when the user, for example, creates a new item on portfolio or something like this.
The code below must be typed below our last function and not inside it.
/*--- Custom Messages - project_updated_messages ---*/
 add_filter('post_updated_messages', 'project_updated_messages');

 function project_updated_messages( $messages ) {
   global $post, $post_ID;

   $messages['project'] = array(
  0 => '', // Unused. Messages start at index 1.
  1 => sprintf( __('Project updated. <a href="%s">View project</a>'), esc_url( get_permalink($post_ID) ) ),
  2 => __('Custom field updated.'),
  3 => __('Custom field deleted.'),
  4 => __('Project updated.'),
  /* translators: %s: date and time of the revision */
  5 => isset($_GET['revision']) ? sprintf( __('Project restored to revision from %s'), wp_post_revision_title( (int) $_GET['revision'], false ) ) : false,
  6 => sprintf( __('Project published. <a href="%s">View project</a>'), esc_url( get_permalink($post_ID) ) ),
  7 => __('Project saved.'),
  8 => sprintf( __('Project submitted. <a target="_blank" href="%s">Preview project</a>'), esc_url( add_query_arg( 'preview', 'true', get_permalink($post_ID) ) ) ),
  9 => sprintf( __('Project scheduled for: <strong>%1$s</strong>. <a target="_blank" href="%2$s">Preview project</a>'),
    // translators: Publish box date format, see http://php.net/date
    date_i18n( __( 'M j, Y @ G:i' ), strtotime( $post->post_date ) ), esc_url( get_permalink($post_ID) ) ),
  10 => sprintf( __('Project draft updated. <a target="_blank" href="%s">Preview project</a>'), esc_url( add_query_arg( 'preview', 'true', get_permalink($post_ID) ) ) ),
   );

   return $messages;
 }

 /*--- #end SECTION - project_updated_messages ---*/
This function creates custom messages for when a user modifies the portfolio post, see a message example on image below:
You can see that with only this code you can add tags/categories to your portfolio and create new portfolio items! But let’s add more one feature, good idea? Sure!

Adding a Demo URL Meta Box

In this step, we’ll add a meta box on the portfolio item creation screen where the user can paste a url to the website or other page.
Let’s create three functions to add this meta box where we will save our URL for the portfolio item. The code goes below the last function that we’ve created.
/*--- Demo URL meta box ---*/

 add_action('admin_init','portfolio_meta_init');

 function portfolio_meta_init()
 {
  // add a meta box for WordPress 'project' type
  add_meta_box('portfolio_meta', 'Project Infos', 'portfolio_meta_setup', 'project', 'side', 'low');

  // add a callback function to save any data a user enters in
  add_action('save_post','portfolio_meta_save');
 }

 function portfolio_meta_setup()
 {
  global $post;

  ?>
   <div class="portfolio_meta_control">
    <label>URL</label>
    <p>
     <input type="text" name="_url" value="<?php echo get_post_meta($post->ID,'_url',TRUE); ?>" style="width: 100%;" />
    </p>
   </div>
  <?php

  // create for validation
  echo '<input type="hidden" name="meta_noncename" value="' . wp_create_nonce(__FILE__) . '" />';
 }

 function portfolio_meta_save($post_id)
 {
  // check nonce
  if (!isset($_POST['meta_noncename']) || !wp_verify_nonce($_POST['meta_noncename'], __FILE__)) {
  return $post_id;
  }

  // check capabilities
  if ('post' == $_POST['post_type']) {
  if (!current_user_can('edit_post', $post_id)) {
  return $post_id;
  }
  } elseif (!current_user_can('edit_page', $post_id)) {
  return $post_id;
  }

  // exit on autosave
  if (defined('DOING_AUTOSAVE') == DOING_AUTOSAVE) {
  return $post_id;
  }

  if(isset($_POST['_url']))
  {
   update_post_meta($post_id, '_url', $_POST['_url']);
  } else
  {
   delete_post_meta($post_id, '_url');
  }
 }

 /*--- #end  Demo URL meta box ---*/
I won’t explain in details this code because you can learn about meta boxes in this tutorial: Reusable Custom Meta Boxes or just do a little search through the WordPress Codex or on Google.
The code above just creates one meta box with one field where the user can type a URL. We need all these functions, the first just initializes the meta box, the second is the meta box code, and the last is a function to save the data.
Ok! After this, we can go on to next step and work on the front-end, because the back-end is done! We’ll then add the content after.

Step 3: Creating the Portfolio Page template

Now we’ll work to show our portfolio entries to the user! But first let’s create some categories and then add some items to the portfolio.
In this tutorial I’ll use a two column portfolio layout, with some adjustments on markup and CSS you can create a lots of layouts!
A few tips to create a portfolio item
  • Create the tags/categories first
  • In the “Add New Project” page you’ll have an editor like the post/page editor, then just type all the text and images that your user will see when they click on the “More Details” link
  • To add thumbnails we’ll use the Featured Image that is a default WordPress feature
  • In this tutorial I’ll use images with 400px x 160px (width and height), but feel free to use one that you like and that fits in your layout
  • Use http:// before the links on the meta box so you don’t get a 404 not found error
Ok, the first thing that we’ll need to do now is create a new Page Template called “Portfolio 2 Columns”, so let’s go!

Creating the Page Template

First, duplicate the page.php file. Then, rename it to page_portfolio_2c.php.
We need to edit this new file and paste the code below on the file’s first line:
<?php
/*
Template Name: Portfolio 2 Columns
*/
?>
This will show a new option on the page creation screen, but remember that this code MUST be pasted on the file’s first line!
Now just erase all the content inside content div, in this tutorial, I’m using the Twenty Eleven theme and after erasing, I have this code in my file:
<?php
/*
Template Name: Portfolio 2 Columns
*/
?>

<?php
get_header(); ?>

  <div id="primary">
   <div id="content" role="main">

    <?php // I removed all the lines here ?>

   </div><!-- #content -->
  </div><!-- #primary -->

<?php get_footer(); ?>
If you are using your own theme, then erase all the lines that get content from your page, like the_content() for example. We’ll create some custom code, so don’t leave other code here, in the portfolio page we just need your projects!
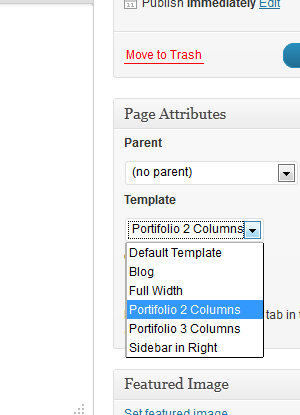
Now, go to WordPress Admin and create a new Page called “Portfolio” and don’t forget to select “Portfolio 2 Columns” in the Template field, like the image below.
Just add a title and leave the content blank, we don’t need it.
If you try to access the page now you’ll get only the header, footer and blank content. So, let’s add life to our filterable portfolio!

Step 4:The jQuery Filterable Portfolio

Let’s talk a little about the plugin that we’ll use to make the portfolio.

The plugin

In this tutorial I’ll make use of a plugin called Filterable, this plugin was created by GetHifi.
This plugin was written without jQuery’s compatibility mode, so I just changed it and the version that works fine with WordPress is in the Source Code file for this tutorial.
The plugin is a little old, to be more exact, it’s from 2009, but it’s on MIT License, so you can use on premium themes, commercial sites and wherever you like.
Just download the modified script that is on Source Code (link on tutorial top) and let’s begin! If you like, visit the homepage to get more details about it.

How Filterable works

Using Filterable is very simple! The first step is use the right markup, the plugin expects markup like the example below:
<ul id="portfolio-filter">
  <li><a href="#all">All</a>
  <li><a rel="jquery" href="#jquery">jQuery</a>
  <li><a rel="webdesign" href="#webdesign">Webdesign</a>
 </ul>
Here we have the filter items, when we click on one of these links, then all the magic will happen. Important: all the entries will need a class with the same text in the ‘href’ and ‘rel’ attributes.
And now, we have the portfolio items markup:
<div id="portfolio-wrapper">
  <ul id="portfolio-list">

   <li class="portfolio-item all webdesign">
    <!-- ALL CUSTOM MARKUP HERE -->
   </li>

   <li class="portfolio-item all jquery">
    <!-- ALL CUSTOM MARKUP HERE -->
   </li>

  </ul>
  <div class="clearboth"></div>
 </div>
Important: What really matters here is that all the items (li) must be inside a (ul), in other words, must be wrapped. Note that we use a div too, we use it because we’ll ‘float’ the li elements, so it is important to have another wrapper and a clear div to avoid structure breaking problems.
After this, we’ll need to call the filterable script in our functions.php file and initialize the filterable portfolio by calling the filterable() function, like the code below:
<script>
  jQuery(document).ready(function() {
   jQuery("#portfolio-list").filterable();
  });
 </script>
But for now, we’ll add our custom markup inside the li, but, we’ll need to generate all the filters and class names with PHP to get all the categories, portfolio entries and all the other details from WordPress! Let’s work!

Creating the Portfolio Filter

Let’s back to the page_portfolio_2c.php file and write the portfolio filter. The code actually is something like the code below:
<?php
/*
Template Name: Portfolio 2 Columns
*/
?>

<?php
get_header(); ?>

  <div id="primary">
   <div id="content" role="main">

    <!-- WE'LL ADD OUR CODE HERE, INSIDE CONTENT DIV -->

   </div><!-- #content -->
  </div><!-- #primary -->

<?php get_footer(); ?>
We need get all the terms/categories from WordPress, edit some names to use inside the class attribute and print a ul for the required template.
We’ll type the following code inside the #content div:
<?php
  $terms = get_terms("tagportfolio");
  $count = count($terms);
  echo '<ul id="portfolio-filter">';
  echo '<li><a href="#all" title="">All</a></li>';
   if ( $count > 0 )
   {
    foreach ( $terms as $term ) {
     $termname = strtolower($term->name);
     $termname = str_replace(' ', '-', $termname);
     echo '<li><a href="#'.$termname.'" title="" rel="'.$termname.'">'.$term->name.'</a></li>';
    }
   }
  echo "</ul>";
 ?>
The code above will generate a ul with the default element ‘All’, and do a loop on terms to print all other categories that have entries. Let’s do a more detailed explanation:
First, we create a variable called $terms, and we use the get_terms() function that returns an array with all terms. As a parameter, the function requires a string or an array of strings with the taxonomy name(s), we pass tagportfolio, that was the name we used in our functions.php file. You can get more detailed info under get_terms() in the WordPress Codex.
Then, we create a variable called $count and use the count() function to get the total number of elements in the array, we print the default markup and the All item.
After that, we verify if the $count variable is greater than zero, if yes, we have at least one category with items to print.
Inside if, we create a foreach loop to get all array values, and create a different li element for each element in the $terms array.
Inside foreach, we create a variable called $termname to store the term name, remember that we change the text to lower case, because this variable will be used inside the class attribute. Then, we just replace any white space with a - using the str_replace function, this line will enable you to use categories/terms with more than one word, like “WordPress Themes” for example. And last, we print an li element and use our variables to print the data in the right place.
If you test now, you’ll see a categories/terms list with the names that you created in WordPress Admin. Now, let’s work on the items.

Displaying the Portfolio Items

Now let’s display the portfolio items, we need do it following the required template shown above.
We’ll do it just adding the code below:
<?php
 $loop = new WP_Query(array('post_type' => 'project', 'posts_per_page' => -1));
 $count =0;
?>

<div id="portfolio-wrapper">
 <ul id="portfolio-list">

  <?php if ( $loop ) :

   while ( $loop->have_posts() ) : $loop->the_post(); ?>

    <?php
    $terms = get_the_terms( $post->ID, 'tagportfolio' );

    if ( $terms && ! is_wp_error( $terms ) ) :
     $links = array();

     foreach ( $terms as $term )
     {
      $links[] = $term->name;
     }
     $links = str_replace(' ', '-', $links);
     $tax = join( " ", $links );
    else :
     $tax = '';
    endif;
    ?>

    <?php $infos = get_post_custom_values('_url'); ?>

    <li class="portfolio-item <?php echo strtolower($tax); ?> all">
     <div class="thumb"><a href="<?php the_permalink() ?>"><?php the_post_thumbnail( array(400, 160) ); ?></a></div>
     <h3><a href="<?php the_permalink() ?>"><?php the_title(); ?></a></h3>
     <p class="excerpt"><a href="<?php the_permalink() ?>"><?php echo get_the_excerpt(); ?></a></p>
     <p class="links"><a href="<?php echo $infos[0]; ?>" target="_blank">Live Preview →</a> <a href="<?php the_permalink() ?>">More Details →</a></p>
    </li>

   <?php endwhile; else: ?>

    <li class="error-not-found">Sorry, no portfolio entries found.</li>

  <?php endif; ?>

 </ul>

 <div class="clearboth">
</div>
A lot of lines of code, no? But don’t worry, I’ll explain the code for you.
The first step is create a custom query, we do it with WP_Query function, I pass as parameter the custom post type “project”, that we created on functions.php file. This query will get all the projects that you’ve created.
Then, I do a loop like we do normally with post exhibition, for example.
Inside the while, we do the same process used on filter creation, but here we create a array called links where we’ll store all the terms of the post. Note that now, beyond the taxonomy name we pass the post ID in get_the_terms().
Then, we use join and create a unique string with all array elements, if the post terms are “WordPress” and “Design”, the $tax variable will be equal to “wordpress design”, we’ll use this to add the right classes to allow the portfolio to be filterable. If the post doesn’t have terms, we just set $tax being equal to a blank string.
After this, we create a variable called $infos where we’ll get the demo url from our Custom Post Field created in the functions.php file
Then, we just print the template markup and make use of functions like get_the_excerpt(), the_post_thumbnail (note that you can change the dimensions to fit your layout, if you for example, would like to create a three column portfolio.)
If you update the page, you will see all the items listed, but the filter still doesn’t work. Let’s fix it!

Using Filterable in WordPress

Now, let’s use our plugin. Did you already download it? If yes, copy and paste the filterable.js file inside the js/ folder.
In the functions.php file, let’s add the jQuery library to the ‘head’ tag first. To do it we’ll use a custom function and the wp_enqueue_script function.
function enqueue_filterable()
 {
  wp_register_script( 'filterable', get_template_directory_uri() . '/js/filterable.js', array( 'jquery' ) );
  wp_enqueue_script( 'filterable' );
 }
 add_action('wp_enqueue_scripts', 'enqueue_filterable');
Now, back to the page_portfolio_2c.php file and below the last code added but inside the content div, add the following code:
<script>
  jQuery(document).ready(function() {
   jQuery("#portfolio-list").filterable();
  });
 </script>
This only links the plugin to the page and calls the filterable() function to make our portfolio filterable.

Full Code

<?php
/*
Template Name: Portfolio 2 Columns
*/
?>

<?php
get_header(); ?>

  <div id="primary">
   <div id="content" role="main">

   <?php
     $terms = get_terms("tagportfolio");
     $count = count($terms);
     echo '<ul id="portfolio-filter">';
     echo '<li><a href="#all" title="">All</a></li>';
     if ( $count > 0 ){

      foreach ( $terms as $term ) {

       $termname = strtolower($term->name);
       $termname = str_replace(' ', '-', $termname);
       echo '<li><a href="#'.$termname.'" title="" rel="'.$termname.'">'.$term->name.'</a></li>';
      }
     }
     echo "</ul>";
   ?>

   <?php
    $loop = new WP_Query(array('post_type' => 'project', 'posts_per_page' => -1));
    $count =0;
   ?>

   <div id="portfolio-wrapper">
    <ul id="portfolio-list">

    <?php if ( $loop ) :

     while ( $loop->have_posts() ) : $loop->the_post(); ?>

      <?php
      $terms = get_the_terms( $post->ID, 'tagportfolio' );

      if ( $terms && ! is_wp_error( $terms ) ) :
       $links = array();

       foreach ( $terms as $term )
       {
        $links[] = $term->name;
       }
       $links = str_replace(' ', '-', $links);
       $tax = join( " ", $links );
      else :
       $tax = '';
      endif;
      ?>

      <?php $infos = get_post_custom_values('_url'); ?>

      <li class="portfolio-item <?php echo strtolower($tax); ?> all">
       <div class="thumb"><a href="<?php the_permalink() ?>"><?php the_post_thumbnail( array(400, 160) ); ?></a></div>
       <h3><a href="<?php the_permalink() ?>"><?php the_title(); ?></a></h3>
       <p class="excerpt"><a href="<?php the_permalink() ?>"><?php echo get_the_excerpt(); ?></a></p>
       <p class="links"><a href="<?php echo $infos[0]; ?>" target="_blank">Live Preview →</a> <a href="<?php the_permalink() ?>">More Details →</a></p>
      </li>

     <?php endwhile; else: ?>

     <li class="error-not-found">Sorry, no portfolio entries for while.</li>

    <?php endif; ?>

    </ul>

    <div class="clearboth"></div>

   </div> <!-- end #portfolio-wrapper-->

   <script>
    jQuery(document).ready(function() {
     jQuery("#portfolio-list").filterable();
    });
   </script>

   </div><!-- #content -->
  </div><!-- #primary -->

<?php get_footer(); ?>

Step 5: Some style

Now that we’ve coded everything that we need, let’s add some CSS to our style.css file, if you have other files just add the code there.
/* CLEARFIX
----------------------------------------------- */

.clearboth {
 display: block;
 margin: 0;
 padding: 0;
 clear: both;
}

/* PORTFOLIO FILTER STYLE
----------------------------------------------- */

#portfolio-filter {
 list-style-type: none;
}

#portfolio-filter li {
 display: inline;
 padding-right: 10px;
}

#portfolio-filter li a {
 color: #777;
 text-decoration: none;
}

#portfolio-filter li .current,
#portfolio-filter li:hover {
 color: #084a9a;
}

/* PORTFOLIO LIST STYLE
----------------------------------------------- */

#portfolio-wrapper {
 padding-bottom: 25px;
}

#portfolio-list {
 list-style-type: none;

}

#portfolio-list .portfolio-item {
 width: 400px;
 float: left;
 margin-right: 5px;
}

#portfolio-list .portfolio-item h3 a {
 color: #084a9a;
 text-transform: uppercase;
 font-weight: bold;
}

#portfolio-list .portfolio-item .excerpt
{
 text-align: justify;
 font-size: 14px;
 line-height: 18px;
 padding-right: 15px;
 margin-bottom: 5px;
}

#portfolio-list .portfolio-item .excerpt a {
 color: #555;
}

#portfolio-list .portfolio-item .excerpt a:hover {
 text-decoration: none;
}
Now, if you test again you’ll get a nice filterable portfolio! Wow, all the work is done!

Conclusion

And it’s done! Now you know how to create an amazing filterable portfolio with a free jQuery plugin that you can use in any work that you do.
I hope that you enjoy the content, thank you very much for reading!"
read more

Using WordPress Multisite: A Network of Websites at Your Fingertips

"Today, we will look at the basics of WordPress MS – or for those users that have been using WordPress for a while – Multisite or WordPress MU. WordPress MS is a feature that many users are unaware of, and one that is often confusing to install and configure. But no more! In this tutorial, we will walk through installing WordPress MS, becoming familiar with the network admin, and integrating useful plugins for your Multisite network.


Introduction

WordPress Multisite is a feature that since WordPress version 3 has been included discreetly right into the install itself. It is a feature that packs a huge punch, allowing 1000s of blogs to exist virtually within one, single WordPress install. It is a great idea for large-scale sites that use multiple sub-domains, blog networks, social networks, or even internal networking for businesses or organizations. While this feature has been around for almost as long as WordPress itself, it is just now getting the attention it deserves – even from WordPress devs.

What We Will Do

In this tutorial we will:
  • take an in-depth look at WordPress MS (aka Multisite or WordPress MU)
  • install WordPress MS and learn about the different installation options
  • create new sites with MS
  • look at some useful plugins to combine with WordPress MS
  • examine projects that could benefit from MS
By the end of this tutorial series, you should be extremely familiar with what WordPress MS is, how to install it, how to create new sites, and how to use it most effectively for your next project.

What Exactly is WordPress MS?

In a nutshell, Multisite enables a single WordPress install to act like a network of sites centered around a single domain (http://yoursite.com). It allows for either new sub-domains (http://subdomain.yoursite.com) or sub-directories (http://yoursite.com/subdomain), and it does all this virtually, which means you do not need to create new folders. Instead, by just adding some code to wp-config.php and .htaccess, you have thousands of sites right at your fingertips.
Multisite also allows for easy network management through a single admin dashboard which a user with appropriate permissions can access via any network site’s admin bar. Multisite is by no means “new”. It has been around for almost as long as WordPress itself, although previously it was developed separately. Since WP 3.0 it has been included together with WordPress, and, as I mentioned above, it seems like it will only get more user-friendly as the WordPress devs seem to be paying some particular attention to it in 2012.
Next, let’s look at installing Multisite on a typical WordPress install.

Installing WordPress Multisite

For many people, installing Multisite can be a nightmare. I hope to alleviate that by taking you step-by-step through both a sub-directory and sub-domain install. Let me say first, that it is by far easier to install Multisite on a new install, even though it is still possible to do it on an older install with pre-existing content. However, there could possibly be permalink issues.
With that said, the following steps assume that you have completed a standard install of WordPress. However, the steps can apply to a new or previous install.

Activating the Network Setup Menu Item

In order to even begin the process of installing Multisite, you need to open your wp-config.php file, and right above
/* That’s all, stop editing! Happy blogging. */
add the following:
/** Allow Multisite **/

define(’WP_ALLOW_MULTISITE’, true);
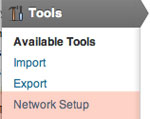
The first line simply is a comment that will help us keep our code tidy. Next, we tell our WordPress install to allow Multisite functionality. Once you have edited and saved the file, you should now see the following in your “Tools” submenu:
If you are using a previous WordPress install with active plugins, you will get a notice in Network Setup to deactivate all of your plugins before you continue.

Configuring the Network from the Dashboard

The first screen in “Network Setup” will look like this:
From this screen, you have the following items to configure:
  • Site Addresses – From here you will select whether to use sub-domains or sub-directories. If you choose to work with sub-domains, you should verify with your host if it is possible.
  • Network Title – The title for your network.
  • Admin E-Mail Address – The admin contact for your new network.
The server address should already be filled in to display how your new permalinks will appear.
If this is a pre-existing install, you will receive a note saying that only sub-domains are possible due to possible permalink conflicts. If you are installing on a localhost, you will only be allowed to install via sub-directories.
After you have configured these settings, click install, and you should see the following screen:

Finishing the Multisite Install

Now, let’s look step-by-step at the instructions given on the “Enabling the Network” page. Before you dig into this, I would strongly suggest that you backup your wp-config.php and .htaccess files. This will save a lot of headache in the future.
  1. Create a new directory named blogs.dir, and place that in your root folder’s wp-content folder. This folder must be writable by the web server, as it will be used to store all of our network’s uploaded media.
  2. Add the following code for a subdomain install:
    define( ’SUBDOMAIN_INSTALL’, true );
     $base = ’/’;
     define( ’DOMAIN_CURRENT_SITE’, ’yoursite.com’ );
     define( ’PATH_CURRENT_SITE’, ’/’ );
     define( ’SITE_ID_CURRENT_SITE’, 1 );
     define( ’BLOG_ID_CURRENT_SITE’, 1 );
     
    and this for a sub-directory install
    define( ’MULTISITE’, true );
     define( ’SUBDOMAIN_INSTALL’, false );
     $base = ’/’;
     define( ’DOMAIN_CURRENT_SITE’, ’yoursite.com’ );
     define( ’PATH_CURRENT_SITE’, ’/’ );
     define( ’SITE_ID_CURRENT_SITE’, 1 );
     define( ’BLOG_ID_CURRENT_SITE’, 1 );
     
    to wp-config.php right above:
    /* That’s all, stop editing! Happy blogging. */
     
    Make sure to change yoursite.com to the URL of your site – make sure it is without WWW. Broken down, this code identifies this as a sub-domain or sub-directory install, and sets your main site’s ID as 1. Every site has an ID, and it is important to note these as you start to work with plugins and build custom queries.
  3. Add the authentication keys provided to wp-config.php. This will help secure your install.
  4. Finally, you want to add the following code to your .htaccess file:
    RewriteEngine On
      RewriteBase /
      RewriteRule ^index\.php$ - [L]
    
      # uploaded files
      RewriteRule ^files/(.+) wp-includes/ms-files.php?file=$1 [L]
    
      RewriteCond %{REQUEST_FILENAME} -f [OR]
      RewriteCond %{REQUEST_FILENAME} -d
      RewriteRule ^ - [L]
      RewriteRule . index.php [L]
     
    This code will replace any other WordPress code that you find in .htaccess.
For another reference on setting up a WordPress Multisite network, be sure to visit the “Create a Network of WordPress Sites” page in the Codex.

Things to Note with Multisite Installs

  • Multisite is easiest to install on a fresh WordPress install with the sites as sub-directories. That isn’t to say don’t install it any other way, just to point out the easiest path.
  • If you use Multisite, then you can not give WordPress it’s own folder. It must be installed in the root folder of your site. Editor’s Note: This is not 100% correct, for further information and clarification, see Andrea_R’s comment below.
  • Your web host may not allow for the creation of sub-domains. Be sure to check this out before attempting a sub-domain install.
  • You must activate the network feature from the WordPress dashboard. Simply adding the code to wp-config.php and .htaccess is not enough.

Navigating the Network Admin

In order to access the Multisite admin dashboard in WordPress 3.0 and later, simply hover over My Sites in the admin bar at the top of the browser window, and click on Network Admin.
Once in the dashboard, the menu looks like this:
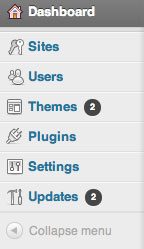
The Network Admin menu has the following submenus:
  • Sites – From here you can create new network sites, visit admin dashboards, delete sites, and edit site settings.
  • Users – This submenu allows you to manage users by creating, editing, and deleting them. You can also see which users have registered on specific sites.
  • Themes – With Multisite, themes are managed from the network. Themes must be installed, activated, and edited from within the network admin dashboard. They can still be switched in the site dashboard.
  • Plugins – Just like themes, plugins are installed and activated on the network from this dashboard. Plugins can still be activated and set up in the site dashboard.
  • Settings – This submenu lets you set the network name, admin email, registration settings, welcome emails, initial site settings, and upload settings. This is a great submenu to configure if you are using Multisite as a blog engine or social network.
  • Updates – From this submenu, you can do network-wide updates on WordPress core, plugins, and themes.
Next, I want to walk you through creating your first network site. If you are familiar with using WordPress, everything else should seem pretty normal, with the exception of having to go through a network dashboard to activate plugins and themes instead of a normal site dashboard.

Creating a New Site

  1. From the network dashboard, navigate to Sites –> Add New.
  2. Next, you will need to specify the site address, site title, and an admin email. The screen will look like this:
  3. Once added, you will see a message at the top verifying the site’s creation. You can now visit the site’s dashboard, or edit the site’s settings from the network dashboard. Two emails will also be sent. Once will go to the network’s overall admin notifying them of the new site, and one will go to the site’s new admin, notifying them of their login credentials.
And that’s how easy creating sites can be in WordPress MS! Now, let’s look at some plugins.

Indispensable Plugins for WordPress MS

Here is a list of some plugins that I suggest using on MS installs, and, as always, if you have others to add throw them in!
  • WordPress MU Sitewide Tags Pages

    This plugin allows you to create a specific blog on the network where ALL recent posts on the network can be found. From within the plugin, you can also specify this to be on the main site that you set up in the initial Multisite install. The max number of posts to display can be set as well.
  • Multipost MU / ThreeWP Broadcast

    This plugin allows users that create content on different blogs to "broadcast" their posts to other blogs on the network. In addition to post content, categories, tags, and custom fields can also be broadcasted. To ease publishing to multiple blogs, blog groups can be created.
  • More Privacy Options

    This plugin allows you to set the privacy level of each blog from within the network dashboard site’s settings panel. The options are:
  • Domain Mapping

    This plugin allows users to use their own domain names on your Multisite network. This plugin does require a knowledge of adding and editing plugin files and a basic understanding of how servers work and your specific server settings. A great tutorial for setting up this plugin can be found on Otto’s blog, “WordPress 3.0 Multisite Domain Mapping Tutorial“.
  • Multisite User Management

    This plugin allows admins to set the default role of each, individual network blog. Once activated, a list of blogs appears on the network settings page. This plugin is different than the New Blog Defaults plugin, as it targets the individual sites as opposed to every new blog. For instance, if you want one site to allow all default users editor capabilities and another to have subscriber capabilities, then this is the plugin you are looking for.
  • New Blog Defaults

    This plugin creates defaults for any new blog created on the network. Once activated, a new menu appears under the network Settings submenu. From here, you can edit any of the normal WordPress settings: general blog settings, reading settings, writing settings, permalink settings, discussion settings, privacy settings, and media settings. You can also choose a site’s default theme, and set other options like categories, links, and initial user settings.
  • Extended Super Admins

    This plugin allows for the creation of specific user classes with specific roles. The plugin, once activated, can be found under the main network Settings submenu. The capabilities list is extensive.

Projects that Could Benefit from WordPress MS

Now that I’ve outlined how to install Multisite, how to create new sites, and what plugins to use, I thought it would be great to put some ideas down about possible projects that could benefit from Multisite. As always, if you have other ideas or Multisite installs that you’ve worked with before, feel free to add them in the comments.
  • Blog networks
  • Social networks
  • Internal networks for organizations or companies
  • Educational sites
  • Sites that span cities, customer groups, or other various groups
  • Any other WP site that may need the option for multiple sites within one install

Conclusion

This year holds some exciting things for Multisite, and as more and more users discover how to implement it, this currently under-used feature could soon become one of the core features WordPress is known and used for. I hope that you have learned how to install Multisite, how to navigate the network admin, and how to find plugins that can improve the functionality of your networks. Overall, I hope that you feel more comfortable using Multisite in your projects, and that, if you’ve never used it, you’ll take the plunge and play around with it.
Thanks for reading!"
read more

How to Integrate prettyPhoto with Post Images in your Themes

"prettyPhoto is a lightbox plugin made by Stéphane Caron. Today we’re going to learn how to ship the plugin with your WordPress themes.


Introduction

Giving a built-in lightbox option instead of making users download a plugin has many benefits for theme authors. For me it’s being able to theme the lightbox to suit my WordPress themes. It’s also a nice feature to have available to your theme’s users, of course you should also give them an option to disable the functionality. With that said let’s get to it.

Step 1 Download prettyPhoto and set up directory structure

Head over to margins for-errors.com and download the plugin. Once you’ve got it we’re going to create a new directory structure for the plugin to make things easier for ourselves.
First let’s delete a few things we don’t need. In the images folder delete everything apart from the prettyPhoto folder and it’s contents. In the root folder, delete the file xhr_response.html and index.html. Now move jquery.prettyPhoto.js from the js folder to the root plugin folder and delete the js folder.
Finally, rename the folder to prettyPhoto and upload the folder to your theme’s directory, you probably already have a js or scripts directory so upload to that, for this tutorial let’s presume it’s in your-theme/js

Step 2 Add the scripts to your theme (Updated: See comments below)

Before we load up the plugin files in our theme we need to load jQuery. We’re going use the Google hosted version of jQuery using the method shared on Digging into WordPress, so let’s add the snippet to our functions.php.
if (!is_admin()) {
 add_action("wp_enqueue_scripts", "register_scripts", 11);
}
function register_scripts() {
 wp_deregister_script('jquery');
 wp_register_script('jquery', "http" . ($_SERVER['SERVER_PORT'] == 443 ? "s" : "") . "://ajax.googleapis.com/ajax/libs/jquery/1.7.1/jquery.min.js", false, null);
 wp_enqueue_script('jquery');

 wp_register_script('prettyPhoto_script', (get_bloginfo('stylesheet_directory')."/js/prettyPhoto/jquery.prettyPhoto.js"));
 wp_enqueue_script('prettyPhoto_script');
 wp_register_script('customprettyPhoto_script', (get_bloginfo('stylesheet_directory')."/js/prettyPhoto/customprettyPhoto.js"));
 wp_enqueue_script('customprettyPhoto_script');
}
You might want to consider the advantages and disadvantages of using a CDN to serve jQuery. WordPress does ship with a copy of jQuery but using Google’s hosted version may benefit your site’s performance. If you’re a theme author I would stick with using the shipped version. Check out the discussion on another tutorial to help you make up your own mind.
You’ll notice we’ve added another file called customprettyPhoto.js. This is where we’ll be making the plugin play nice with our post images and initialising it. So let’s create that file and put it in your prettyPhoto directory. OK, let’s initialise prettyPhoto.
<script>
 $(document).ready(function(){
   $("a[class^='prettyPhoto']").prettyPhoto();
 });
</script>
We need to add a line of jQuery to add the required prettyPhoto class prettyPhoto to the anchor tags that surround our post images. Since we’re talking jQuery let’s use it to accomplish this. Add the following right after $(document).ready(function(){ where we make sure the page is loaded.
$('.entry-content a').has('img').addClass('prettyPhoto');
Replace .entry-content with whatever class name or ID you’ve wrapped your post content with and you should have successfully added the class to all links that wrap your post images. If you had a look at the documentation for prettyPhoto you will see it says to use a rel attribute but instead we’ve used a class. Doing so prevents validation errors in our HTML because rel attributes can only have certain allowed values according to the HTML5 spec.
Next we want to enable prettyPhoto’s description option. We have to overcome one small hurdle which is that prettyPhoto wants us to add title attributes to our anchor tags that will be used for the descriptions but WordPress adds titles to image tags. To solve this we’ll write a couple lines of jQuery that will take the image title tag and set the same title on the anchor tag that wraps the image.
$('.entry-content a img').click(function () {
 var desc = $(this).attr('title');
 $('.entry-content a').has('img').attr('title', desc);
});
Here we fire a function when the user clicks on a post image. We grab the image’s title tag and attach it to the anchor. This step makes it a lot easier for your theme’s users to add descriptions. If you want to disable the functionality altogether just make sure to set each anchors title to be empty, if it’s totally missing, as in there isn’t even an empty title, prettyPhoto will just display “undefined” instead.

Step 3 Add the prettyPhoto CSS to your theme

We need to add the CSS for prettyPhoto to the theme. Back to your functions.php file and add the following line to the top:
wp_enqueue_style('prettyPhoto', get_bloginfo('stylesheet_directory').'/js/prettyPhoto/css/prettyPhoto.css');
Since we kept the images and CSS in their original folders and relative to each other as they were originally we don’t need to worry about broken images.

Step 4 Captions and Titles

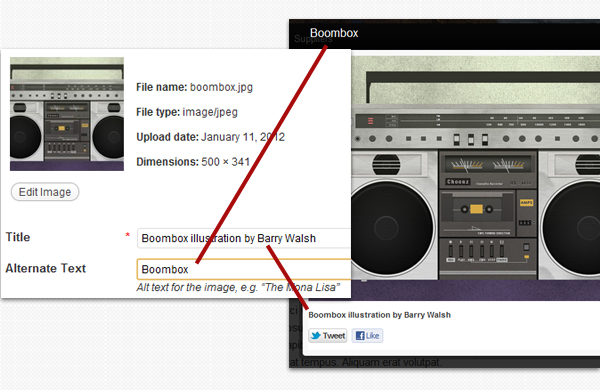
Let’s look at how to add captions and titles that our prettyPhoto will use. Looking at the image above we can see the relationship between the post image alt tag and link title tag we can set when adding an image to a post or page.

Finishing Up

And that’s it, we’ve successfully added prettyPhoto to our theme. Make sure to read the plugin documentation for more uses and options. PrettyPhoto can handle more than just images, it works with videos, ajax and more. It also ships with a handful of themes that may suit your theme out of the box or at least give you a good starting point."
read more

7 Simple Rules: WordPress Plugin Development Best Practices

"We’ve been talking a lot about “Best Practices” here on Wptuts lately. Today, we’ll cover some important best practices for creating a WordPress plugin. From security tips to namespacing tricks, follow these rules and you’ll do no wrong. Whether you’re a budding new plugin developer or a time-tested veteran, these simple rules and suggestions will make you a better developer (and the community will thank you for it!)


Rule 01: Have a Strategy

Yes, a strategy. Try this checklist:
  • Is my plugin just for fun/demonstration purposes or for everyday use in the real world?
  • Am I writing it to contribute to the community, to promote myself or to earn income?
  • Can I afford the time to offer support to users?
  • Have similar plugins already been written? Check the WordPress Plugin Repository.
These questions are important because they impact on how seriously you need to take issues such as coding standards, updates, security, support and documentation. Even if you’re just writing a plugin for your own use or for the use of your colleagues, you need to think hard about how you’re going to go about it so that you don’t make a rod for your own back.

Rule 02: Use Consistent and Clear Coding Standards

Which do you prefer, this?
function parsefile($imagedata,$file){
if(!in_array($imagedata['mime'], array('image/jpeg','image/png','image/gif'))){
 $result['error']='Your image must be a jpeg, png or gif!';
 }elseif(($file['size']>200000)){
 $result['error']='Your image was '.$file['size'].' bytes! It must not exceed '.MAX_UPLOAD_SIZE.' bytes.';
 }
 return $result;
}
Or this?
/*
processes the uploaded image, checking against file type and file size
*/
function parse_file($image_data, $file){

 if(!in_array($image_data['mime'], unserialize(TYPE_WHITELIST))){

   $result['error'] = 'Your image must be a jpeg, png or gif!';

 }elseif(($file['size'] > MAX_UPLOAD_SIZE)){

   $result['error'] = 'Your image was ' . $file['size'] . ' bytes! It must not exceed ' . MAX_UPLOAD_SIZE . ' bytes.';

 }

 return $result;

}
Simple things like consistent spacing, indenting, informative variable naming and succinct comments are a good place to start. That’s the only difference in the examples above. WordPress has an excellent guide to coding standards. If you code to a standard your code will be easier to understand, edit and debug.

Use Namespacing

There are two ways to construct a WordPress plugin: as a bunch of functions or as a class. Keep in mind that the functions in your plugin get thrown into the global namespace with all the other non-namespaced functions, which means that if you have a function named plugin_init then it’s probably going to conflict with the same function written by someone else at some point. The obvious way to fix this issue is to prefix the function name with something unique. I like to use the first letters of my plugin name, so if I had a plugin called My Great Plugin, I would call the above function mgp_plugin_init, and the same for the rest of my functions.
But a better way is to create a class for your plugin, that way all functions will be namespaced under the name of the class and even better, you can now use short, common method (function) names.
class my_class{

 function hello_world(){

   return 'Hello World!';

 }

 function goodbye_world(){

   return 'Goodbye World!';

 }

}
Then you could access your class methods under the its own namespace:
$my_new_plugin = new my_class();

echo $my_new_plugin->hello_world();

echo $my_new_plugin->goodbye_world();

Rule 03: Take Security Seriously

Making your plugin secure is the single most important step to take, but many developers discount security or relegate it to the status of an afterthought. Don’t make that mistake.

Sanitize inputs, escape outputs

You should especially make yourself familiar with:
If you use a function such as wp_insert_post, WordPress will sanitize that data for you. Similarly, if you use the database methods $wpdb->insert or $wpdb->update, WordPress will sanitize the data. But if you choose to access the database more directly with something like $wpdb->get_result, then you should use wpdb->prepare to prevent sql injections of malicious code.
Instead of:
$admin_posts = $wpdb->get_results(
 "SELECT ID, post_title FROM $wpdb->posts WHERE post_status = 'publish' AND post_author = 1"
 );
You would use:
$admin_posts = $wpdb->get_results($wpdb->prepare(
 "SELECT ID, post_title FROM $wpdb->posts WHERE post_status = %s AND post_author = %d",
 'publish', 1
 ));
In the above example, %s is a placeholder for string input (publish) and %d is a placeholder for numeric input (1). You can use as many placeholders as you need.

Use Nonces for Form and URL Verification

It’s important to know that when a form or url is posted back to WordPress, that it was your WordPress site that actually generated it and not some third party or malicious agent. To take care of this aspect of security, we use nonces. A nonce is a number used once.
For a form, we generate a nonce field using wp_nonce_field that will be included in our form as a hidden field:
wp_nonce_field('my_nonce', 'my_nonce_submit');
Because it’s now a hidden field in our form, it’ll come back to us when the form is submitted. We can then check that the nonce is valid using wp_verify_nonce:
wp_verify_nonce($_POST['my_nonce_submit'], 'my_nonce') )
That will return true if the nonce verifies.
For a url (links in emails, browser urls), you can create a nonced url with wp_nonce_url:
$nonced_url = wp_nonce_url('http://my_site.com?action=register&id=123456', 'register_nonce');
That would create a url like this…
http://my_site.com?action=register&id=123456&_wpnonce=250d696dc6
…which you could send in a registration confirmation email. You would then check the incoming url for a nonce with the same id using the check_admin_referer function and proceed with verification if true.
if($_GET['action'] == 'register'){

 if(check_admin_referer('register_nonce')){

   if(verify_id($_GET['id'])){

     echo 'Registration verified!';

   }

 }else{

   echo 'Registration verification FAILED!';

 }
}

Rule 04: Access Web Services Intelligently

The internet is full of web services providing us with everything from weather forecasts to stock quotes to the latest tweets from Twitter. The most efficient way for a plugin to access remote data is to use the HTTP API which will handle your request in the background, using the most efficient of the five possible remote methods that PHP exposes. It’s like a one-stop shop for webservice access.
This uses the wp_remote_get method (a wrapper function of the HTTP class) to get a page body:
$page_data = wp_remote_get('http://site.com/page');

if($page_data['response']['code'] == 200){

 $body = $page_data['body'];

}
Same with wp_remote_post to login:
$args = array(
 'login' => 'login_name',
 'password' => 'my_password'
 );

$response = wp_remote_post('http://site.com/login', $args);

Rule 05: Internationalization

This doesn’t have to be a big deal but is essential if you want to reach the widest audience possible. At a minimum all you need do is prepare your plugin with the _e() and __() functions and worry about the texdomain afterwards.
It’s all explained very well in this wp.tutsplus article by Tom McFarlin and here at the WordPress codex.

Rule 06: Load Only What You Need

When you go away overnight, you don’t take as much with you as you would if you were going on vacation for a month. So treat your plugin the same way: only load the stylesheets, javascript and other scripts that you need for that page or section of the site. At the very least, don’t load admin scripts on the frontend and vice-versa.
if(is_admin()){

 //load my plugin stuff for the admin pages

}else{

 //load my plugin stuff for the frontend

}

Rule 07: Tidy Up After Yourself

When you activate a plugin, you will see a deactivate link appear in the plugins admin page. But deactivating only stops the plugin from functioning. After deactivation, you then get a delete link. The delete link is the key to tidying up after yourself. It should really be called uninstall.
If you create a file named uninstall.php in the same directory as you plugin, the code in this file will be run when the user clicks delete.
if(defined('WP_UNINSTALL_PLUGIN') ){

 //delete options, tables or anything else

}
The above code checks for the WP_UNINSTALL_PLUGIN constant which WordPress sets when you hit delete. Then you can proceed to delete any options or custom tables that your plugin created when it was activated.

Bonus Tips

Turn on debug

The WordPress debugger will find errors in your code that while they may not crash you plugin should still be corrected to make sure that you’re doing things correctly. So, turn on WordPress debug by placing this in your /wp-config.php:
define('WP_DEBUG', TRUE);

Study the WordPress function library

WordPress often has functions that will solve a programming task in one function that you may have written many lines of code to achieve. Check out the function library to make sure you’re not writing more code than you need to.

Get some peer review

Getting others to look at your code is a strong form of quality control. Other users will find faults that you haven’t noticed in your own testing. Don’t be afraid to post your code: everyone makes mistakes.

Don’t use deprecated functions!

WordPress is full of outdated functions that while still supported for current versions may not be in future releases. You may have used code from an old tutorial. Look it up in the WordPress codex to see if it is marked as deprecated. There will be a link to the newer function.

Use a good WordPress code forum

If you have a problem, ask others. There are plenty of forums for WordPress solutions. One of my favorites is WordPress Answers from the wonderful Stack Exchange network.

Take some pride in your work!

It’s easy to release a plugin with a rider that you take no responsibility for the effects of your code. Now, that’s a necessary given: you can’t be responsible for how your plugin will be used. But you can take a professional pride in how you go about your work. Always do your best. Your reputation will be the better for it."
read more

Changing the Fonts of Your WordPress – Part 2: Theme Integration

"WordPress continually proves itself time, time, and again that it has very few limitations, and is rapidly pushing itself to being, if not the best, but certainly the most versatile CMS available. Out of the box it is certainly not perfect, but you can change it however you want. In the previous tutorial, we went over how to add fonts to your theme via a plugin. Now, we’ll integrate font options directly into the theme’s options.

Again, we will be using Google Web Fonts because it’s easy, fast and, most importantly, free. With Google Web Fonts there is no need to worry about using the proper font formats, everything is handled by Google.

Step 1 Add a Settings Page

First, make sure you have a theme options page. If you don’t know how to make one, I suggest reading Create a Settings Page by Jarkko Laine. In this tutorial, I’m going to assume that you know the basics and build from there. So let’s go into our functions.php file and add a simple typography settings page:
add_action( 'admin_menu', 'my_fonts' );
function my_fonts() {
   add_theme_page( 'Fonts', 'Fonts', 'edit_theme_options', 'fonts', 'fonts' );
}

Step 2 Add the Form

Now that we’ve added a settings page, we have to code the callback function we’re using to render the page itself, which would be typography. All we need is a basic form that shows a dropdown of all the fonts that users can choose from and allow them to change it.
function fonts() {
?>
   <div class="wrap">
       <div><br></div>
       <h2>Fonts</h2>

       <form method="post" action="options.php">
           <?php wp_nonce_field( 'update-fonts' ); ?>
           <?php settings_fields( 'fonts' ); ?>
           <?php do_settings_sections( 'fonts' ); ?>
           <?php submit_button(); ?>
       </form>
   </div>
<?php
}
Okay, we’ve added our fonts form to the page, just some basic settings_fields, but WordPress has no idea. Now we use the admin_init action to initialize our settings and add the callbacks:
add_action( 'admin_init', 'font_init' );
function font_init() {
   register_setting( 'fonts', 'fonts' );

   // Settings fields and sections
   add_settings_section( 'font_section', 'Typography Options', 'font_description', 'fonts' );
   add_settings_field( 'body-font', 'Body Font', 'body_font_field', 'fonts', 'font_section' );
}
All we’re doing here is creating a settings section for our fonts forms and the field for a single font, you can add more if you want, in this tutorial I’m only going over the body tag. Just add more by copying that field and replace body with something else like h1. We also now have a setting called fonts, where we will be storing our font data/options. Let’s go ahead and define the callback functions, font_description and body_font_field.
function font_description() {
   echo 'Use the form below to change fonts of your theme.';
}
function body_font_field() {
   $options = (array) get_option( 'fonts' );
   $fonts = get_fonts();

   if ( isset( $options['body-font'] ) )
       $current = $options['body-font'];
   else
    $current = 'arial';

   ?>
       <select name="fonts[body-font]">
       <?php foreach( $fonts as $key => $font ): ?>
           <option <?php if($key == $current) echo "SELECTED"; ?> value="<?php echo $key; ?>"><?php echo $font['name']; ?></option>
       <?php endforeach; ?>
       </select>
   <?php
}
We have to get the font options that we just made in the init action and the fonts we have available, get_fonts(). Set the current font in the form to whatever is in the options, otherwise it’ll default to Arial. Then, use a foreach loop to go through our array of available fonts. You can also add a description or make it a brief tutorial on how to use it.

Step 3 Getting the Fonts

As you noticed in the previous snippet of code, we need to define the get_fonts() function to retrieve the fonts we need. You can either include the Google Webfonts or just stick with the basic CSS fonts. We’ll just use an array to store all of the fonts, and then distinguish them by their font name. You can do this with any fonts, but for the purposes of this tutorial, we’ll just be using Arial, Ubuntu and Lobster.
function get_fonts() {
   $fonts = array(
       'arial' => array(
           'name' => 'Arial',
           'font' => '',
           'css' => "font-family: Arial, sans-serif;"
       ),
       'ubuntu' => array(
           'name' => 'Ubuntu',
           'font' => '@import url(http://fonts.googleapis.com/css?family=Ubuntu);',
           'css' => "font-family: 'Ubuntu', sans-serif;"
       ),
       'lobster' => array(
           'name' => 'Lobster',
           'font' => '@import url(http://fonts.googleapis.com/css?family=Lobster);',
           'css' => "font-family: 'Lobster', cursive;"
       )
   );

   return apply_filters( 'get_fonts', $fonts );
}
Note: You are not limited to only using Google Webfonts. If you want to use a custom font that is hosted on your FTP or on Amazon S3, then replace @import with @font-face and change the url to where your font file is hosted.

Step 4 Add the CSS

Before you apply any of fonts in your CSS, you should remove all instances of Google Webfonts of in your CSS files. This way when we make the import call to get the Ubuntu font, we’re not wasting an extra 100 ms getting the Lobster font too.
Now that we have all of our fonts set, we have to create a wp_head action that adds the styling to your WordPress. If you are using this script for multiple tags, simply duplicate the code, just changing “body” to whichever tag you’re editing.
add_action( 'wp_head', 'font_head' );
function font_head() {
   $options = (array) get_option( 'fonts' );
   $fonts = get_fonts();
   $body_key = 'arial';

   if ( isset( $options['body-font'] ) )
       $body_key = $options['body-font'];

   if ( isset( $fonts[ $body_key ] ) ) {
       $body_font = $fonts[ $body_key ];

       print_ '<style>';
       echo $body_font['font'];
       echo 'body { ' . $body_font['css'] . ' } ';
       echo '</style>';
   }
}
We start by checking if a font is chosen in our options, if not, then set the font to our default, Arial. Now we print out the style tag, the import statement and our CSS code.

What You Get in the End

This is what you should’ve ended up with:
The final font options page.

Full Source Code

For anyone who is having some trouble putting it all together. Here is the full source code, ready to just paste into the functions.php file:
<?
// Changing the Fonts of Your WordPress - Part 2: Theme Integration
// Tutorial on WP Tuts
// by Fouad Matin
// Please credit this tutorial, by putting a link back to http://wp.tutsplus.com/tutorials/changing-the-fonts-of-your-wordpress-site-part-2-theme-integration/
// Enjoy!
add_action( 'admin_menu', 'my_fonts' );
function my_fonts() {
   add_theme_page( 'Fonts', 'Fonts', 'edit_theme_options', 'fonts', 'fonts' );
}
function fonts() {
?>
   <div class="wrap">
       <div><br></div>
       <h2>Fonts</h2>

       <form method="post" action="options.php">
           <?php wp_nonce_field( 'update-fonts' ); ?>
           <?php settings_fields( 'fonts' ); ?>
           <?php do_settings_sections( 'fonts' ); ?>
           <?php submit_button(); ?>
           </form>
       <img style="float:right; border:0;" src="http://i.imgur.com/1qqJG.png" />
   </div>
<?php
}

add_action( 'admin_init', 'my_register_admin_settings' );
function my_register_admin_settings() {
   register_setting( 'fonts', 'fonts' );
   add_settings_section( 'font_section', 'Font Options', 'font_description', 'fonts' );
   add_settings_field( 'body-font', 'Body Font', 'body_font_field', 'fonts', 'font_section' );
   add_settings_field( 'h1-font', 'Header 1 Font', 'h1_font_field', 'fonts', 'font_section' );
}
function font_description() {
   echo 'Use the form below to change fonts of your theme.';
}
function get_fonts() {
   $fonts = array(
       'arial' => array(
           'name' => 'Arial',
           'font' => '',
           'css' => "font-family: Arial, sans-serif;"
       ),
       'ubuntu' => array(
           'name' => 'Ubuntu',
           'font' => '@import url(http://fonts.googleapis.com/css?family=Ubuntu);',
           'css' => "font-family: 'Ubuntu', sans-serif;"
       ),
       'lobster' => array(
           'name' => 'Lobster',
           'font' => '@import url(http://fonts.googleapis.com/css?family=Lobster);',
           'css' => "font-family: 'Lobster', cursive;"
       )
   );

   return apply_filters( 'get_fonts', $fonts );
}
function body_font_field() {
   $options = (array) get_option( 'fonts' );
   $fonts = get_fonts();
   $current = 'arial';

   if ( isset( $options['body-font'] ) )
       $current = $options['body-font'];
   ?>
       <select name="fonts[body-font]">
       <?php foreach( $fonts as $key => $font ): ?>
           <option <?php if($key == $current) echo "SELECTED"; ?> value="<?php echo $key; ?>"><?php echo $font['name']; ?></option>
       <?php endforeach; ?>
       </select>
   <?php
}
function h1_font_field() {
   $options = (array) get_option( 'fonts' );
   $fonts = get_fonts();
   $current = 'arial';

   if ( isset( $options['h1-font'] ) )
       $current = $options['h1-font'];

   ?>
       <select name="fonts[h1-font]">
       <?php foreach( $fonts as $key => $font ): ?>
           <option <?php if($key == $current) echo "SELECTED"; ?> value="<?php echo $key; ?>"><?php echo $font['name']; ?></option>
       <?php endforeach; ?>
       </select>
   <?php
}

add_action( 'wp_head', 'font_head' );
function font_head() {
   $options = (array) get_option( 'fonts' );
   $fonts = get_fonts();
   $body_key = 'arial';

   if ( isset( $options['body-font'] ) )
       $body_key = $options['body-font'];

   if ( isset( $fonts[ $body_key ] ) ) {
       $body_font = $fonts[ $body_key ];

       echo '<style>';
       echo $body_font['font'];
       echo 'body  { ' . $body_font['css'] . ' } ';
       echo '</style>';
   }

   $h1_key = 'arial';

   if ( isset( $options['h1-font'] ) )
       $h1_key = $options['h1-font'];

   if ( isset( $fonts[ $h1_key ] ) ) {
       $h1_key = $fonts[ $h1_key ];

       echo '<style>';
       echo $h1_key['font'];
       echo 'h1  { ' . $h1_key['css'] . ' } ';
       echo '</style>';
   }
}
?>

Conclusion

By now, you should know how to add a font settings page, get fonts from the Google Webfonts directory, and apply those fonts to the theme. If you have any additional suggestions or questions regarding custom typography, feel free to leave a comment!"
read more